How to Change Reset Account Lockout Counter After Time in Windows 11

The “Reset account lockout counter after” setting in Windows 11 controls how long Windows remembers your failed sign-in attempts. Once that time passes with no new failures, the counter goes back to zero. It is not the same as the lockout duration, which is how long you stay locked out once you hit the limit. The two work together, and this guide covers both.
Older write-ups quote 30 minutes as the default. On current Windows 11 builds the default is 10 minutes (see the defaults list below). A shorter reset time means a few typos spread over a day will not add up to a lockout. You can change the value in Local Security Policy on Pro, Enterprise and Education, or from Windows Terminal on any edition, including Home.
Open Local Security Policy by pressing Win and searching secpol.msc, then navigate to Security Settings Account Policies Account Lockout Policy and double-click Reset account lockout counter after to change the minutes. This applies only to Pro, Enterprise and Education editions; Home users must use Windows Terminal instead.
What Is Account Lockout?
Account lockout is a security feature that stops automated tools from guessing passwords over and over (brute-force attacks). After too many failed sign-in attempts, Windows locks the account so the guessing has to stop.
The Account Lockout Policy settings control when an account locks and what happens afterward. None of them do anything unless the lockout threshold is turned on, so check that first.
Important Policy Settings
Four policy settings work together to decide how Windows handles wrong passwords. To change the reset account lockout counter after time in Windows 11, you need to know what each one does. Together they set how many wrong tries are allowed, how long an account stays locked, and when the counter returns to zero.
Account lockout threshold: This is the number of failed sign-in attempts that triggers a lockout. If it is set to 0, accounts never lock, and the other lockout settings have no effect.
Account lockout duration: This is how many minutes a locked account stays inaccessible before it unlocks itself. An administrator can unlock the account sooner.
Reset account lockout counter after: This is the number of minutes that must pass after a failed sign-in attempt before the failed-attempt counter resets to zero. Windows also calls it the lockout observation window. You will see that name in the command-line output later.
Allow Administrator account lockout: This decides whether the built-in Administrator account can be locked out.
Why This Matters
This setting matters because it balances security against convenience. A sensible lockout policy stops automated password guessing. It also keeps real users from locking themselves out after a few ordinary typing mistakes.
Two examples show the effect. With a threshold of 10 and a reset time of 10 minutes, someone has to fail 10 times within a 10-minute stretch to cause a lockout. Raise the reset time to 60 minutes and the same 10 failures can be spread over an hour. That is stricter on you and on an attacker.
References:
Account Lockout Policy - Windows 10
This link describes Account Lockout Policy configurations and provides details about each parameter.
Reset account lockout counter after - Windows 10
This page details best practices, locations, values, and security considerations for the 'Reset account lockout counter after' security policy setting.
New 🪟 Windows 11 Defaults
Starting with Windows 11 build 22528 and higher, the defaults are:
- Account lockout threshold: 10 failed tries
- Account lockout duration: 10 minutes
- Allow Administrator account lockout: Enabled
- Reset account lockout counter after: 10 minutes
On older builds, the threshold may be set to 0 (no lockout) until someone configures it.
Option 1Use Local Security Policy
Local Security Policy (secpol.msc) is a built-in tool in the Pro, Enterprise and Education editions of Windows 11. It lets you change the reset account lockout counter after time without touching the registry. Windows 11 Home does not include it. If you run Home, skip to the Windows Terminal method further down.
- Open Local Security Policy. Press the Windows key and search for
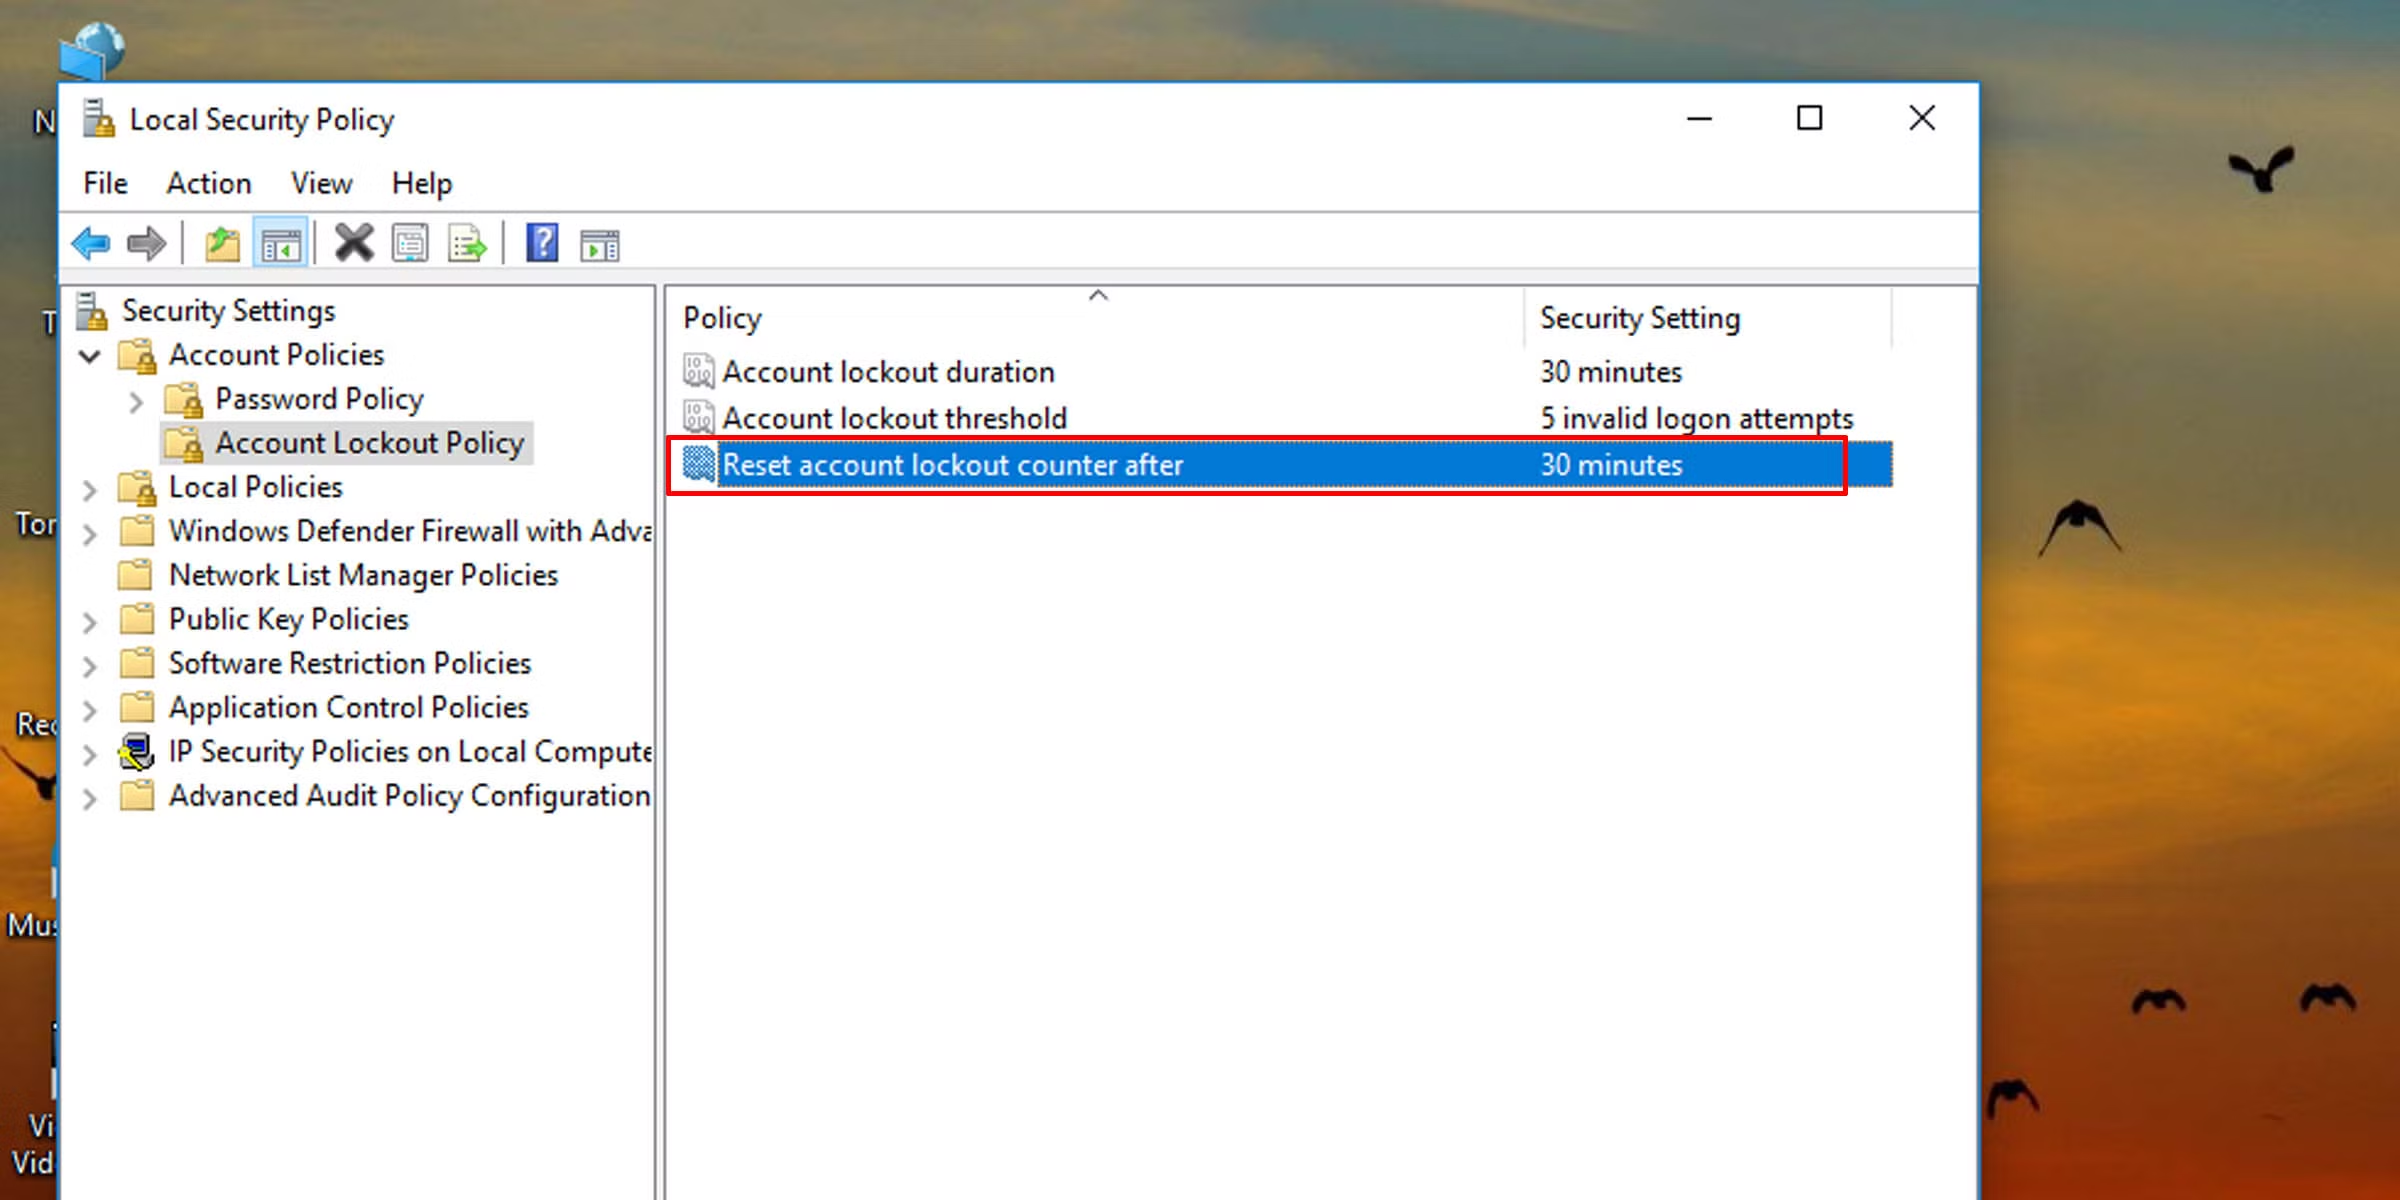
secpol.msc. Click the result to open it. Click Yes if User Account Control asks for permission. ⚠️ Requires admin privileges The Local Security Policy window opens with a tree of settings in the left pane. - Find Account Lockout Policy. In the left pane, click Account Policies to expand it. Then click Account Lockout Policy. The right pane now lists the lockout settings and their current values.
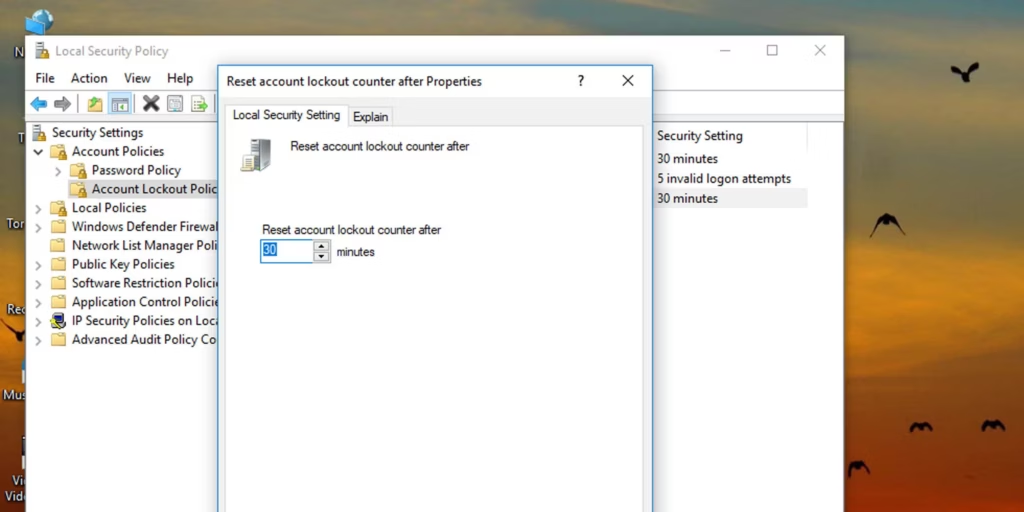
- Open Reset account lockout counter after. In the right pane, double-click "Reset account lockout counter after". Its Properties window opens. If the value reads "Not applicable" or the setting seems to be ignored, the lockout threshold is probably 0. Set the threshold first, then come back to this step.
- Enter the new time. Type a number between 1 and 99999 minutes. This is how long must pass before the failed sign-in counter resets to zero. Click OK.
Important: First, verify that the 'Account lockout threshold' is enabled. Also, the 'Account lockout duration' must be greater than or equal to the 'Reset account lockout counter after' setting. The default for both is 10 minutes.
- Check Account lockout duration. If you set Reset account lockout counter after higher than Account lockout duration, a popup appears with suggested values. Click OK to accept and update Account lockout duration to match. You should then see both values listed in the right pane.
- Change other settings (optional). You can also change Account lockout duration, Account lockout threshold, and Allow Administrator account lockout from this same screen.
- Close the window. Close Local Security Policy when you are done. The change normally takes effect right away and does not need a restart. To undo it, reopen the setting and enter the old value, such as 10.
Option 2Use Windows Terminal
Windows Terminal gives you a command-line way to check and change the reset account lockout counter after time. It works on every edition, including Home, where Local Security Policy is missing. You run specific commands with administrator rights from PowerShell or Command Prompt.
- Open Windows Terminal as admin. Press the Windows key and search for Windows Terminal. Right-click it and select Run as administrator. Click Yes if User Account Control asks. ⚠️ Requires admin privileges Select either Windows PowerShell or Command Prompt. Either one works for these commands.
- Check current settings. Copy and paste this command and press Enter:
net accountsThe output lists the lockout settings. Look for "Lockout observation window (minutes)" to see the current reset time. - Change the setting. Copy and paste this command and press Enter:
net accounts /lockoutwindow:<number>Replace <number> with a number between 1 and 99999 minutes. For example:net accounts /lockoutwindow:10Windows should confirm that the command completed successfully. If you see "Access is denied," the window is not running as administrator. Close it and start again from step 1.
Also, make sure the 'Lockout duration' (in minutes) is greater than or equal to the 'Lockout observation window' (in minutes). The default for both is 10 minutes.
- Verify the change. Run the check command from step 2 again. "Lockout observation window (minutes)" should now show your new number.
- Change other settings (optional). You can also change the Account lockout threshold, Allow Administrator account lockout, and the lockout duration with other commands.
- Close Windows Terminal. Close the window when you are done. You do not need to restart. To undo the change, run the change command again with your old value, such as 10.
Summary
Account lockout is a key security feature that locks Windows accounts after too many failed password attempts. You can change the counter reset window in Local Security Policy on supported editions, or in Windows Terminal on any edition. Whichever way you do it, keep the lockout threshold turned on. Keep the lockout duration at least as long as the reset time.
Have a question about this guide?
Answered by AI from this guide. Good questions may be added to this page — please don't include personal details.
Did this guide fix your problem?

About the Author
Richard
Tech Writer, IT Professional
Richard is a writer at Geek Rewind who turns complex IT tasks into clear, step-by-step guides. He draws on years of hands-on experience in system administration and enterprise IT operations, focusing on Windows, Linux and WordPress: the problems people actually run into, and the fixes that work. His server and WordPress guides come from systems he runs himself. Richard builds and maintains the platform behind Geek Rewind, from its Ubuntu servers and Nginx configuration to its custom WordPress plugins. Many new tutorials start with readers' questions, and he's always glad to answer them in the comments.
No comments yet — be the first to share your thoughts!