How to Enable the Hidden Administrator Account in Windows 11

The hidden Administrator account in Windows 11 is a built-in account with full access to every file and setting on your PC. It does not go through the usual User Account Control prompts that a normal administrator account does. Microsoft ships it turned off on both Windows 11 Home and Pro to protect system files from accidental damage.
You only need it for heavy troubleshooting, or for stubborn file permission errors that a standard administrator account cannot get around. You can turn it on in under a minute from Command Prompt. This guide covers turning it on, setting a password, signing in, and turning it off again.
Open Command Prompt as Administrator, then type net user Administrator /active:yes and press Enter to enable the built-in Administrator account. Next, set a password by typing net user Administrator your_password and pressing Enter. You can then sign in with those credentials.
What is the Built-in Administrator Account?
Windows 11 includes a special, hidden Administrator account. It is different from the administrator account you probably created during setup. That account still works under restrictions and asks for approval before big changes. The built-in Administrator account has more power than a typical user account and can make significant system changes without asking. That is why it ships disabled.
How to Turn On the Hidden Administrator Account
You turn the account on from Command Prompt, and you will need to be signed in with an account that already has administrator rights. Once enabled, the profile gives you extensive control over the system. The whole job takes a few commands, and the steps below show how to open Command Prompt with the right permissions first.
Open Command Prompt as Administrator
- Click the Start button (the Windows icon) or press the Win. The Start menu opens with a search box ready for typing.
- Type
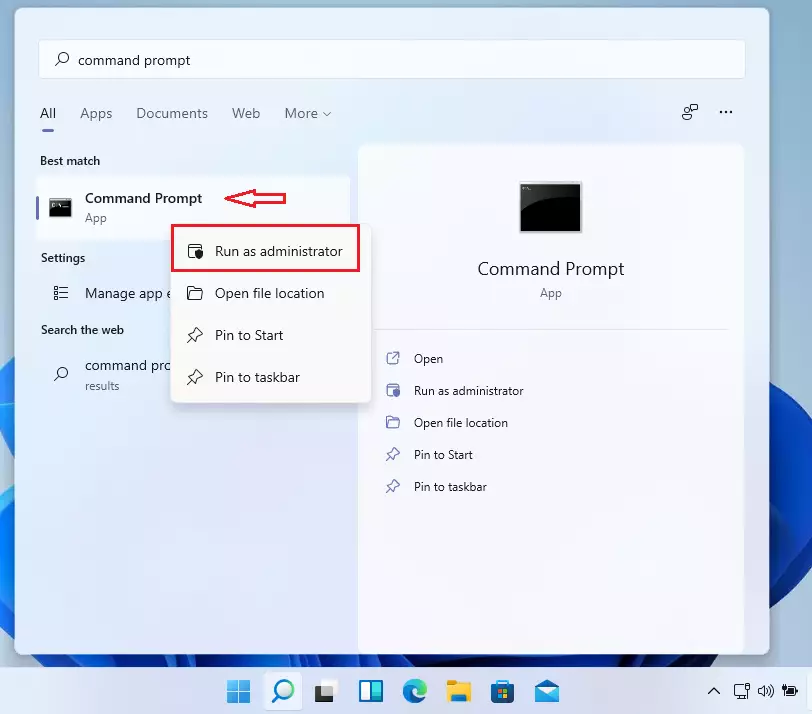
cmdor Command Prompt. Command Prompt should appear at the top of the search results. - Right-click Command Prompt and choose Run as administrator. ⚠️ Admin privileges required If you skip this and open a normal window, the commands later in this guide fail with an “Access is denied” error.
- If a security box pops up, click Yes to allow it. If you are signed in with a standard account instead, Windows asks for an administrator’s password. Without one, you cannot continue. When the window opens, the title bar should read “Administrator: Command Prompt”.
Enable the Administrator Account
You turn on the Windows 11 Administrator account by running one command in an elevated Command Prompt. Open the Start menu , type cmd, right-click Command Prompt, and select Run as administrator. Then type net user Administrator /active:yes and press Enter. That activates the built-in profile, which gives you full control of the computer for fixing serious system problems.
In the elevated Command Prompt window, type the command below exactly as shown and press Enter:
net user Administrator /active:yes
If it worked, Command Prompt prints a confirmation message like the one in this example:
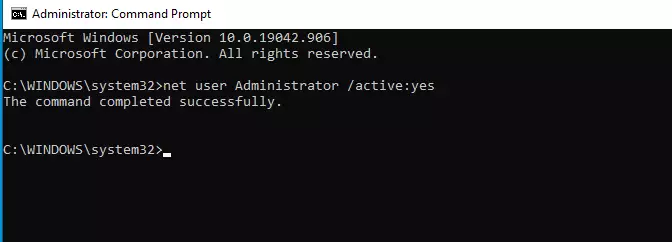
The Administrator account is now active. If you see "System error 5 has occurred. Access is denied" instead, the window is not elevated. Close it and reopen Command Prompt with Run as administrator.
The account has no password, and you cannot log into it until you set one. The next section covers that.
Set a Password for the Administrator Account
Give the Administrator account a strong password right after you turn it on. This profile has total control over your PC, so anyone who gets into it can change any system setting. To set the password, stay in the same Command Prompt window, type net user Administrator followed by your password in place of your_strong_password, and press Enter.
- Stay in the same elevated Command Prompt window.
- Type the command below, replacing
your_strong_passwordwith a password you choose. Make it long, complex and hard to guess.
net user Administrator your_strong_password
For instance, if you chose a sample password like MySecurePass123!, the command takes this format:
net user Administrator MySecurePass123!
Press Enter. The password is shown on screen as you type it, so make sure nobody is looking over your shoulder. Command Prompt should report that the command completed successfully.
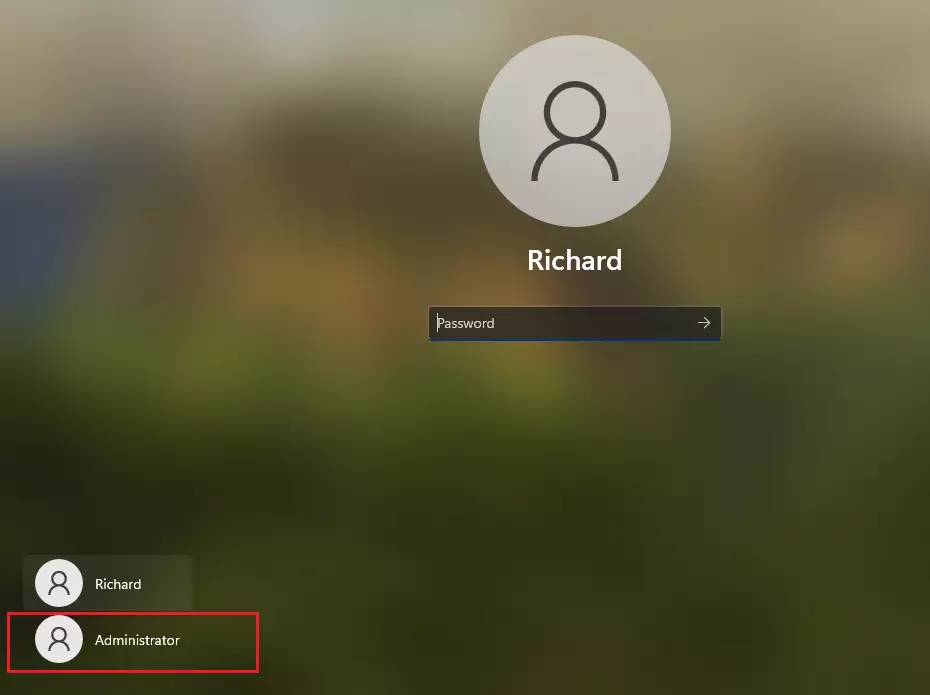
After that, sign out of your current user profile. The Administrator account now appears as an option on the sign-in screen, and you can sign in with the new password. Keep the password somewhere safe, since you will need it each time you use the account.
How to Turn Off the Administrator Account
Leaving this powerful profile active is a security risk and makes accidental changes more likely. To disable it, open Command Prompt as an administrator, type net user Administrator /active:no, and press Enter. That hides the account again. This is also how you undo everything in this guide.
Sign out of the Administrator account first if you are using it, and sign back in with your normal account. Then open Command Prompt as administrator (refer to the steps above), type this command, and press Enter: ⚠️ Admin privileges required
net user Administrator /active:no
What happens? This action hides and disables the Administrator account again. It no longer shows on the sign-in screen. Nothing needs a restart. If you need it later, repeat the enable steps and set a new password.
Summary
- The hidden Administrator account has full control of Windows 11, and it is turned off by default on both Home and Pro.
- It's useful if your main account stops working, you hit stubborn permission errors, or you need to fix big problems.
- Always set a strong password when you turn it on.
- Be careful using this account. It can make big changes to your PC without asking for approval.
- Turn off the Administrator account when you don't need it to keep your PC safe.
- If you want to learn more about Windows 11 tips and tricks, visit Microsoft Support for Windows.
The Windows 11 Administrator account is a built-in profile that gives you full control over your computer. It is there for fixing major problems when your normal login stops working. Turn it on from an elevated Command Prompt, set a strong password straight away, and turn it back off when you finish your work. Use it carefully, because it can change core system files without warning.
Was this guide helpful?

About the Author
Richard
Tech Writer, IT Professional
Richard is a writer at Geek Rewind who turns complex IT tasks into clear, step-by-step guides. He draws on years of hands-on experience in system administration and enterprise IT operations, focusing on Windows, Linux and WordPress: the problems people actually run into, and the fixes that work. His server and WordPress guides come from systems he runs himself. Richard builds and maintains the platform behind Geek Rewind, from its Ubuntu servers and Nginx configuration to its custom WordPress plugins. Many new tutorials start with readers' questions, and he's always glad to answer them in the comments.


No comments yet — be the first to share your thoughts!