How to Show or Hide Administrator Accounts in Windows 11 UAC Prompt

The User Account Control (UAC) prompt is the security window that asks for your permission before an app makes changes to Windows 11. When it asks for credentials, it can either list the administrator accounts so you can click one, or leave you with empty fields where you type an administrator username and password yourself. This guide shows how to switch between the two.
Hiding the accounts stops anyone standing at your PC from seeing which administrator names exist when a password prompt appears. You can make the change in two ways. The Local Group Policy Editor works on Windows 11 Pro, Enterprise and Education. The Registry Editor (the built-in tool for editing Windows settings directly) works on every edition, including Home.
Open Local Group Policy Editor with Win+R, type gpedit.msc, navigate to Computer Configuration Administrative Templates Windows Components Credential User Interface, double-click Enumerate administrator accounts on elevation, select Enabled to show accounts or Disabled to hide them, click OK, then restart your PC.
What is UAC?
User Account Control (UAC) is a Windows security feature that stops unwanted changes to a PC. When a user or an app tries something that needs administrator permission, such as installing software or changing system settings, Windows shows a pop-up. If you are signed in with a standard account, that pop-up asks for an administrator’s credentials. The prompt exists to protect the stability and security of the computer.
This setting only affects that credential prompt. It does not turn UAC on or off, and it does not add or remove any administrator accounts.
Why Use This Feature?
Hiding administrator accounts adds a layer of security. Anyone who wants to approve a change must already know the administrator username as well as the password, which blocks casual attempts. The default on Windows 11 is to hide the accounts.
Showing the accounts is faster, because you click the right account and type only the password. That is handy on a home PC where everyone already knows the administrator name. On a shared or public computer, keep the accounts hidden.
Method 1Using Local Group Policy Editor (🪟 Windows 11 Pro, Enterprise, or Education)
The Local Group Policy Editor lets Windows 11 Pro, Enterprise and Education users choose whether administrator accounts appear on the UAC prompt. Windows 11 Home does not include this tool, so if gpedit.msc gives a "cannot find" error, use the Registry Editor method further down instead. You need to be signed in as an administrator to change this policy.
- Open the Local Group Policy Editor %%ADMIN%%
Press Windows key + R to open the Run box. Typegpedit.mscand press Enter. The Local Group Policy Editor window opens. If UAC asks for permission, approve it. - Navigate to the correct folder
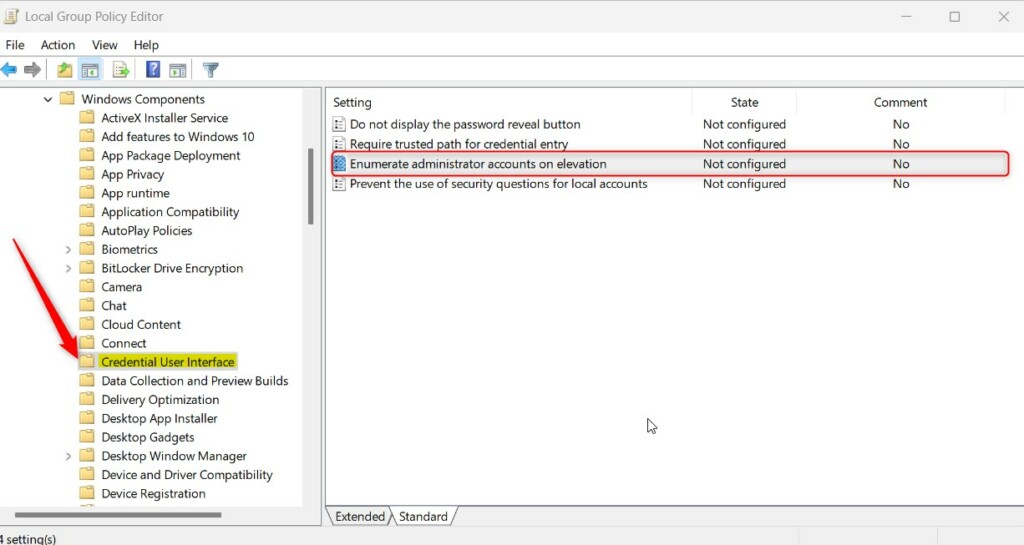
In the left pane, expand the folders until you reach this location:Computer Configuration > Administrative Templates > Windows Components > Credential User Interface - Click on the Credential User Interface folder
Select it in the left pane. The right pane now lists the policies stored in that folder. - Find and open the setting
In the right pane, findEnumerate administrator accounts on elevationand double-click it. A properties window opens for that policy. - Choose your option
The properties window has three choices:- Enabled: Shows all administrator accounts in the UAC prompt, so you can click one instead of typing its name.
- Disabled: Hides the admin accounts. You must type the admin username and password.
- Not Configured: Same as Disabled. Admin accounts are hidden. This is the default, and it is also how you undo your change later.
- Save your changes
Click OK to save. The window closes and the policy's state now shows your choice in the right pane. - Restart your computer
Restart your PC so the change takes effect. The next time UAC asks for credentials, the prompt follows the option you chose.
Method 2Using Registry Editor (All 🪟 Windows 11 Editions)
Press Windows key + R, type regedit into the Run box and press Enter. Follow the folder path exactly, because a wrong entry in the wrong place can cause problems.
Follow each step exactly. Before you start, make a backup. In Registry Editor, click File, then Export, choose All as the export range, and save the file somewhere safe. If something goes wrong, you can double-click that file to restore the settings.
- Open the Registry Editor %%ADMIN%%
Press Windows key + R. Typeregeditand press Enter. Approve the UAC prompt if it appears. The Registry Editor window opens. - Navigate to the correct location
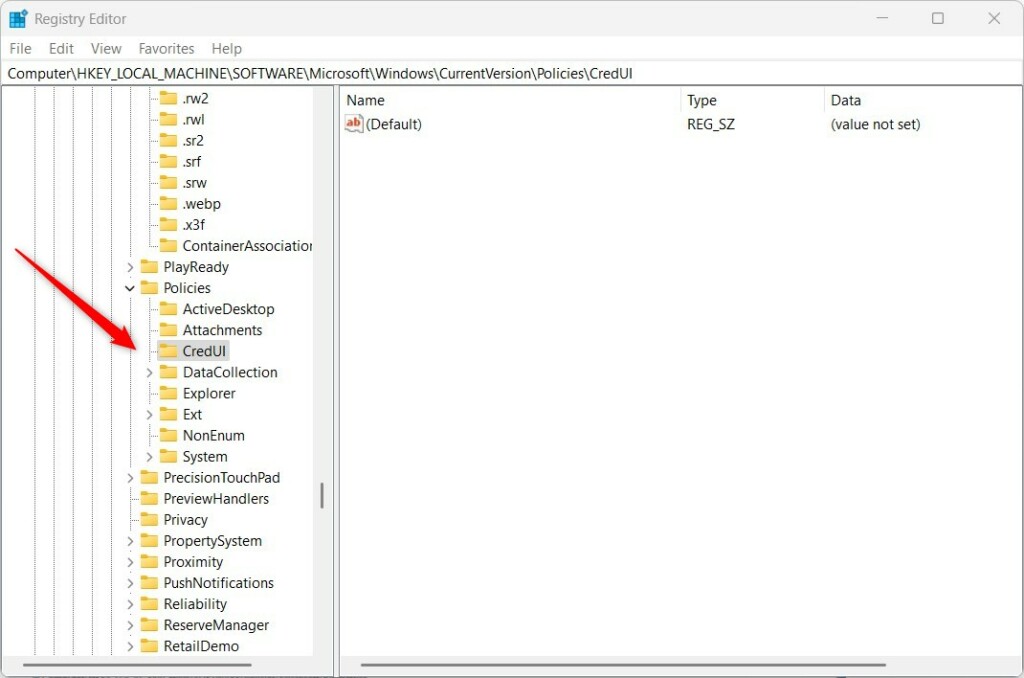
Go to this path in the left pane:HKEY_LOCAL_MACHINE\SOFTWARE\Microsoft\Windows\CurrentVersion\Policies\CredUIYou can also paste the path into the address bar at the top of the window and press Enter. - Create the folder if needed
If the CredUI folder (called a key in the registry) doesn't exist, you need to create it. Right-click onPolicies. ChooseNew > Key. Name itCredUI. The new key appears in the left pane under its parent. If CredUI is already there, skip this step. - Create a new value
Click the CredUI key to select it. Then right-click an empty area on the right side of the window. ChooseNew > DWORD (32-bit) Value. - Name the new value
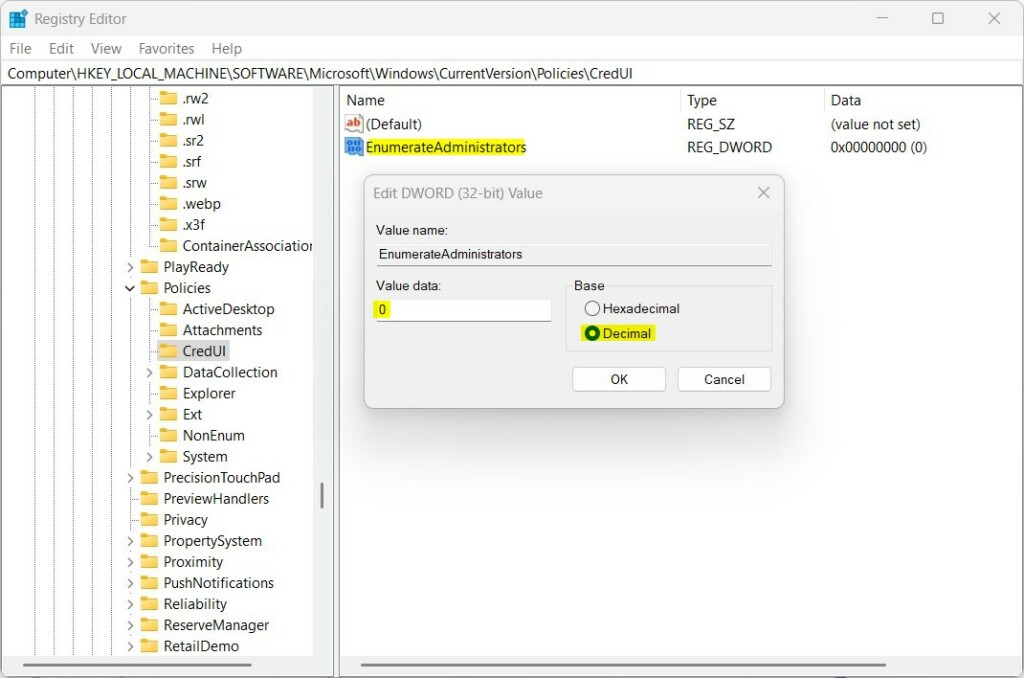
Name itEnumerateAdministrators. Press Enter to confirm the name. The new entry appears in the right pane. - Set the value
Double-click the newEnumerateAdministratorsvalue. In the window that opens, set Base to Decimal. Then enter one of these numbers in the Value data box:0to hide administrator accounts in the UAC prompt.1to show administrator accounts in the UAC prompt.
- Save and close
Click OK, check that the right pane shows the number you entered, and close the Registry Editor. - Restart your computer
Restart your PC to see the changes. To undo the change later, return to the same value and set it back, or delete the value to return to the default behavior, which hides the accounts.
What Happens When You Change This Setting?
This setting switches the UAC prompt between two layouts. One shows a list of clickable administrator accounts. The other shows blank fields, so you must type both the username and the password by hand every time.
To check your change after restarting, start something that needs elevation while signed in as a standard user. Right-clicking an app and choosing Run as administrator is an easy test. The prompt should look the way you set it.
With the value set to 0 (hide accounts), the next UAC prompt for credentials shows an empty username field. You have to type the full administrator account name and its password. If a prompt still shows the old layout, restart the PC again and confirm the value was saved in the right key.
Summary
Controlling how administrator accounts appear on the UAC prompt is simple once you pick the right tool for your edition of Windows. Use the Local Group Policy Editor on Pro, Enterprise and Education, or the Registry Editor on any edition, including Home, to switch between a list of accounts and a manual login field.
- Use the Local Group Policy Editor for Windows 11 Pro and above.
- Use the Registry Editor for all Windows 11 editions, including Home. Back up the registry first.
- Always restart your PC after making these changes for them to work.
User Account Control (UAC) is a security feature in Windows 11 that helps prevent unauthorized changes to a computer. To understand UAC better, or to learn how to run applications with administrator rights, see the related guides below.
Change UAC Behavior for Standard Users in Windows 11
How to Run an App as Administrator in Windows 11
How to Open the Registry Editor in Windows 11
If you have a tip to share or a question, leave a comment below.
Have a question about this guide?
Answered by AI from this guide. Good questions may be added to this page — please don't include personal details.
Did this guide fix your problem?

About the Author
Richard
Tech Writer, IT Professional
Richard is a writer at Geek Rewind who turns complex IT tasks into clear, step-by-step guides. He draws on years of hands-on experience in system administration and enterprise IT operations, focusing on Windows, Linux and WordPress: the problems people actually run into, and the fixes that work. His server and WordPress guides come from systems he runs himself. Richard builds and maintains the platform behind Geek Rewind, from its Ubuntu servers and Nginx configuration to its custom WordPress plugins. Many new tutorials start with readers' questions, and he's always glad to answer them in the comments.
No comments yet — be the first to share your thoughts!