How to Change UAC Prompt Behavior in Windows 11
Change User Account Control (UAC) prompt behavior by opening Local Security Policy (secpol.msc) or Registry Editor (regedit). Navigate to Security Options or the System key, respectively, and modify the ConsentPromptBehaviorUser setting. Remember to restart your computer for changes to take effect.
What is User Account Control (UAC)?
User Account Control, or UAC, is a security feature in Windows 11 that stops programs from changing your computer without you knowing. It acts like a guard, asking for your okay before any app tries to change important system settings, which helps keep your PC safe.
Why does this matter? UAC protects your computer from unwanted changes, which is pretty important for keeping your system secure.
What happens when UAC works? If you try to run a program that requires special admin access (which means full control over your computer), Windows will prompt you for permission first. For instance, Windows might ask you to enter an administrator’s username and password.
Your Options for UAC Prompt Behavior
Windows 11 lets you choose how the User Account Control (UAC) prompt asks for permission when programs want to make changes. You can pick to automatically deny requests, stopping programs from running and showing an ‘Access Denied’ message, or set it to ask for your password on a secure screen for better safety.
- Automatically deny elevation requests — The program won’t run. Windows shows an “Access Denied” message instead. Use this if you want to keep things simple and avoid password prompts.
- Prompt for credentials on the secure desktop — Windows switches to a locked-down screen and asks for an admin username and password. If you enter them correctly, the program runs with admin rights.
- Prompt for credentials (Default) — Windows asks for an admin username and password on your normal screen. If correct, the program runs with admin rights.
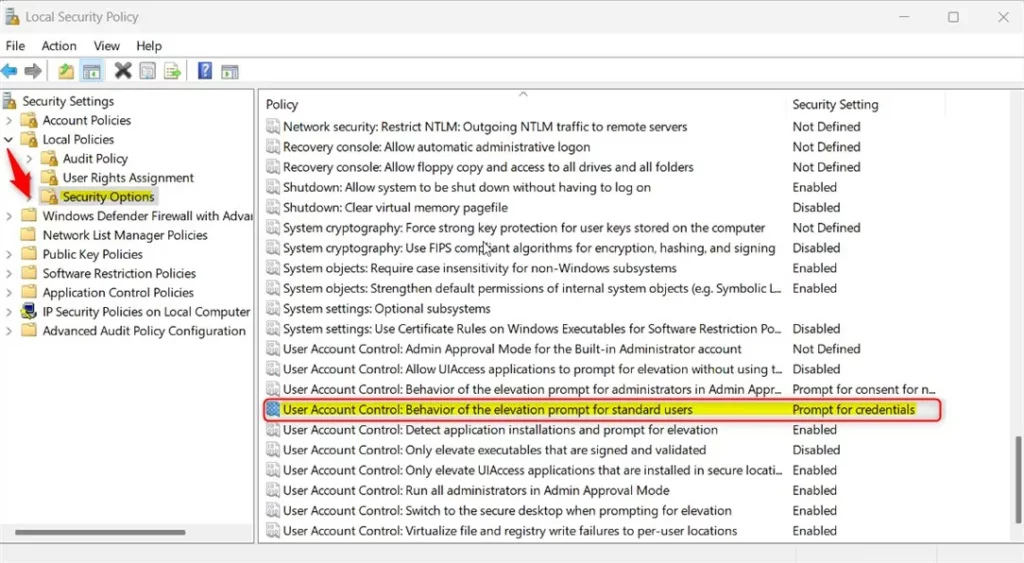
How to Change UAC Behavior Using Local Security Policy
You can change how the Windows 11 UAC prompt asks for permission using the Local Security Policy editor. This tool lets you adjust when Windows asks for your okay before making system-wide changes. To open it, press the Windows Key + R, type secpol.msc, and then press Enter.
- Press Windows Key + R to open the Run box.
- Type
secpol.mscand press Enter. The Local Security Policy Editor opens. - In the left panel, expand Local Policies > Security Options.
- Find and double-click User Account Control: Behavior of the elevation prompt for standard users in the right panel.
- Choose the option you want from the dropdown menu:
- Automatically deny elevation requests
- Prompt for credentials on the secure desktop
- Prompt for credentials
- Click OK to save your choice.
- ⚠️ Admin privileges required — Restart your computer to apply the changes.
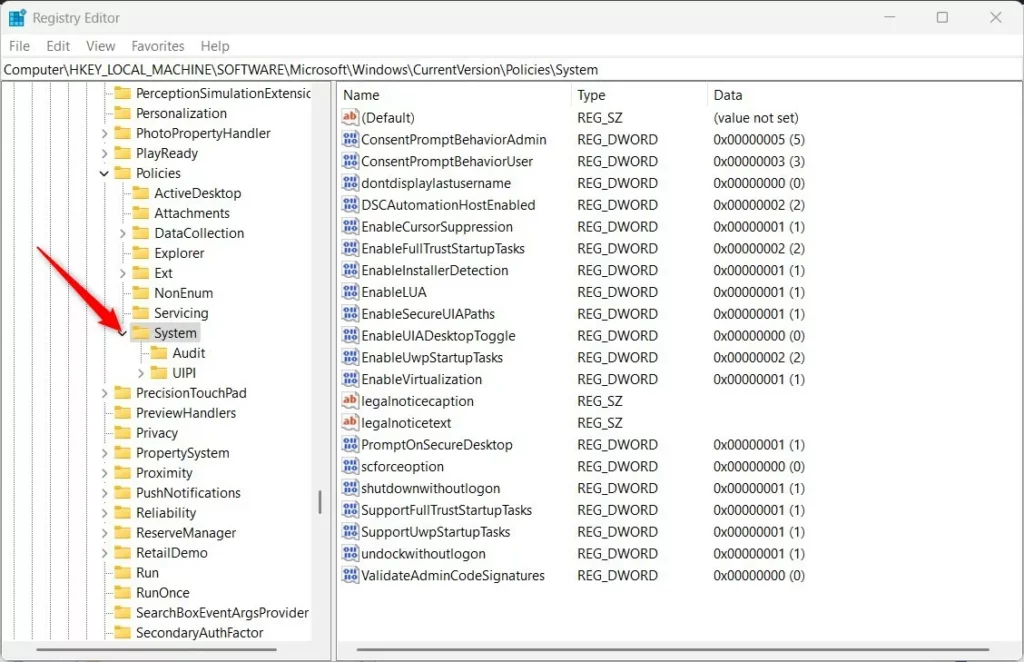
How to Change UAC Behavior Using Registry Editor
If the Local Security Policy tool isn’t on your computer, you can change the Windows 11 UAC prompt behavior using the Registry Editor. Press the Windows Key + R, then type regedit and press Enter to open it. You’ll then need to go to a specific folder to make your changes.
- Press Windows Key + R. Type
regeditand press Enter to open Registry Editor. - Navigate to this folder:
HKEY_LOCAL_MACHINE\SOFTWARE\Microsoft\Windows\CurrentVersion\Policies\System - If you don’t see the System folder, right-click on Policies. Select New > Key. Name it System.
- In the System folder, right-click in the right pane. Select New > DWORD (32-bit) Value.
- Name the new value:
ConsentPromptBehaviorUser - Double-click the new value. Set the Base to Decimal. Enter one of these numbers in Value data:
- 0 = Automatically deny elevation requests
- 1 = Prompt for credentials on the secure desktop
- 3 = Prompt for credentials (default)
- Click OK and close Registry Editor.
- ⚠️ Admin privileges required — Restart your computer to apply the changes.
Learn More
For more details, visit the official Microsoft page: Microsoft UAC Behavior Settings
Summary
Windows 11 uses User Account Control (UAC) prompts to ask for permission before programs make important changes, keeping your PC secure. You can choose how often UAC asks for this permission, like denying requests or prompting on a secure screen. These settings can be changed using either the Local Security Policy Editor or the Registry Editor.- Windows 11 asks for permission before running some programs. This keeps your PC safe.
- You can change how Windows asks for this permission. You can deny requests, prompt on a secure screen, or prompt normally.
- You can make these changes using the Local Security Policy Editor or the Registry Editor.
- Always restart your computer after making changes so they take effect.
How to enable UAC prompt?
You can change the UAC behavior by navigating to Control Panel, then System and Security, and finally Change User Account Control settings. Move the slider to your desired level of notification and select OK to save your changes.
Was this guide helpful?

About the Author
Richard
Tech Writer, IT Professional
Richard, a writer for Geek Rewind, is a tech enthusiast who loves breaking down complex IT topics into simple, easy-to-understand ideas. With years of hands-on experience in system administration and enterprise IT operations, he’s developed a knack for offering practical tips and solutions. Richard aims to make technology more accessible and actionable. He's deeply committed to the Geek Rewind community, always ready to answer questions and engage in discussions.


No comments yet — be the first to share your thoughts!