How to Reset Your Security Key on Windows 11

Resetting a security key on Windows 11 clears all saved sign-in data and returns the hardware to its factory state. The key can be a physical USB key or a Bluetooth /NFC device. It relies on FIDO2 security standards to protect your accounts from unauthorized access.
You need physical access to the key to complete the wipe. Clearing the device makes it safe to hand over to another person or to set up with a fresh account.
Before you start, know what a reset does. It removes every sign-in credential stored on the key and also removes its PIN. Any account that uses the key, such as a Microsoft account or a work or school account, will no longer accept it until you register it again. It does not change your Windows password or PIN, and it does not touch your Windows Hello settings.
Open Settings Accounts Sign-in options Security Key, click Manage, touch your key to verify, select Reset Security Key or Factory Reset, then confirm the wipe. The key returns to factory state and all stored credentials are erased permanently.
Step 1Go to Security Key Settings
The reset starts in the Settings app, in the security key section of your account options. These steps are written for current Windows 11. Home and Pro show the same menu.
- Click the Start button (the Windows icon) in the bottom-left corner of your screen.
- Click the Settings cogwheel icon. The Settings window opens. You can also press the Win plus I.
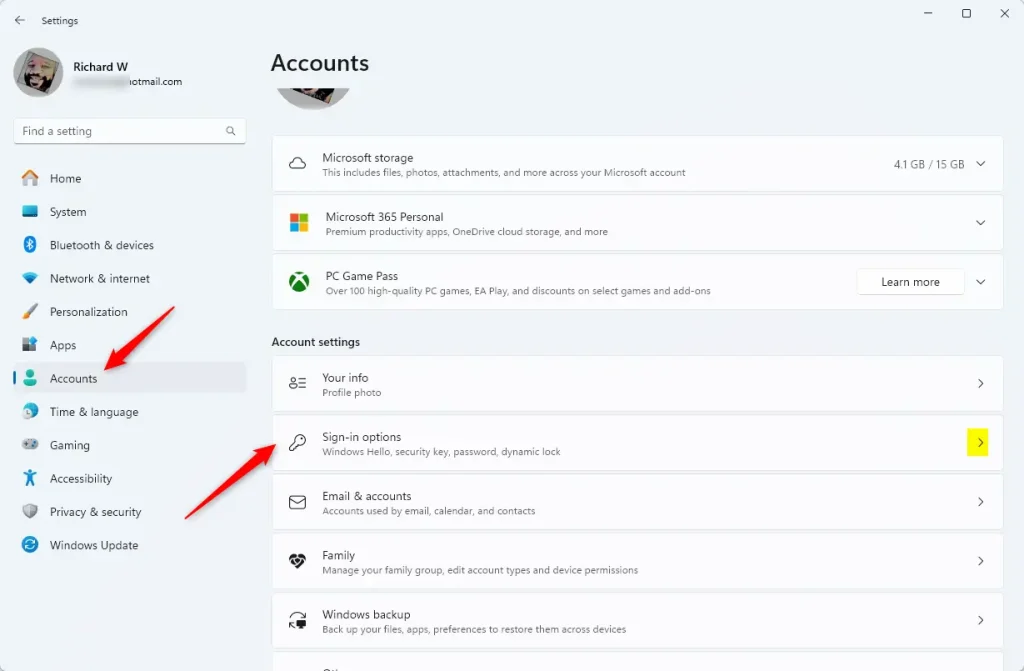
- In the Settings window, click Accounts in the left menu.
- Under Accounts, click Sign-in options.
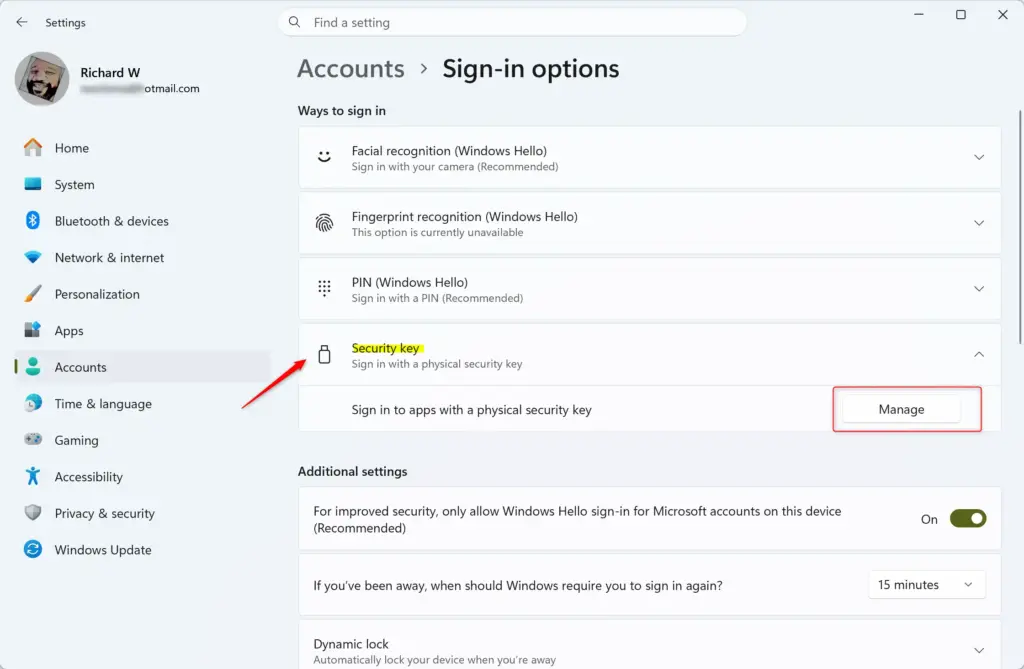
- Scroll down and click Security Key. The section expands and shows a short description of the key and a button.
- Click the Manage button. A security key window opens and asks you to touch your key.
If you don’t see a Security Key entry, scroll further. It sits below the other sign-in methods such as Face, Fingerprint and PIN. On a work or school PC, an administrator may have hidden or restricted it. In that case, ask your IT team.
Step 2Prove It’s You
Windows has to confirm that you hold the key before it allows a reset. Plug the key in if it isn’t already connected, then touch it or tap it as it asks. Once Windows accepts it, the management options appear.
- You might be asked to plug in your security key if it's not already connected.
- Windows will then ask you to confirm it's you. You might need to:
- Touch the metal part of your security key.
- Tap your key on your computer's NFC reader (if it's an NFC key).
- Enter the PIN you set for your security key.
If nothing happens, try a different USB port and plug the key in directly rather than through a hub. Make sure the key is touched on its contact point, not just held. If the key has a PIN and you have forgotten it, you can still reset the key. The reset is the standard way to clear a forgotten PIN.
Step 3Start the Reset
After verification, the window shows the options for your key. The wipe option is there. Select it and read the confirmation prompt before you go any further.
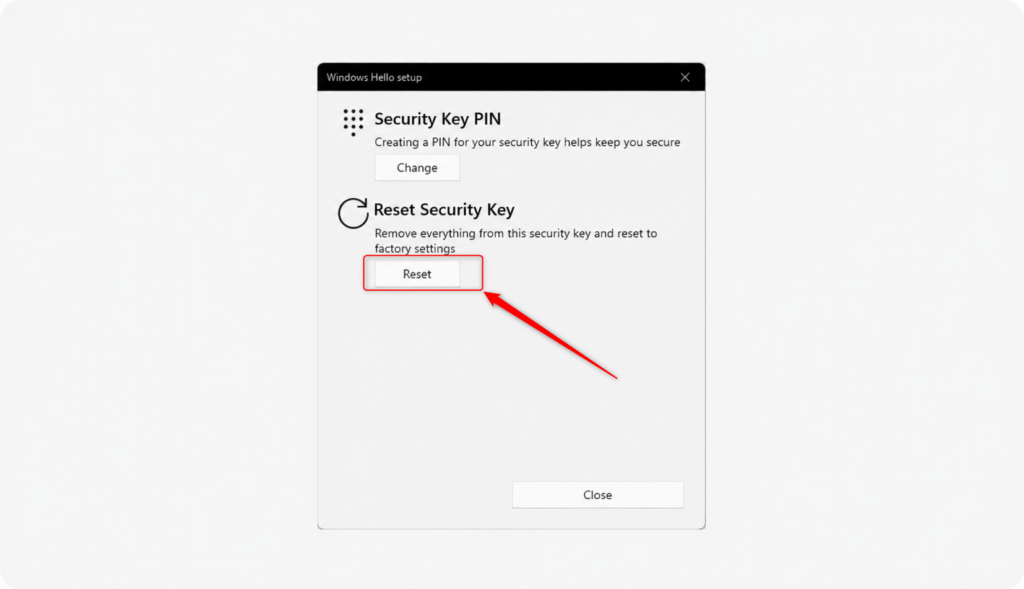
- Look for an option like Reset Security Key or Factory Reset. The exact words might be a little different depending on your key and Windows version.
- Select that option.
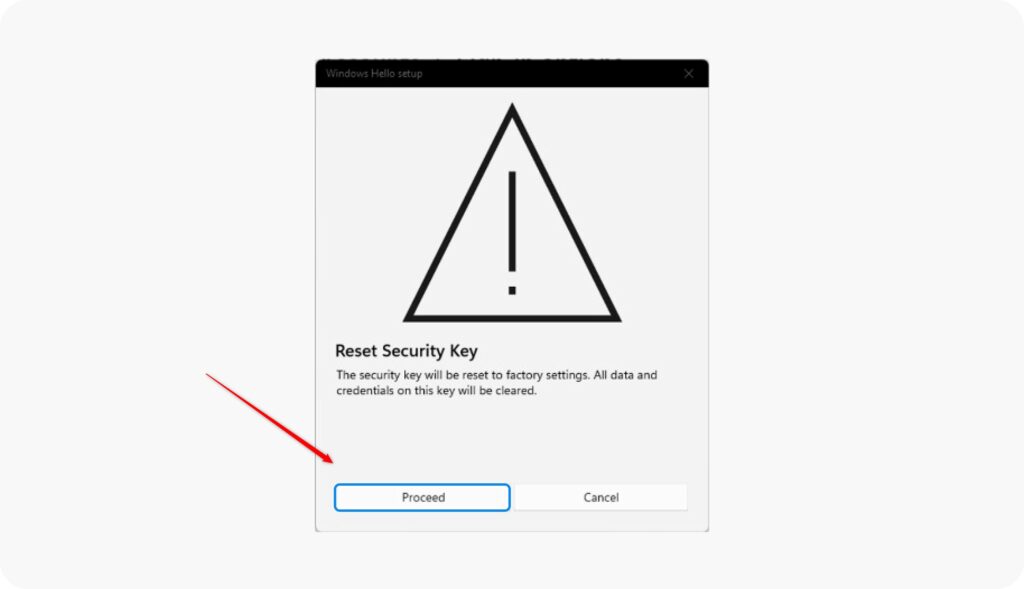
- Read the message that appears. It warns that everything on the key will be erased.
- Confirm that you want to reset the key.
Many keys only accept a reset shortly after they are plugged in, often within the first few seconds. If Windows tells you to remove the key and insert it again, do exactly that, then touch the key again when prompted. If the reset fails, unplug the key, plug it back in and repeat the steps quickly.
There is no way to restore the credentials afterward. Read the warning message carefully and confirm only if you are sure.
If it is your only sign-in method for an account, set up another way to get in first, such as a second key, an authenticator app or recovery codes. Otherwise you could lock yourself out. Once the reset is done, you will need to register the key again with each account you want to use it with.
Step 4Follow the Key Maker's Instructions
Some manufacturers need an extra step after the Windows prompt to finish wiping the device. This might be an on-screen prompt or a physical button press on the key itself. Follow these so the key clears completely.
- After you confirm the reset in Windows, watch for instructions from the company that made your security key.
- Follow them. They could involve pressing a button on the key or using a special tool from the maker.
- If you don't see instructions, or they aren't clear, go to the website of the company that made your security key. Look for a support section or search for your key model and terms like "reset" or "factory default."
Some keys do more than FIDO2, for example one-time passwords or smart card features. The Windows reset may only clear the FIDO2 part, so use the maker's tool if you need to clear the rest as well.
Step 5Finish the Reset
Once the manufacturer steps are finished, go back to the Settings window to wrap up.
- Return to the Windows Settings window.
- Click the Close button to exit the security key management screen.
Your security key is now reset and ready to be set up again. To use it, add it as a sign-in method in each account's security settings. You will also be asked to create a new PIN for the key when you first use it.
References:
Summary
Resetting your security key on Windows 11 takes minimal effort. Go to Settings Accounts Sign-in options Security Key and click Manage. After proving your identity, select the reset option and follow any prompts from the key's maker. Closing the settings window finishes the reset. Remember that the wipe is permanent, so make sure you have another way into your accounts before you start.
Have a question about this guide?
Answered by AI from this guide. Good questions may be added to this page — please don't include personal details.
Did this guide fix your problem?

About the Author
Richard
Tech Writer, IT Professional
Richard is a writer at Geek Rewind who turns complex IT tasks into clear, step-by-step guides. He draws on years of hands-on experience in system administration and enterprise IT operations, focusing on Windows, Linux and WordPress: the problems people actually run into, and the fixes that work. His server and WordPress guides come from systems he runs himself. Richard builds and maintains the platform behind Geek Rewind, from its Ubuntu servers and Nginx configuration to its custom WordPress plugins. Many new tutorials start with readers' questions, and he's always glad to answer them in the comments.
No comments yet — be the first to share your thoughts!