How to Remove a Security Key from Your Microsoft Account


Removing a lost or retired security key from your Microsoft account takes under two minutes. A security key is a small physical device, such as a USB fob, that proves your identity when you sign in. Cleaning out old or lost keys stops anyone who finds one from using it to get into your account.
You make the change on your online Microsoft account page, not on the key. Nothing stored on the physical key is erased. It simply stops working as a sign-in method for your account.
Sign in to your Microsoft account at account.microsoft.com, go to Security info, find your security key in the list, click Del next to it, and confirm the removal. The key stops working as a sign-in method immediately.
Steps to Remove a Security Key
Before you start, check that you have at least one other way to sign in, such as a phone number, an authenticator app, or a second key. If the key you are removing is your only method, add a replacement first so you don’t lock yourself out. You also need a device with a web browser and a way to pass Microsoft’s identity check, such as a code sent to your phone or email.
The steps below clear the key from your profile.
Go to Your Microsoft Account Security Page
First, sign in to your account in a browser.
- Open a web browser and go to the Microsoft My Account page.
- Sign in if you are not already signed in. If you use a work or school account, sign in with those credentials. A work or school account may be managed by your organization, and your administrator may control which sign-in methods you can change.
- If Microsoft asks you to verify your identity, enter the code it sends you. This is normal when you open security settings.
Once you are signed in, you should see your account dashboard.
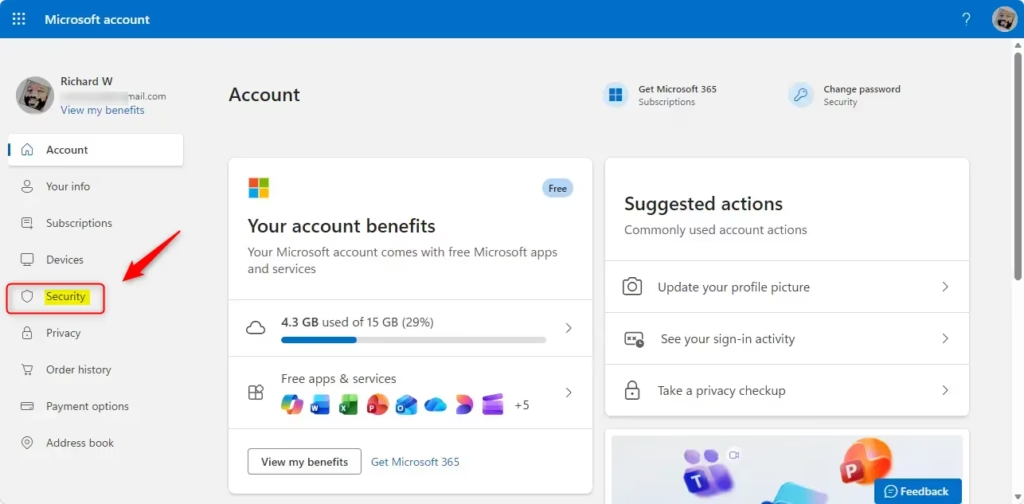
Find Your Security Information
The Microsoft account security settings page lists all your verification methods, including phone numbers, authenticator apps, and hardware tokens. If you can't find a section for security keys right away, scroll down the page or look for the security info area.
Locate the Security Key to Remove
The security settings page shows every active sign-in method linked to your profile. Scan the list to find the key you want to remove. Entries usually show a custom nickname. If you never named the key, it appears as "Security Key."
If you have more than one key, check the nickname and the date added, if shown, so you pick the right one. If you have two keys with the same default name, keep the one you still have in hand. Plug it in and test it on a sign-in before you delete the other.
Select the "Delete" Option
On some account types the button may be labeled Remove instead. Check the selection carefully before you go on, because revoking a key permanently disables it for future sign-ins.
Revoking a key permanently disables it for future sign-ins. If you remove the wrong one by mistake, you can add it again later, but you will have to go through the setup process once more.
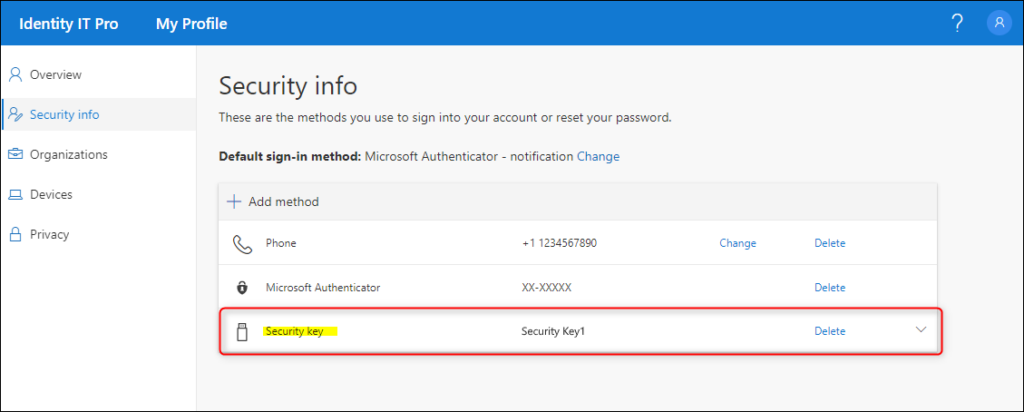
Confirm Your Decision
Microsoft asks you to confirm before it deletes the key. This prompt is your last chance to stop the removal. If you chose the right key, click OK or Confirm to carry out the deletion. If you are unsure, close the prompt without confirming and recheck the list.
Check That It's Removed
Once you confirm, the key disappears from your list of active verification methods. Any future sign-in attempt that uses that hardware will fail. The security info page should update on its own to show the current state. If the key is still listed, refresh the page. If it is still there after a refresh, sign out, sign back in, and check again.
If you removed the key because it was lost or stolen, it is also a good idea to review your other sign-in methods and change your password.
References:
Summary
Clearing out an old sign-in key takes only a few clicks. Open your account's security info page, find the key you want to remove, and confirm the deletion prompt. Make sure you have another working sign-in method before you do, and the key itself is left untouched.
Did this guide fix your problem?

About the Author
Richard
Tech Writer, IT Professional
Richard is a writer at Geek Rewind who turns complex IT tasks into clear, step-by-step guides. He draws on years of hands-on experience in system administration and enterprise IT operations, focusing on Windows, Linux and WordPress: the problems people actually run into, and the fixes that work. His server and WordPress guides come from systems he runs himself. Richard builds and maintains the platform behind Geek Rewind, from its Ubuntu servers and Nginx configuration to its custom WordPress plugins. Many new tutorials start with readers' questions, and he's always glad to answer them in the comments.
The options do not even exist. The Security page looks nothing like what you show and what it currently looks like.