How to Register a Security Key in Microsoft Account

Registering a physical security key in your Microsoft account lets you sign in with a small hardware token and a PIN instead of a password. These keys use the FIDO2 standard, a secure sign-in method supported by Windows 10 and Windows 11 that proves who you are during login.
Most personal Microsoft accounts support any standard FIDO2 security key right away. If you use a work or school account managed by an organization, you need a compatible USB token and permission from your IT department before you begin. Your administrator has to allow security keys as a sign-in method for your account. If they have not, the option will not appear in the steps below.
Go to account.microsoft.com, sign in, and open Security Info. Click Add method, select Security key from the dropdown, then plug in your FIDO2-certified key and press its button when prompted. Enter your security key’s PIN to complete registration.
What is a Security Key?
A security key is a physical hardware token that looks like a USB drive or key fob. It plugs into your computer, or taps against it, to keep your account safe. Once you register one with your Microsoft account, you have to plug it in and type its PIN to sign in. Someone who knows your password still cannot get into your account without the key in their hand.
Two form factors are common:
- USB Security Keys: These look like small USB drives that you plug into a USB port on your computer. Check whether your key has a USB-A or USB-C connector, and make sure your PC has a matching port.
- NFC Security Keys: You tap these on an NFC reader, like tapping a credit card to pay. Your PC needs a built-in or external NFC reader for this to work.
If your company requires a specific hardware model, use the approved one. The manufacturer’s documentation lists the exact features of your key, such as the connector type and whether it supports NFC.
Other Things You Need
To register a security key on your Microsoft account, you need a computer running Windows 10 or later and a supported web browser such as Microsoft Edge or Google Chrome. You also need a physical FIDO2-certified security key that works with Microsoft services. Check all of this before you open your account settings.
- Your Device and Browser are Ready: You need a computer with at least the Windows 10 May 2019 Update and a supported web browser. Windows 11 meets this requirement. Keep your browser up to date, because old versions may not show the key prompt.
- You Have a Compatible Security Key: It must work with FIDO2 and Microsoft. If you are unsure about compatibility, your organization's IT help desk is the best place to ask. The packaging usually says "FIDO2" if the key supports it.
- You Have Another Security Method Already Set Up: Before you can add a security key, you must have at least one other verification method set up, like your phone number or an authenticator app. If you have none, add one first. You will probably be asked to verify with it during the steps below.
Registering Your Security Key: Step-by-Step
Have the key within reach and do not unplug it until the last step is done. The whole process takes a few minutes.
Head to Your Security Info Page
- Open a web browser such as Microsoft Edge.
- Go to the My Profile page.
- Sign in if the page asks you to. If you are already signed in with a work or school account, authentication usually happens automatically.
You should now see the Security Info page with the sign-in methods already on your account. If you were asked to verify, use your phone or authenticator app.
Add a New Method
- Find the Add method button on the Security Info page.
- Click Add method.
A small window opens with a dropdown list of the authentication methods you can add. If you use a personal Microsoft account, the page may word this slightly differently, for example as an option to add a new way to sign in or verify. The idea is the same.
Choose "Security Key"
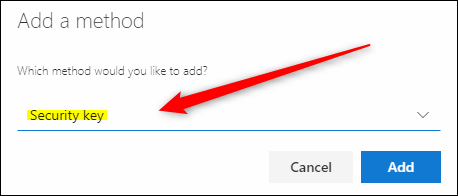
- Open the dropdown menu of available methods.
- Choose Security key.
This tells Microsoft that you are about to add a hardware token. If Security key is not in the list, your administrator probably has not enabled it for your account. Ask your IT department. On a personal account, check that you are signed in to the right account.
Select Your Key Type
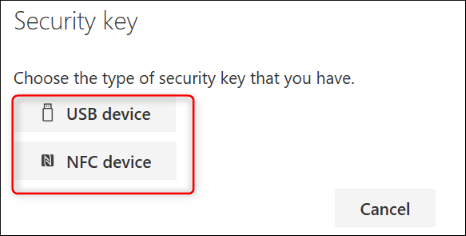
- Choose the type of key you have.
- Select USB device if the key plugs directly into a port on your computer.
- Select NFC device if you tap the key on a reader.
If you are not sure which you have, check the packaging or ask your IT support desk. Some keys offer both connections. If yours does, pick whichever you plan to use most often. You can register the same key for only one type at a time here, so choose the one that matches how you will sign in.
Prepare Your Security Key
- Click the prompt on the Microsoft page to continue.
- When the page asks, insert the USB key into your computer, or tap the key on your NFC reader.
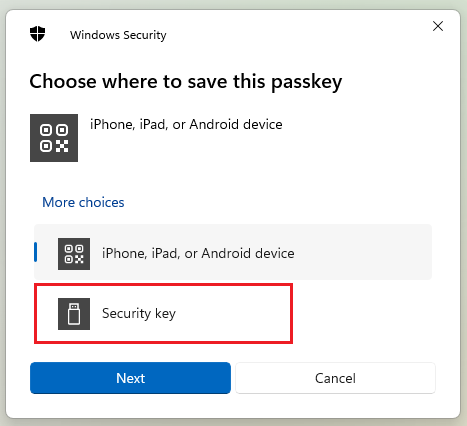
Your browser or Windows then opens its own security key window and guides you through the rest. If nothing appears, unplug the key, plug it in again, and make sure the browser window is in front.
Create Your PIN
- When Windows asks you to create a PIN, type a PIN of your own choosing.
- Type it a second time to confirm it.
Pick something you will remember, and do not reuse your Windows PIN or password. The PIN lives on the key itself. Too many wrong attempts in a row will lock the key, and it may need to be reset, which removes it from every account where you registered it. If the key already has a PIN, Windows asks you to enter it instead.
Confirm and Finish
- When the key's light or button prompts you, touch the key as instructed.
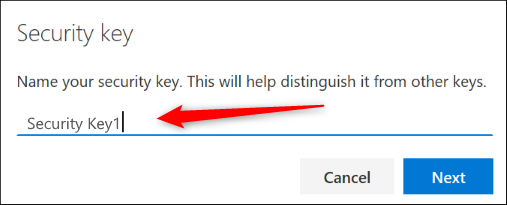
- Give the key a descriptive display name if the page offers that option. A name like "Blue USB key – desk" helps if you register more than one.
- Click Next or Done to finish.
The setup window should close and bring you back to the Microsoft page.
Verify Registration
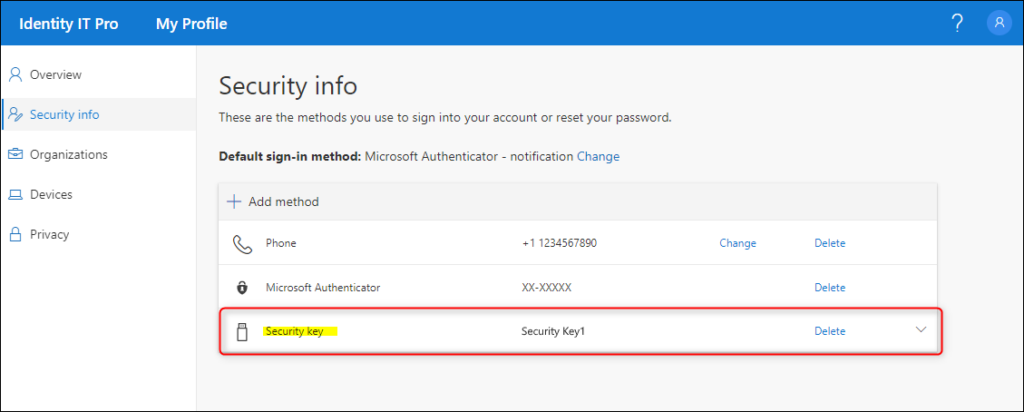
Check the Security Info page. Your new security key should now be listed with the other sign-in methods, under the name you gave it. That confirms the key is linked to your account.
To be sure it works, sign out and sign in again, choosing the security key option when asked. To undo the registration later, open the same page and remove the key from the list. Keep another sign-in method active so you are never locked out.
Reference:
Summary
A security key strengthens your account because signing in requires the physical token and its PIN together. Keep the key somewhere safe. Consider registering a second key as a backup in case you lose the first.
Did this guide fix your problem?

About the Author
Richard
Tech Writer, IT Professional
Richard is a writer at Geek Rewind who turns complex IT tasks into clear, step-by-step guides. He draws on years of hands-on experience in system administration and enterprise IT operations, focusing on Windows, Linux and WordPress: the problems people actually run into, and the fixes that work. His server and WordPress guides come from systems he runs himself. Richard builds and maintains the platform behind Geek Rewind, from its Ubuntu servers and Nginx configuration to its custom WordPress plugins. Many new tutorials start with readers' questions, and he's always glad to answer them in the comments.
No comments yet — be the first to share your thoughts!