How to Manage Update Restart Schedules in Windows 11

Automatic restarts for Windows 11 updates can interrupt your work and close open apps without much warning. You can stop this by setting active hours or changing restart schedules in the Settings app, the Group Policy Editor, or the Registry Editor.
Windows 11 downloads system updates in the background on version 21H2 and later, then prompts you to restart. Managing these schedules prevents sudden reboots and lets you decide when your PC finishes installing updates.
Start with the Settings app, because every edition of Windows 11 has it and nothing in it can damage the system. Use Group Policy or the registry only if you need more control, for example on several PCs or on a machine you manage for someone else.
Open Settings Windows Update Advanced options and set Active hours to Manually, then enter your Start time and End time. Windows will avoid automatic restarts during those hours. You can also click Schedule the restart when an update is pending to pick an exact installation time.
Schedule update installation
The simplest way to avoid a surprise reboot is to pick an exact time for Windows 11 to restart and finish installing pending updates. This only works when an update has already been downloaded and is waiting for a restart. If nothing is pending, the option does not appear, and that is normal.
- Press Win+I to open Settings.

Windows 11 Start menu with Settings gear icon highlighted. - Click Windows Update in the left sidebar. You should see the update status, and a pending update shows a restart message.

Settings › Windows Update - Click Schedule the restart. This button only shows when an update is waiting for a reboot.
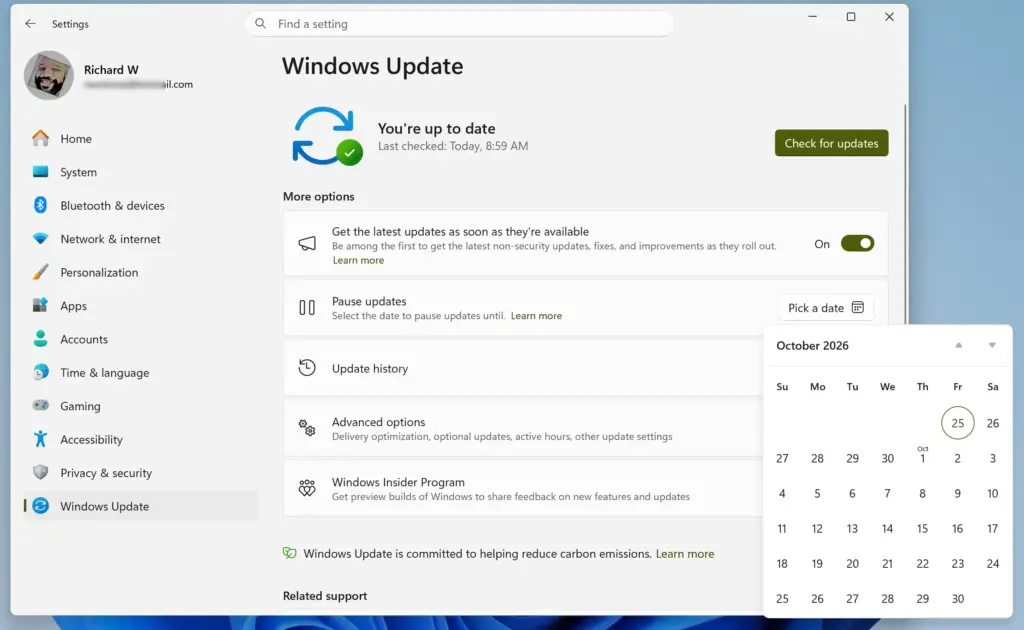
- Turn the schedule on, then choose a day and time that suit you. Windows shows the time you picked on the Windows Update page.
To undo this, go back to the same page and pick a different time, or click Restart now if you would rather finish the update straight away. No restart is needed to save the schedule itself.
Delay automatic restart
You can also hold off updates for a short time when one is already downloaded and you are in the middle of something. This does not cancel the update. It only delays it, and Windows will install it once the pause ends.
- Open Settings.
- Click Windows Update.
- Click Pause updates and choose how long to hold off incoming installations. The menu offers a fixed set of durations rather than a free-form number of days. You can instead select Restart options to temporarily extend the restart time for an update that is already downloaded.
After you pause, the page shows that updates are paused and until when. A Resume updates button appears so you can end the pause early. Windows will not let you pause forever. Once the maximum pause is reached, you have to install updates before you can pause again.
Configure active hours
Active hours tell Windows when you normally use the PC, so it avoids restarting automatically during that window. This is the setting most people want, and it works on both Home and Pro.
- Open Settings.
- Click Windows Update.
- Click Advanced options.
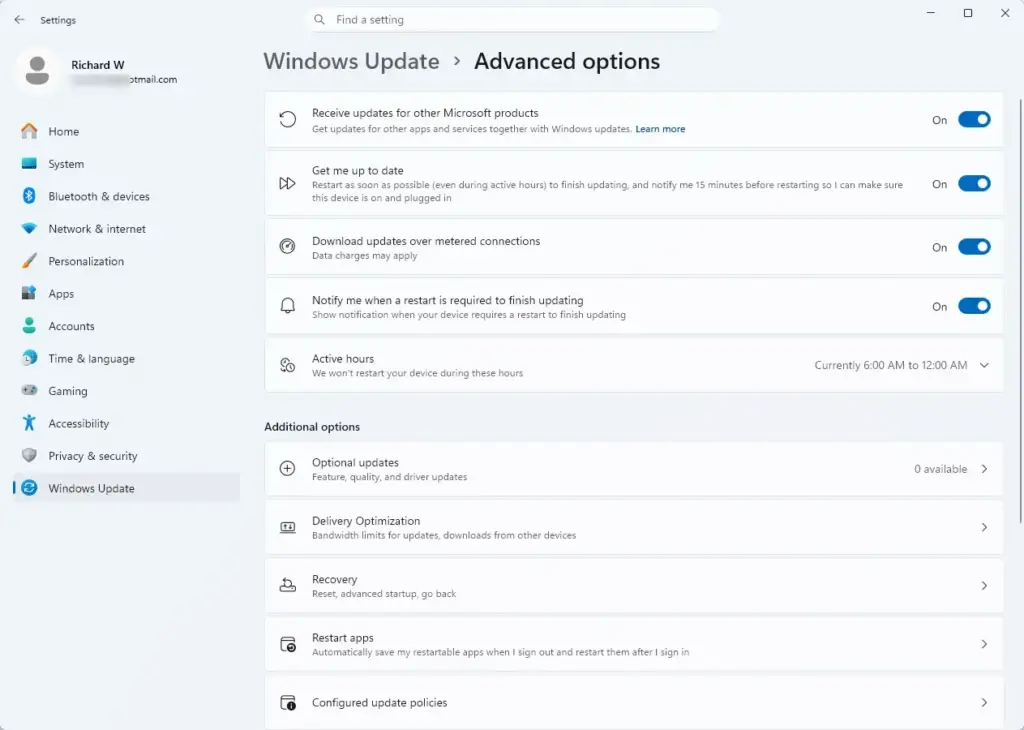
Settings › Windows Update › Advanced options - Find Active hours and change the setting from Automatically to Manually. With Automatically, Windows guesses your hours from your activity, and the guess is often wrong.
- Set your Start time and End time. Click Save if the dialog shows that button.
The change takes effect immediately and needs no restart. To go back, set Active hours to Automatically again. If the setting is greyed out or missing, a Group Policy or registry value set by your organisation, or by you earlier, may be controlling it.
Configure active hours with group policy
The Local Group Policy Editor lets administrators enforce restart behaviour on the PC. It is only included in Windows 11 Pro, Enterprise and Education. On Windows 11 Home, gpedit.msc will not open, so use the Registry Editor method later in this guide.
- Open the Start menu, type
gpedit.msc, and press Enter to launch the Local Group Policy Editor. - In the left pane, navigate to
Computer Configuration\Administrative Templates\Windows Components\Windows Update. In newer builds some policies sit in a subfolder of this node, such as Manage end user experience, so check the subfolders if you do not see a policy straight away. - Double-click the policy named Turn off auto-restart for updates during active hours.
- Set the policy to Enabled.
- Configure the start and end times in the options pane if the policy you opened offers them, then click Apply and OK. A separate policy, Specify active hours range for auto-restarts, covers the times if yours does not.
The policy usually applies after the next policy refresh or a restart. To undo it, open the same policy and set it to Not Configured.
Configure active hours through the Windows registry
It is the way to do this on Windows 11 Home, and it needs an administrator account. A wrong edit here can cause problems, so back up first: in Registry Editor, select the key you are about to change, click File Export, and save the .reg file somewhere safe.
- Open the Start menu, type
regedit, and press Enter to launch Registry Editor. Click Yes if User Account Control asks for permission. - Navigate to the registry path
HKEY_LOCAL_MACHINE\SOFTWARE\Policies\Microsoft\Windows\WindowsUpdate. If the key does not exist, right-click the parent key, select New Key, and name itWindowsUpdate. - Right-click an empty space in the right pane, select
New>DWORD (32-bit) Value, and name itSetActiveHours. The new value appears in the right pane. - Double-click
SetActiveHoursand set its value data according to your deployment configuration. Click OK to save it.
Restart the PC, or at least sign out and back in, so Windows picks up the change. To undo it, delete the value you created or import the .reg backup you exported earlier.
Configure active hours maximum range
Active hours have a maximum length, which limits how many hours per day you can block. In the Settings app the window can be no longer than 18 hours. If you enter a longer span, Windows will not accept it. Check your values against this limit so the configuration is not rejected.
- Open Settings.
- Go to Windows Update Advanced options Active hours.
- Check that the time between your chosen start and end fits within the allowed daily limit. If the dialog does not let you save, shorten the window and try again.
If you work overnight shifts, remember that the window can cross midnight. A window from 10 PM to 4 PM counts as 18 hours, not a negative range.
Limit restart delays
On managed PCs you may want to limit how long users can postpone a forced reboot, so systems stay compliant with security baselines. This is a Group Policy task, so it needs Windows 11 Pro, Enterprise or Education. Home does not include the editor.
- Open the Start menu, type
gpedit.msc, and press Enter to open the Local Group Policy Editor. - Navigate to
Computer Configuration\Administrative Templates\Windows Components\Windows Update. - Locate the policy for specifying deadlines for automatic updates and restarts, Specify deadlines for automatic updates and restarts, and double-click it.
- Set it to Enabled and configure the maximum allowable delay in days before a mandatory reboot occurs. Click Apply and OK.
A shorter deadline means users have less time to postpone, so pick a value that matches how quickly you need patches installed. To remove the limit, set the policy back to Not Configured.
Control restart notifications
Windows alerts you before it performs a scheduled restart. You can change how early and how often these reminder notifications appear on your desktop. The next few sections cover how to adjust them and what each one means.
Display options for update notifications
You can change how intrusive update notifications are, so you do not miss critical reboot warnings while working fullscreen, and so routine alerts do not constantly pop up.
- Open Settings.
- Navigate to System Notifications.
- Scroll down to find Windows Update in the list of notification senders and adjust its alert banners and sound settings. You should see the toggles change as you click them.
If you silence the warnings entirely, the first sign of a restart may be the countdown described below. Turning the sender back on restores the default behaviour.
Automatic restart notifications
Windows triggers an automatic restart notification when an installation is fully prepared and only needs a reboot to finish applying changes. This is the point where you can still pick the timing.
- Open Settings.
- Go to Windows Update to view the pending notification banner.
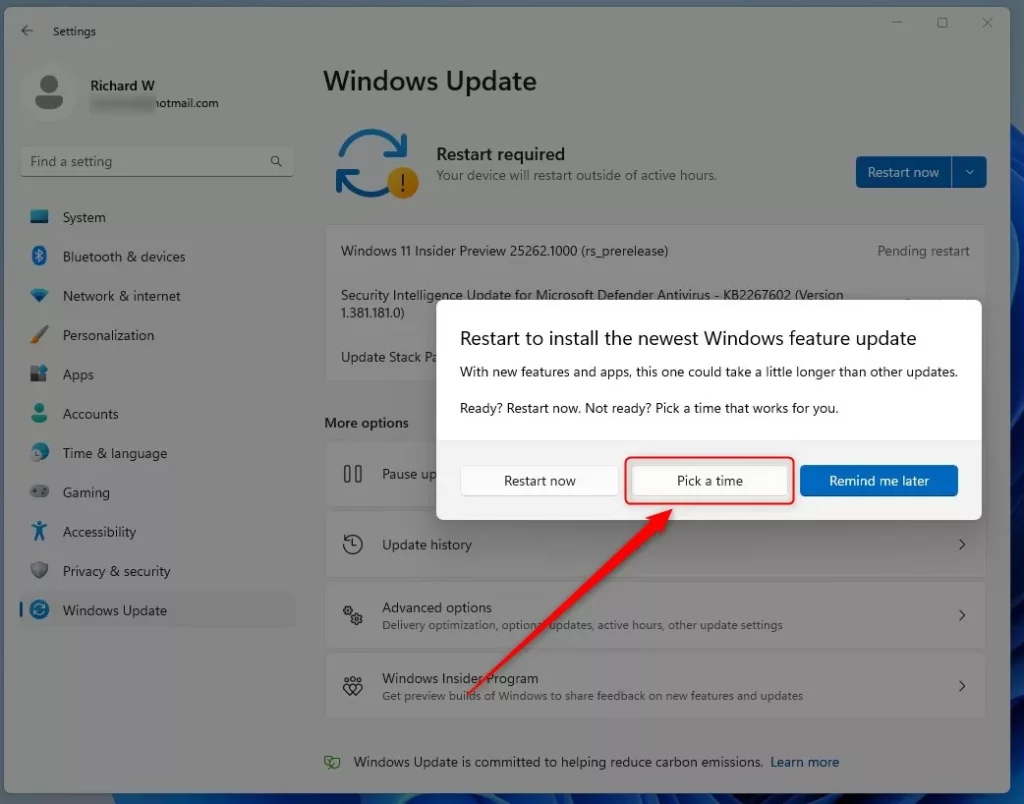
windows pick a time to restart after update - Click Restart now, or choose an alternative time slot from the prompt options.
If you click Restart now, save your work first. Windows closes your apps, and the PC may restart more than once while it finishes the update.
Scheduled automatic restart warnings
When an update reaches its final deployment deadline, Windows shows persistent warnings with a countdown to the restart. At this stage the choice of time is mostly gone, so use the time you have.
- Read the desktop notification dialog and note the exact countdown time remaining.
- Save all open files and close anything important to prevent data loss before the automatic restart triggers.
You will see this stage most often on PCs with a short deadline policy, or on PCs that have put off a restart for a long time.
Engaged restart
Engaged restart mode switches Windows from basic notification banners to more direct prompts, which ask you to pick a reboot time outside your working hours. It runs automatically, so there is no switch to flip. You only need to respond when the prompt appears.
- Wait for the engaged restart notification to appear on your screen.
- Select a designated time window when the device can safely close applications and apply the reboot. Windows should confirm the time you picked.
If you ignore the prompt, Windows picks a restart time for you, normally outside your active hours. Choosing a time yourself is the safer option.
Group policy settings for restart
In enterprise environments, Group Policy objects enforce uniform reboot behaviour across workstations. The steps below use the local editor on one PC, and the same policies exist in domain Group Policy for larger deployments. They need Windows 11 Pro, Enterprise or Education.
- Press Windows Key + R to open the Run dialog and type
gpedit.msc, then press Enter to open the Local Group Policy Editor. - Browse to
Computer Configuration\Administrative Templates\Windows Components\Windows Update. Check the subfolders of this node if a policy is not listed directly. - Configure policies such as Turn off auto-restart for updates during active hours and Specify deadlines for automatic updates and restarts to fit your deployment strategy. Click Apply and OK after each one.
Test on one machine before you roll a policy out widely. Policies can take a refresh cycle to reach a PC, so a restart may be needed before you see the effect.
Registry keys used to manage restart
The registry holds the settings that Group Policy writes, and you can edit them directly to override default behaviour. This is the route on Windows 11 Home. Export the key as a backup before you change anything. The core policy location is:
HKLM\Software\Policies\Microsoft\Windows\WindowsUpdate
This registry path holds core policy settings for update management. Values placed here control global update behaviour across the operating system.
- Open Registry Editor by typing
regeditin the Start menu and pressing Enter. - Navigate to
HKEY_LOCAL_MACHINE\SOFTWARE\Policies\Microsoft\Windows\WindowsUpdate. - Create or modify DWORD values within this key to enforce targeted restart and update constraints.
The Automatic Updates subkey controls how Windows downloads and applies patches, including automated reboot triggers and deadline behaviour:
HKLM\Software\Policies\Microsoft\Windows\WindowsUpdate\AU
Values here apply to the update process itself, so a wrong entry can change when and whether updates install. Change one value at a time and note what you changed.
- Open Registry Editor.
- Navigate to
HKEY_LOCAL_MACHINE\SOFTWARE\Policies\Microsoft\Windows\WindowsUpdate\AU. - Configure specific DWORD entries under this key to manage automatic restart notifications and scheduling rules.
Restart the PC after editing so the changes take effect. To roll back, delete the values you added or import your exported backup.
Bypassing Stuck Restart Prompts via Task Scheduler
If restart prompts keep coming back even after you restart, a stuck trigger may be the cause. You can clear it by disabling and re-enabling the related maintenance tasks in Task Scheduler. This step requires administrator privileges.
- Open the Start menu, type
Task Scheduler, and press Enter. - In the left pane, expand the directory tree to
Task Scheduler Library\Microsoft\Windows\UpdateOrchestrator. - Look for tasks named Reboot or Reboot_AC in the middle pane.
- Right-click the stuck task and select Disable, then right-click it again and select Enable to force Windows to rebuild its clean restart trigger queue.
If a task is missing or the options are greyed out, you are probably not running Task Scheduler as an administrator. Close it, then reopen it from an administrator account.
Clearing Pending Update Reboot Flags in the File System
Sometimes Windows insists a reboot is required even after you have restarted. This usually means stale update markers are still on disk. Clearing them forces Windows Update to re-evaluate the real state of pending updates. This step requires administrator privileges, and deleting files from system directories incorrectly can disrupt your operating system, so follow the steps exactly and only delete the folder contents named below.
- Open the Start menu, type
cmd, right-click Command Prompt, and select Run as administrator. - Type
net stop wuauservand press Enter to stop the Windows Update service. The window should report that the service stopped. - Type
net stop bitsand press Enter to stop the Background Intelligent Transfer Service. - Navigate to
C:\Windows\SoftwareDistributionin File Explorer and delete the contents of the folder to clear cached update markers. If Windows says a file is in use, make sure both services from the previous steps have stopped. Skip anything that still refuses to delete. - Return to the Command Prompt window, type
net start wuauserv, and press Enter to restart the update service.
Afterwards, open Settings Windows Update and click Check for updates. Windows rebuilds the cache, so the first check may take longer than usual.
If this didn't work
If your restart schedules still fail to apply correctly, the cause may be corrupted system components. Windows has two built-in repair tools for this: the Deployment Image Servicing and Management tool (DISM) and the System File Checker (SFC). Open an elevated Command Prompt, as in the previous section, and run DISM first. It repairs the component store, which SFC uses as its source of good files. Then run the system file checker scan to repair damaged operating system files that control update states.
Both scans can take several minutes. Let each one finish before you start the next, and restart the PC when both are done. Then check Windows Update again to see whether the restart options and schedule now behave as expected.
How to set auto reboot schedule?
Open Settings with Windows Key + I, go to Windows Update, then select Schedule the restart. Pick your preferred date and time from the menu. Windows will install updates at that time instead of forcing a restart without warning.
Can I schedule my computer to restart at a certain time?
Yes. Press Windows Key + I to open Settings, click Windows Update, then choose Schedule the restart. You can pick the exact day and time you want your PC to restart and install waiting updates.
How do I stop a scheduled restart?
Open Settings with Windows Key + I, go to Windows Update, and look for a scheduled restart. Click the option to change or remove it. You can also set Active hours to prevent automatic restarts during your work time.
Why is my Windows Update taking so long to restart?
The restart delay usually means Windows is still downloading or preparing the update in the background. Check Windows Update in Settings to see the progress. Large updates take longer. If it's stuck, restart your PC manually or check your internet connection.
Was this guide helpful?

About the Author
Richard
Tech Writer, IT Professional
Richard is a writer at Geek Rewind who turns complex IT tasks into clear, step-by-step guides. He draws on years of hands-on experience in system administration and enterprise IT operations, focusing on Windows, Linux and WordPress: the problems people actually run into, and the fixes that work. His server and WordPress guides come from systems he runs himself. Richard builds and maintains the platform behind Geek Rewind, from its Ubuntu servers and Nginx configuration to its custom WordPress plugins. Many new tutorials start with readers' questions, and he's always glad to answer them in the comments.

No comments yet — be the first to share your thoughts!