How to Turn On or off Automatically Adjust Active Hours in Windows 11

Automatically Adjust Active Hours in Windows 11 stops your PC from restarting during the workday. Windows tracks your regular device use over a 30-day period and sets your active hours on its own, so you avoid sudden update reboots while you work.
You can turn this setting on or off in the Windows Update menu whenever your daily schedule changes. It is available in both Windows 11 Home and Pro. If you work irregular shifts, the manual option is usually the better choice, because Windows can only learn from the pattern it has already seen.
Open Settings , go to Windows Update Advanced options Active hours, then use the dropdown menu to select On to enable Automatically adjust active hours for this device based on activity, or Off to disable it. Changes apply immediately without restarting.
How to Turn On or Off Automatically Adjust Active Hours Using Settings
The Settings app is the easiest way to change this, and it needs no special tools. The path is Windows Update Advanced options Active hours You can undo the change at any time by repeating the steps and picking the other option.
- Open Windows Settings : Click the Start menu button (the Windows icon at the bottom-left corner of the taskbar ), then click Settings.
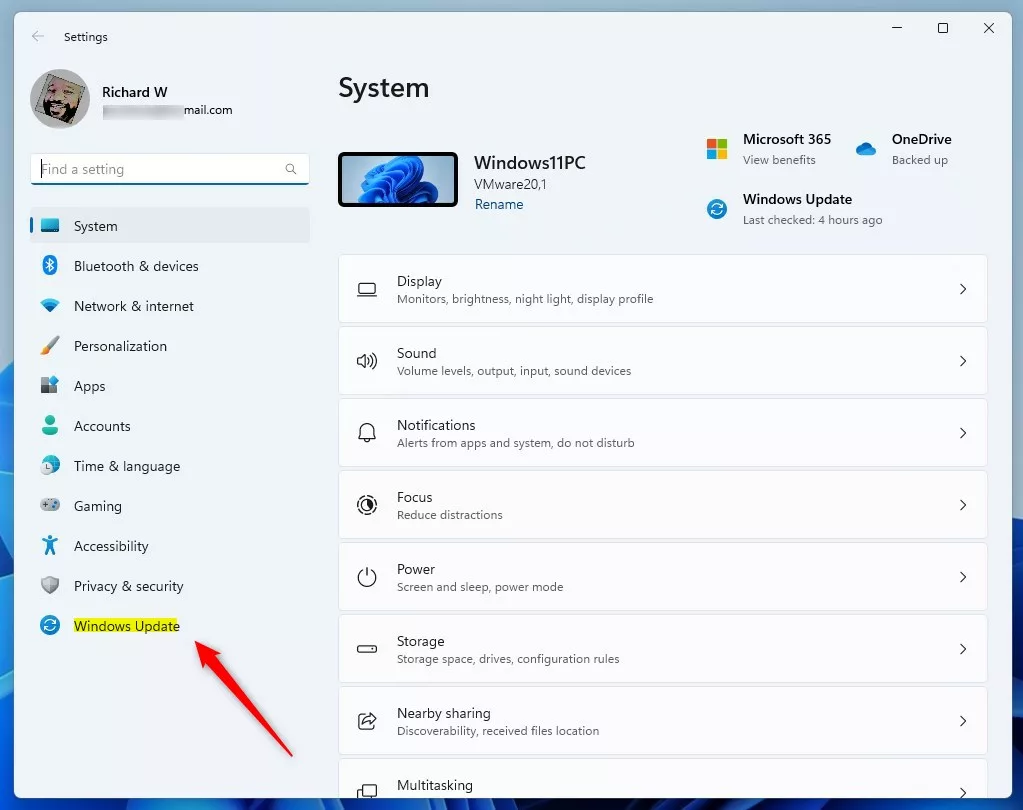
Or press Windows key + I on your keyboard to open Settings directly. Either way, the Settings window should now be open. - In the Settings window, click Windows Update in the left-side menu. The update status and buttons appear on the right.
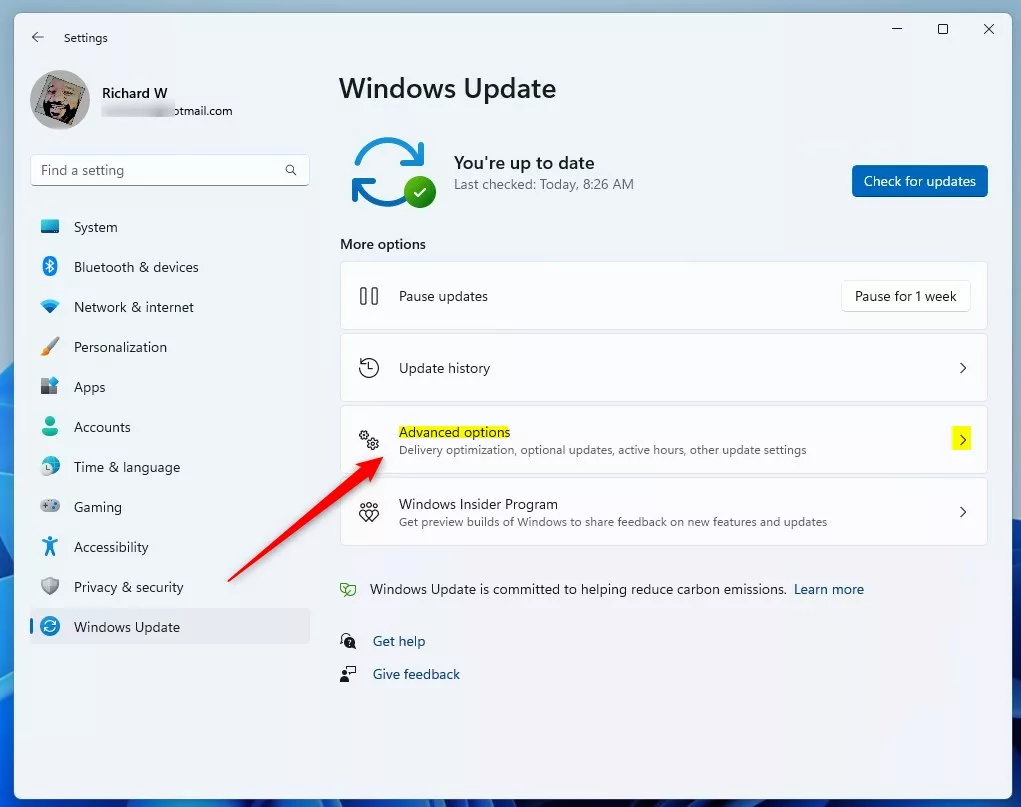
- On the right side, click Advanced options. You may need to scroll down a little to see it.
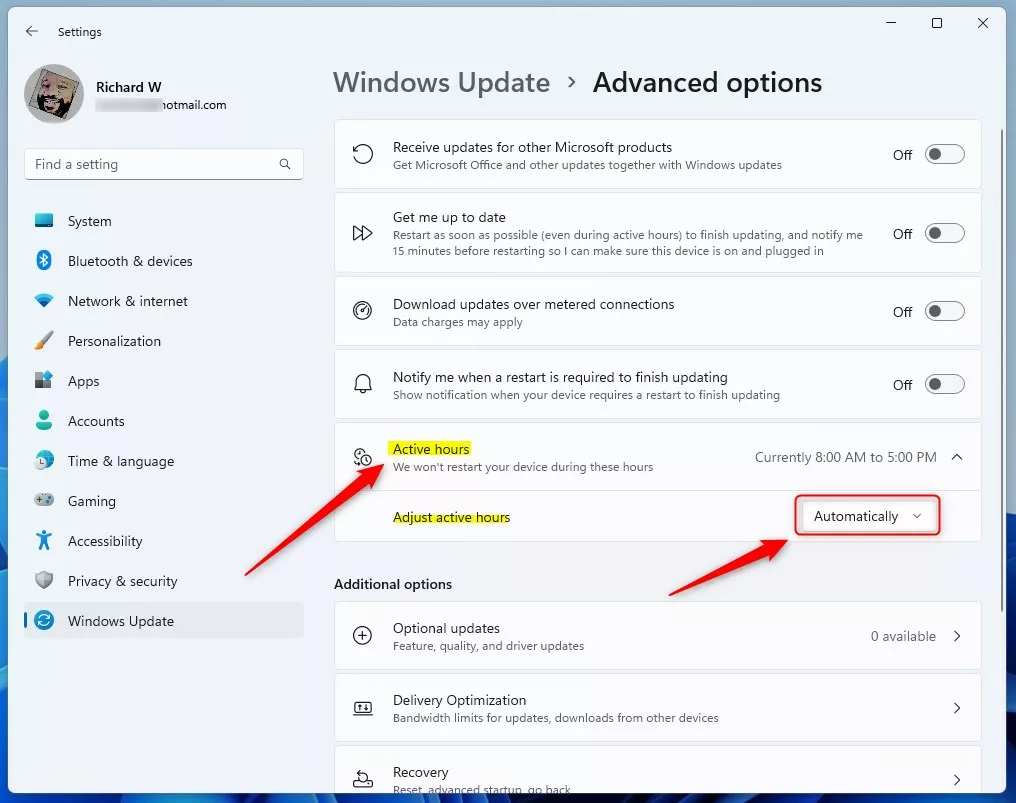
- Find the section called Active hours and click it to expand it.
- Look for the option that says Automatically adjust active hours for this device based on activity.
Use the dropdown menu to select On if you want Windows to set your active hours automatically, or Off if you want to set them yourself. If you choose the manual option, Windows shows start and end times that you can change.
If you don’t see the option, install any pending updates and check again. Menu layouts can differ slightly between Windows 11 versions. If your PC is managed by an employer or school, an administrator may control this setting, and your choice can be locked or reset.
Closing the configuration window saves the changes automatically. Background update services immediately apply the new scheduling rules. You don’t need to restart the PC or click a Save button for this method.
How to Turn On or Off Automatically Adjust Active Hours Using Registry Editor (Advanced)
You can manage Windows 11 active hours with the Registry Editor (a tool for changing advanced system settings) if you prefer not to use the main settings menu. Press Win+R, type regedit, and press Enter to open the registry tool and update the system values. This method needs an administrator account.
In Registry Editor, choose File Export, pick All as the export range, and save the file somewhere safe. To restore it later, double-click the saved file. Creating a System Restore point first is also a good idea.
- Open the Registry Editor:
- Press Windows key + R to open the Run box.
- Type
regeditand press Enter. - If a User Account Control window pops up, click Yes to allow. The Registry Editor window should now open.
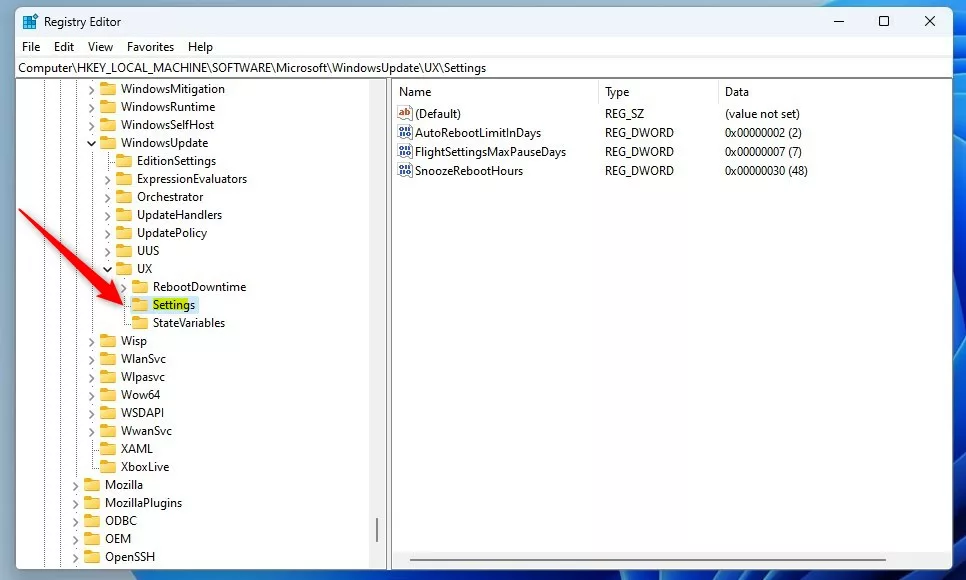
- Navigate to this key path. You can expand the folders in the left pane, or paste the path into the address bar at the top of the window:
HKEY_LOCAL_MACHINE\SOFTWARE\Microsoft\WindowsUpdate\UX\Settings - If the Settings folder is missing inside UX, right-click UX, choose New Key, and name it Settings.
- Now, inside the Settings folder, right-click an empty area on the right side and choose New DWORD (32-bit) Value. A new entry appears with its name highlighted for editing.
- Name the new DWORD value: SmartActiveHoursState
- Double-click SmartActiveHoursState and set the Base to Decimal.
Then, enter the value:- 1 to turn On Automatically Adjust Active Hours
- 0 to turn Off Automatically Adjust Active Hours
- Click OK to save. The new value should now show in the right pane.
- Close the Registry Editor and restart your computer for the change to take effect.
You can also right-click SmartActiveHoursState and delete it, or import the backup you made earlier.

Summary
- Automatically Adjust Active Hours helps Windows choose when to avoid restarting your PC during the times you use it most.
- You can turn this feature on or off in Windows Settings, or with the Registry Editor if you prefer. Settings applies the change at once. The registry method needs a restart.
- Using this feature helps keep your computer updated without interrupting your work.
- Follow the steps above to control how Windows handles your update restarts, and switch to manual hours if your schedule changes often.
Windows 11 active hours help prevent unexpected system reboots by letting your PC know when you are actively using it. You can manage this feature through the main Settings app or by changing values in the Registry Editor, so your computer stays updated without interruptions.
Have a question about this guide?
Answered by AI from this guide. Good questions may be added to this page — please don't include personal details.
Did this guide fix your problem?

About the Author
Richard
Tech Writer, IT Professional
Richard is a writer at Geek Rewind who turns complex IT tasks into clear, step-by-step guides. He draws on years of hands-on experience in system administration and enterprise IT operations, focusing on Windows, Linux and WordPress: the problems people actually run into, and the fixes that work. His server and WordPress guides come from systems he runs himself. Richard builds and maintains the platform behind Geek Rewind, from its Ubuntu servers and Nginx configuration to its custom WordPress plugins. Many new tutorials start with readers' questions, and he's always glad to answer them in the comments.
No comments yet — be the first to share your thoughts!