
Installing Nextcloud with WSL on Windows 11 lets you run a full Linux environment directly on your PC for self-hosted file sharing.
Nextcloud offers a private alternative to cloud storage services, letting you sync and share your files securely. The Windows Subsystem for Linux (WSL) allows you to run Linux applications like Nextcloud without needing a separate virtual machine.
This setup specifically uses WSL2, which provides better performance for Linux programs on Windows 11.
Install WSL by opening an administrator Command Prompt and running wsl –install, then restart your computer. After rebooting, open Command Prompt again and run wsl –install -d followed by your chosen Linux distribution name, like ‘ubuntu-20.04’.
Install Windows Subsystem for Linux in 🪟 Windows 11
Installing the Windows Subsystem for Linux (WSL) on Windows 11 lets you run Linux programs directly on your PC. To start, open Command Prompt as an administrator by searching for it in the Start menu, then right-clicking and choosing ‘Run as administrator’. This prepares your system to run Linux.
Next, right-click the Command Prompt app and choose to Run as administrator.

When the console opens, run the commands below to install Windows Subsystem for Linux (WSL):
wsl --install
Wait for WSL to be installed.
After installing, you should get a success message similar to the lines below:
Installing: Virtual Machine Platform
Virtual Machine Platform has been installed.
Installing: Windows Subsystem for Linux
Windows Subsystem for Linux has been installed.
Downloading: WSL Kernel
Installing: WSL Kernel
WSL Kernel has been installed.
Downloading: GUI App Support
Installing: GUI App Support
GUI App Support has been installed.
Downloading: Ubuntu
The requested operation is successful. Changes will not be effective until the system is rebooted.
Restart your computer.
WSL should be installed and ready to use. When you want to update, run the commands below:
wsl --update
Install Specific Linux distro on 🪟 Windows 11
After installing WSL on Windows 11, you can choose a Linux distribution. Open your administrator Command Prompt and type ‘wsl –list –online’ to see all available options. This command shows you the names of the Linux systems you can install, letting you pick the one you want.
wsl --list --online
You should then see all available distributions that can be installed on WSL.
NAME            FRIENDLY NAME
Ubuntu          Ubuntu
Debian          Debian GNU/Linux
kali-linux      Kali Linux Rolling
openSUSE-42     openSUSE Leap 42
SLES-12         SUSE Linux Enterprise Server v12
Ubuntu-16.04    Ubuntu 16.04 LTS
Ubuntu-18.04    Ubuntu 18.04 LTS
Ubuntu-20.04    Ubuntu 20.04 LTS
To install a Linux distribution from the list above, simply run the commands below using the distribution name. For example, to install Ubuntu 20.04, run the commands below:
wsl --install -d ubuntu-20.04You should then get a message that the distribution is installed.
Downloading: Ubuntu 20.04 LTS
Installing: Ubuntu 20.04 LTS
Ubuntu 20.04 LTS has been installed.
Launching Ubuntu 20.04 LTS.
After installing, you should get a Ubuntu command console with setup details.
Installing, this may take a few minutes.
Please create a default UNIX user account. The username does not need to match your Windows username.
For more information visit: https://aka.ms/wslusers
Enter new UNIX username: Richard
New password:
Retype new password:
passwd: password updated successfully
Installation successful!
To run a command as administrator (user "root"), use "sudo <command>".
See "man sudo_root" for details.

Welcome to Ubuntu 20.04 LTS (GNU/Linux 4.4.0-22000-Microsoft x86_64)
Some troubleshooting commands to run when you run into issues.
wsl --set-default-version 1
bcdedit /set hypervisorlaunchtype auto start
Install Apache HTTP Server
Apache is a web server that Nextcloud needs to function. To install it on your Ubuntu WSL, open your Linux terminal. First, run ‘sudo apt update’ to refresh your software list, then run ‘sudo apt install apache2’ to install the Apache server software.
To install Apache on Ubuntu, run the commands below:
sudo apt update
sudo apt install apache2
After installing Apache2, the commands below can be used to stop, start and restart Apache2 services.
sudo service apache2 stop
sudo service apache2 start
sudo service apache2 restart
To validate that Apache is installed and functioning, open your web browser and browse to the server’s hostname or IP address.
You should get a test page if everything works.
http://localhost

Install MariaDB Database Server
Nextcloud requires a database to store its information, and MariaDB is a good option. To install MariaDB on your Ubuntu WSL, open your Linux terminal and type the command ‘sudo apt-get install mariadb-server mariadb-client’. This installs both the database server and the tools to manage it.
MariaDB is a truly open-source database server you can run with your projects. It is fast, secure, and the default server for almost all Linux.
To install MariaDB, run the commands below:
sudo apt-get install mariadb-server mariadb-client
After installing MariaDB, the commands below can be used to stop, start, and restart MariaDB services.
sudo service mysql stop
sudo service mysql start
sudo service mysql restart
sudo mysql_secure_installation
When prompted, answer the questions below by following the guide.
- Enter current password for root (enter for none): Just press the Enter
- Set root password? [Y/n]: Y
- New password: Enter password
- Re-enter new password: Repeat password
- Remove anonymous users? [Y/n]: Y
- Disallow root login remotely? [Y/n]: Y
- Remove test database and access to it? [Y/n]: Y
- Reload privilege tables now? [Y/n]: Y
To verify and validate that MariaDB is installed and working, log in to the database console using the commands below:
sudo mysql -u root -p
Type the root password when prompted.
Welcome to the MariaDB monitor.  Commands end with ; or g.
Your MariaDB connection id is 46
Server version: 10.3.29-MariaDB-0ubuntu0.20.04.1 Ubuntu 20.04
Copyright (c) 2000, 2018, Oracle, MariaDB Corporation Ab and others.
Type 'help;' or 'h' for help. Type 'c' to clear the current input statement.
MariaDB [(none)]>
The server was successfully installed if you see a similar screen.
Install PHP and Related Modules
PHP is essential for Nextcloud as it connects different software parts. To install PHP and the modules Nextcloud needs, open your terminal. Run the command ‘sudo apt install php libapache2-mod-php php-imagick php-imap php-json php-ldap php-common php-pgsql php-ssh2 php-sqlite3 php-xml php-mysql php’.
To install PHP and recommended modules, run the commands below.
sudo apt install php libapache2-mod-php php-imagick php-imap php-json php-ldap php-common php-pgsql php-ssh2 php-sqlite3 php-xml php-mysql php-gmp php-curl php-intl php7.4-mbstring php-xmlrpc php-gd php-xml php-cli php-zip
That should get PHP installed with recommended PHP modules that you can run with many PHP-based applications.
To validate that PHP is installed, run the commands below:
php -v
You should see an output like the one below:
PHP 7.4.3 (cli) (built: Oct  6 2020 15:47:56) ( NTS )
Copyright (c) The PHP Group
Zend Engine v3.4.0, Copyright (c) Zend Technologies
with Zend OPcache v7.4.3, Copyright (c), by Zend Technologies
You can also test with a test PHP script and display the installed version and related modules that are enabled or disabled.
To do that, run the commands below to create a PHP test file called phpinfo.php
sudo nano /var/www/html/phpinfo.php
Then, type the content below and save the file.
<?php phpinfo( ); ?>
Save the file.
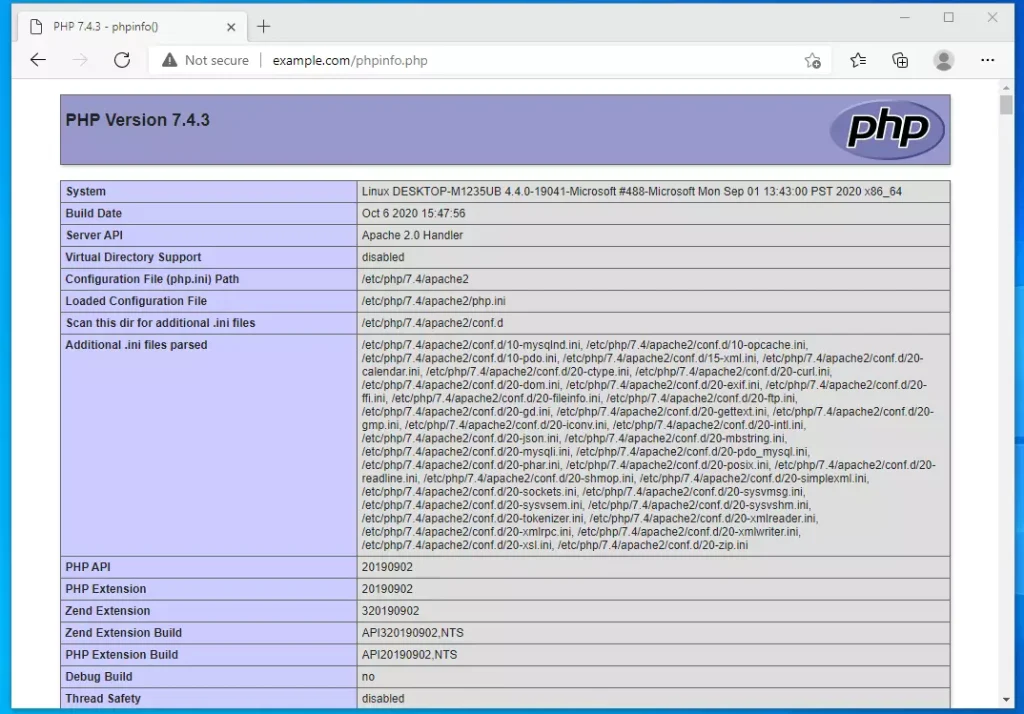
Open your browser and browse to your server hostname followed by phpinfo.php
Restart Apache, then type the address and browse the file.
http://example.com/phpinfo.php
You should see the PHP default test page.
At this stage, all required components that Nextcloud needs are installed above. Continue below to download and configure Nextcloud settings.
Create Nextcloud Database
After installing the necessary software, you need to create a database for Nextcloud. Log into the MariaDB server using ‘sudo mysql -u root -p’. Once logged in, type ‘CREATE DATABASE nextcloud;’ to create the database where Nextcloud will store its data.
sudo mysql -u root -p
Then, create a database called nextcloud
CREATE DATABASE nextcloud;Create a database user called nextclouduser with a new password
CREATE USER 'nextclouduser'@'localhost' IDENTIFIED BY 'new_password_here';
Then, grant the user full access to the database.
GRANT ALL ON nextcloud.* TO 'nextclouduser'@'localhost' WITH GRANT OPTION;
Finally, save your changes and exit.
FLUSH PRIVILEGES;
EXIT;
Download Nextcloud
Downloading the latest stable Nextcloud version is the next step for your personal cloud storage. Use the command ‘wget https://download.nextcloud.com/server/releases/nextcloud-21.0.2.zip -P /tmp’ to download it. Then, unzip it into your web server’s directory using ‘sudo unzip /tmp/nextcloud-21.0.2.zip -d /var/www’.
When writing this article, the latest stable version of Nextcloud is version 21.0.2. Make sure to visit the Nextcloud download page and check if a new version of Nextcloud is available.
wget https://download.nextcloud.com/server/releases/nextcloud-21.0.2.zip -P /tmp
sudo unzip /tmp/nextcloud-21.0.2.zip  -d /var/www
Then, run the commands below to set the correct permissions for Nextcloud to function.
sudo chown -R www-data:www-data /var/www/nextcloud/
sudo chmod -R 755 /var/www/nextcloud/
Configure Nextcloud Site
Configuring the Apache2 site file tells your web server how to handle requests for your Nextcloud setup. Create a new configuration file by running ‘sudo nano /etc/apache2/sites-available/nextcloud.conf’. You will then paste the necessary configuration details into this file.
sudo nano /etc/apache2/sites-available/nextcloud.conf
Then copy and paste the content below into the file and save it. Replace the highlighted line with your domain name and directory root location.
<VirtualHost *:80>
     ServerAdmin admin@example.com
     DocumentRoot /var/www/nextcloud/
     ServerName example.com
     ServerAlias www.example.com

     Alias /nextcloud "/var/www/nextcloud/"

     <Directory /var/www/nextcloud/>
        Options +FollowSymlinks
        AllowOverride All
        Require all granted
          <IfModule mod_dav.c>
            Dav off
          </IfModule>
        SetEnv HOME /var/www/nextcloud
        SetEnv HTTP_HOME /var/www/nextcloud
     </Directory>

     ErrorLog ${APACHE_LOG_DIR}/error.log
     CustomLog ${APACHE_LOG_DIR}/access.log combined

</VirtualHost>
Save the file and exit.
Nextcloud's VirtualHost requires activation. You can enable the VirtualHost by running the commands provided, which also activate other necessary modules for Nextcloud.
sudo a2ensite nextcloud.conf
sudo a2enmod rewrite
sudo a2enmod headers
sudo a2enmod env
sudo a2enmod dir
sudo a2enmod mime
When you’re done, restart Apache.
sudo service apache2 restart
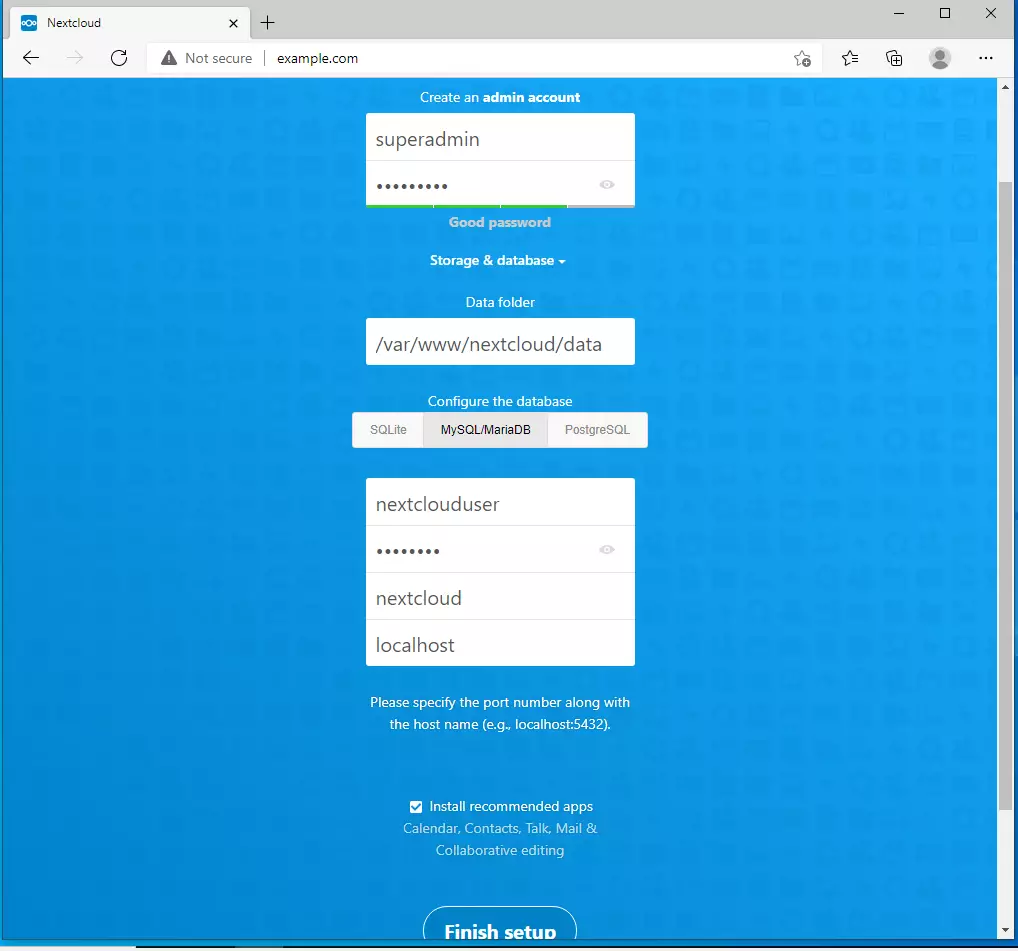
Now browse the server hostname or IP address and set up the Nextcloud platform.
http://example.com
Create an admin account, enter the database details, and finish the installation.
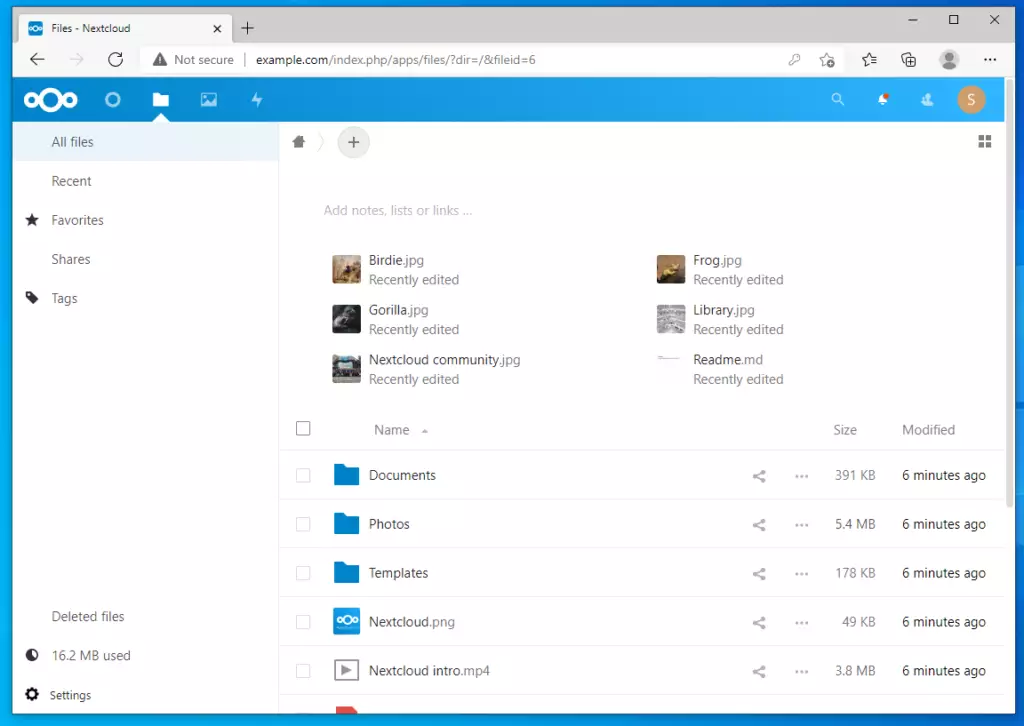
Log in with the account you create above and start building your environment.
Conclusion:
This post showed you how to install Nextcloud in Windows WSL. If you find any error above, please use the comment form below to report.
Was this guide helpful?

About the Author
Richard
Tech Writer, IT Professional
Richard, a writer for Geek Rewind, is a tech enthusiast who loves breaking down complex IT topics into simple, easy-to-understand ideas. With years of hands-on experience in system administration and enterprise IT operations, he’s developed a knack for offering practical tips and solutions. Richard aims to make technology more accessible and actionable. He's deeply committed to the Geek Rewind community, always ready to answer questions and engage in discussions.


Hello,
thanks for this descreption.
Only one problem. I could not unzip the nextcloud package.
sudo unzip /tmp/nextcloud-21.0.2.zip -d /var/www
crashed
So I installed the ZIP Package then the rest of the installation had no problems.
Question: In the last step I selected the wrong database now NextCloud runs with SQL Lite. Is there a possibility to change it?
Not sure why it would crash. If you select the wrong database connection, you can rerun the installation. Delete the content in the /var/www/ and and extract new archived content there.
Thanks,
need to install zip unzip and it will work.
Error while trying to create admin user: Failed to connect to the database: An exception occurred in the driver: SQLSTATE[HY000] [2002] No such file or directory
Unfortunately, it doesn’t work. The installation went through without errors. In the step “Now browse to the server hostname or IP address and begin setting up the Nextcloud platform.” the default page “Apache2 Default Page” opens.
It’s already working. What was missing from the tutorial was the information to remove the sample Apache configuration file referencing the same port (or port change).