How to Get Custom Themes in Windows 11 Settings Personalization

A Windows 11 theme bundles your desktop background, accent color, sounds, and mouse pointer into one package. You can apply a ready-made theme, build your own from individual settings, save it, share it as a file, or delete it when you no longer want it. This guide covers each of those, plus the separate Accessibility options for contrast themes and color filters.
Open Settings , select Personalization, click Themes, then click Browse themes to access the Microsoft Store where you can download custom themes. Once downloaded, they appear in your theme grid and you can apply them immediately.
Apply a theme
To apply a theme in Windows 11, open Settings , select Personalization, click Themes, and pick a thumbnail in the grid. This changes your desktop background, accent color, sounds, and mouse cursor all at once. The theme can be pre-installed or one you downloaded.
- Open Settings by pressing the Win and selecting the gear icon. You can also press Win+I.

Windows 11 Start menu with Settings gear icon highlighted. The Settings window opens with a list of categories on the left.
- Select Personalization from the left sidebar.
- Click Themes.
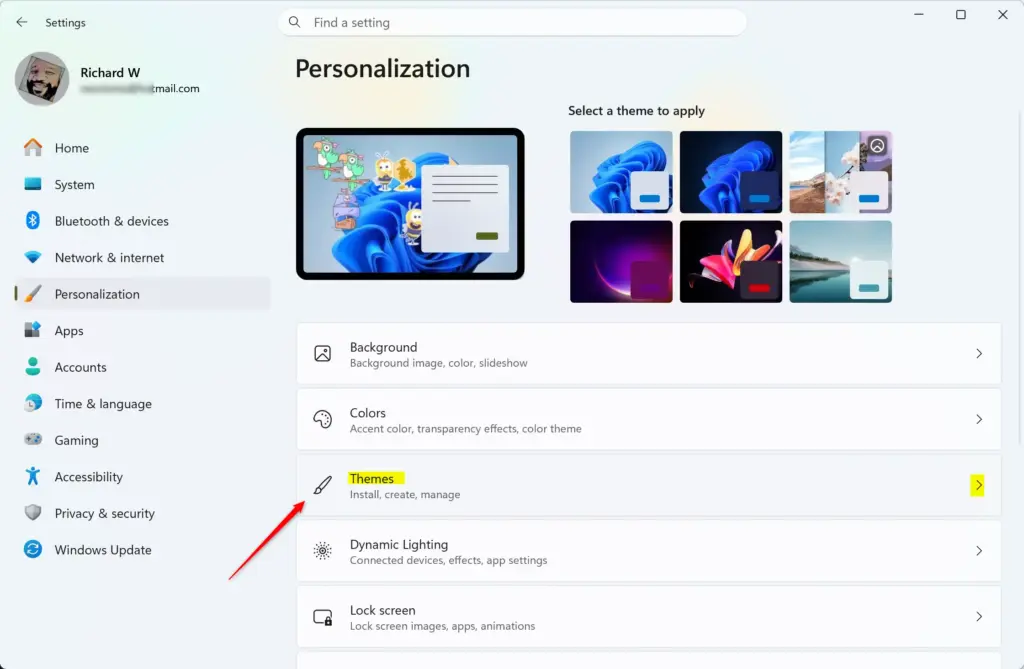
Settings › Personalization › Themes You should see a Current theme area at the top, with buttons for Background, Colors, Sounds, and Mouse cursor. Below it is a grid of theme thumbnails.
- Click any theme thumbnail in the grid.
The theme applies right away. Your wallpaper, accent color, sounds, and cursor change without a restart. If you do not like the result, click a different thumbnail to switch.
If you want more choices than the built-in set, use the Browse themes button on the same page. It opens the Microsoft Store, where you can download more themes. Once downloaded, they show up in the grid.
Customize and share a theme
You can build your own look by changing each visual element separately, then packaging the result into a theme you can reuse or share.
Save a theme
To save a custom theme in Windows 11, change your background, colors, sounds, and mouse cursor under Personalization and Themes, then click the Save theme button. This stores your current setup so you can switch back to it later or move it to another computer.
- Open Settings.
- Select Personalization and click Themes.
Settings › Personalization › Themes - Click Background, Colors, Sounds, or Mouse cursor and change each element until your desktop looks the way you want.
Use the back arrow or the Themes breadcrumb at the top to return after each change. Once you have changed something, the current theme usually shows as unsaved or custom.
- Return to the main Themes page and click the Save theme button. On some builds this button is labeled simply Save, next to the current theme.
- Type a descriptive name for your setup and click Save.
Your new theme now appears in the theme grid, and you can apply it again at any time.
Share a theme
To share a theme in Windows 11, open Settings, go to Personalization and Themes, right-click your custom theme, and select Save theme for sharing. This exports your wallpapers, color choices, and sound schemes into a single file. You can send that file to other users or copy it to another PC.
- Open Settings.
- Select Personalization and click Themes.
- Right-click the custom theme you want to export from the list of available options.
A small context menu appears.
- Click Save theme for sharing.
A file save dialog opens.
- Choose a destination folder on your storage drive, type a file name, and click Save.
Windows saves the theme as a single theme pack file. On the other PC, double-click that file and Windows applies the theme and adds it to the grid. The steps are the same on Home and Pro.
Delete a theme
This clears unwanted themes from your Personalization menu and frees up storage used by cached background images.
- Open Settings.
- Select Personalization and click Themes.
- Right-click the theme you want to remove.
If Delete is missing or greyed out, you are probably on the active theme. You cannot delete the active theme or the default Windows themes built into the system. Switch to a different theme first, then try again.
- Click Delete from the context menu.
- Confirm the removal if the system prompts you.⚠️WarningThe thumbnail disappears from the grid.
Deleting cannot be undone from Settings. If you exported the theme earlier, you can double-click that saved file to bring it back.
Color filters and contrast themes
To use contrast themes and color filters in Windows 11, open Settings, click Accessibility, and choose either Contrast themes for high-contrast visual styles or Color filters for color blindness adjustments. These options make text and application windows easier to read if you have eye strain or a vision condition. They are separate from the regular themes above.
- Open Settings.
- Select Accessibility from the left sidebar.
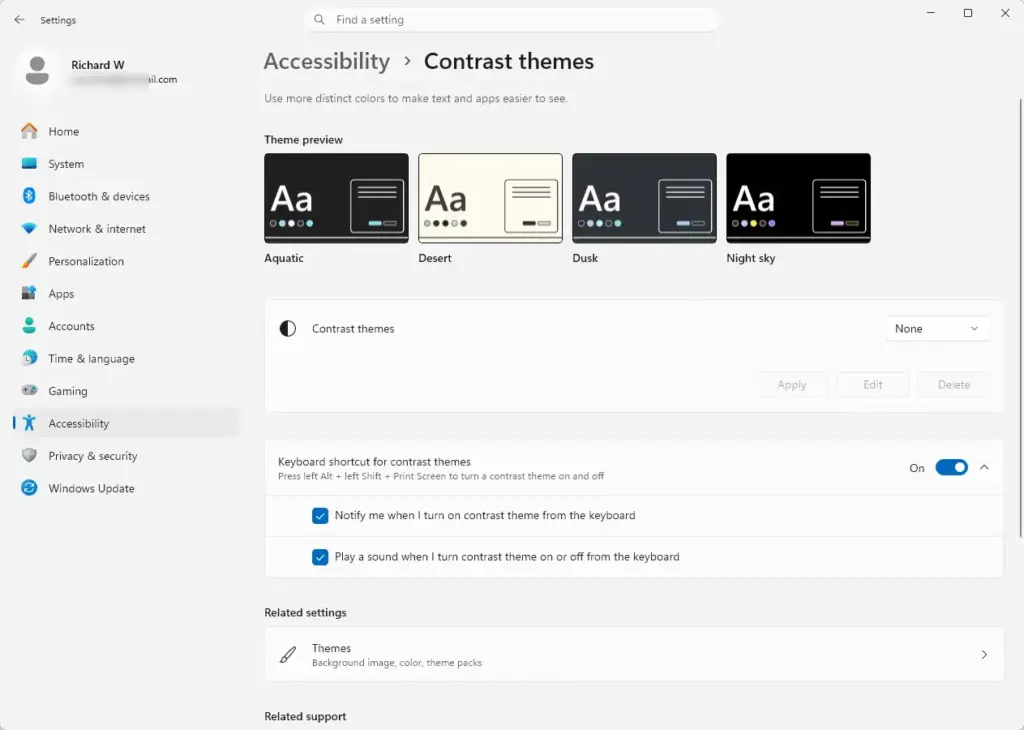
Settings › Accessibility › Contrast themes - Click Contrast themes to choose a high-contrast visual style, or click Color filters to turn on filtering options for color blindness.
- For contrast themes, select your preferred option from the drop-down menu and click Apply.
The screen may go blank for a moment, then return in the new high-contrast colors. To go back, choose None in the same drop-down and click Apply again.
- For color filters, switch the Color filters toggle to On and pick a filter from the list.
The change shows immediately. Switch the toggle to Off to undo it.
What to do next
You should now see your custom visual changes applied across your desktop and be able to manage your themes inside Settings. Next, you can explore how to configure taskbar alignment or customize your lock screen background to match your new desktop look.
Have a question about this guide?
Answered by AI from this guide. Good questions may be added to this page — please don't include personal details.
Did this guide fix your problem?

About the Author
Richard
Tech Writer, IT Professional
Richard is a writer at Geek Rewind who turns complex IT tasks into clear, step-by-step guides. He draws on years of hands-on experience in system administration and enterprise IT operations, focusing on Windows, Linux and WordPress: the problems people actually run into, and the fixes that work. His server and WordPress guides come from systems he runs himself. Richard builds and maintains the platform behind Geek Rewind, from its Ubuntu servers and Nginx configuration to its custom WordPress plugins. Many new tutorials start with readers' questions, and he's always glad to answer them in the comments.
No comments yet — be the first to share your thoughts!