How to Create Your Own High Contrast Theme in Windows 11

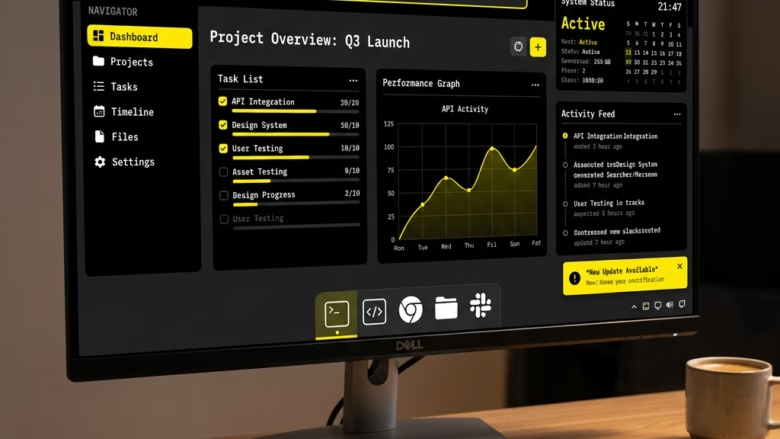
High contrast themes in Windows 11 change the system colors so text, links and buttons stand out sharply from the background. They help with eye strain, glare and low vision, and you can swap the default shades for your own color combinations.
Windows ships with four built-in contrast themes (Aquatic, Desert, Dusk and Night sky). You can use one as it is, or build your own starting from one of them. The settings are the same on Home and Pro, and none of this needs a restart. Everything below starts at Settings Accessibility Contrast themes
Open Settings Accessibility Contrast themes and pick one of the four built-in themes (Aquatic, Desert, Dusk or Night sky) from the dropdown, then click Apply. To build your own, choose a theme, click Edit, and change the colors for Background, Text, Hyperlinks and Button Text. Use Apply to switch the theme on or None to turn it off. No restart is needed.
Getting to the Contrast Theme Settings
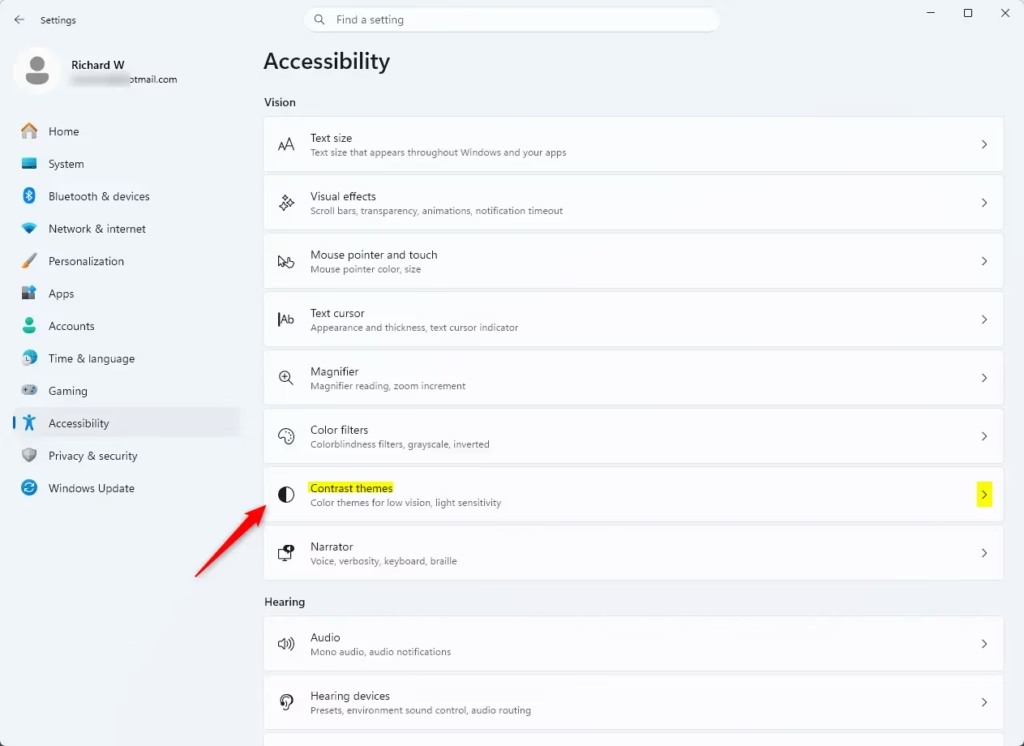
The contrast settings live inside the Accessibility section of the Settings app. This is where you turn the built-in themes on and off, and where you start building a custom one.
- Click the Start button, usually in the bottom-left corner or the center of the taskbar . Then click the gear icon to open Settings. You can also press the Win+I. The Settings window opens.
- Click Accessibility in the left-hand list. The accessibility options appear on the right.
- Click Contrast themes. The contrast settings page opens.
On a work PC, an administrator may have locked some personalization settings. If the options are greyed out, ask your IT team.
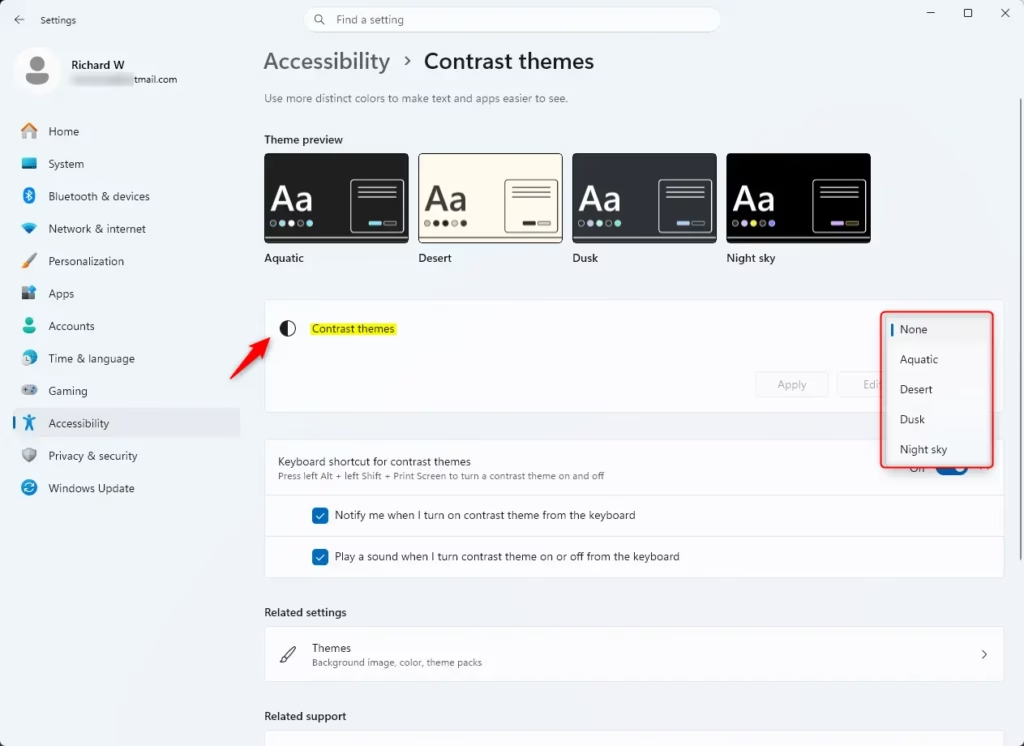
This page has a Contrast themes dropdown with the built-in themes, plus an Apply button and an Edit button. Picking a theme from the dropdown and clicking Apply turns the feature on. Choosing None turns it off.
Quick Tip: You can toggle high contrast from the keyboard. Hold the left Alt key and the left Shift key, then press Print Screen (it may be labelled “PrtScn” or “Print Scrn”). Windows may show a prompt asking whether you want to turn on high contrast. If it does, confirm it. The screen goes blank for a moment, and then the theme switches. This is handy if you switch between normal and high contrast during the day. On some laptops you may also need to hold the Fn key.
Customizing Your Own High Contrast Theme
A custom theme lets you change the individual colors for text, links, buttons and backgrounds so they match what you can see best. You can't build one from scratch. You always start from an existing theme and change its colors.
- On the Contrast themes page, open the Contrast themes dropdown and pick the theme closest to what you want. If none is close, any one will do, because you are going to change the colors anyway.
- Click the Edit button below the dropdown. The color editing panel opens, showing the colors of the theme you picked.
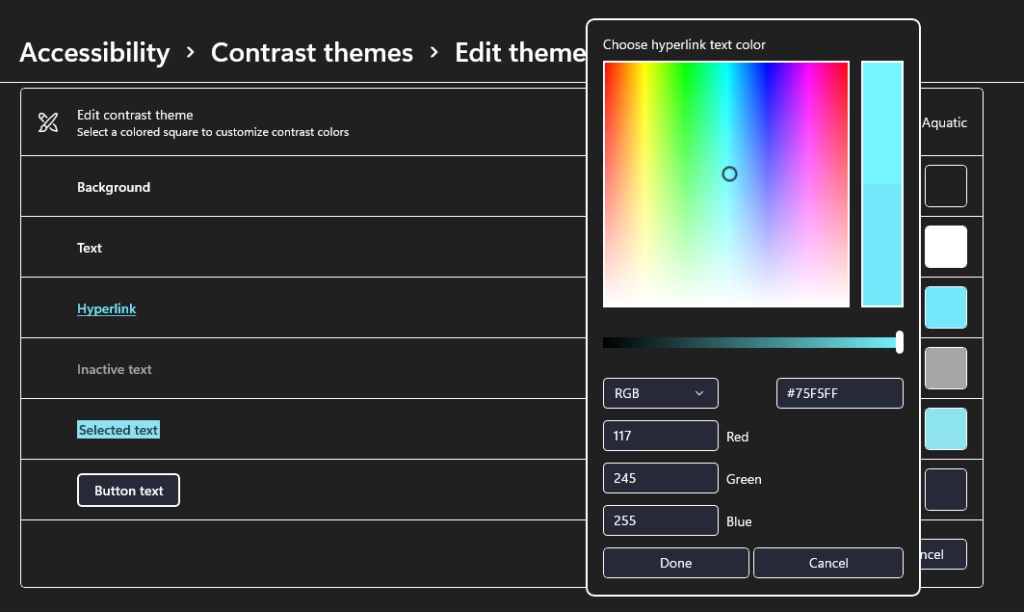
The panel lists these screen elements. Each one has its own color box:
- Background: The color of most windows and the desktop.
- Text: The color of normal text, like in documents or on websites.
- Hyperlinks: The color of links on the web.
- Inactive Text: The color for text that is not active or is grayed out. Some Windows 11 builds label this one "Disabled text".
- Selected Text: The color used when you highlight text or choose an item in a list. For example, if you select text in a Word document, this is the color of that selection.
- Button Text: The color of the text on buttons.
Now set the colors, one element at a time:
- Click the colored box next to the element you want to change. A color palette opens.
- Click a color in the palette to choose it.
- Use the slider below the palette to make the color brighter or less bright.
- Click Done. You return to the list, and the box shows your new color.
- Repeat for each remaining element.
The key rule is that text must stand out clearly from its background. Bright yellow text on a black background is the classic high contrast choice. Avoid pairing two colors of similar brightness, such as red on green. They can blur together even when they look different at first glance. Keep Hyperlinks clearly different from plain Text, and keep Selected Text readable against the selection color.
Practical Tip: Test as you go. Change one element, click Done, and click Apply to see the result right away. It is much easier to fix one bad color than to find it among six.
Saving Your Custom Theme
Without saving, your edits are lost when you change to another theme.
- After you click Done on the last color, you are back on the main Contrast themes screen. Click Save as. A box asks for a name.
- Type a clear name, like "My Bright Text Theme" or "Easy Reader". A name that describes the colors helps if you build more than one.
- Click Save. The theme is added to the list.
- Check that your new theme is selected in the Contrast themes dropdown, then click Apply. Windows shows a short "Please wait" screen, and then your colors appear.
A saved theme takes effect as soon as you apply it. To switch between your saved themes later, go back to the same page and pick one from the dropdown. Your custom themes are listed there with the built-in ones.
Important Note: If you do a long editing session, save along the way. Click Save as and use incremental names such as "My Theme v2", so you can go back to an earlier version if a change doesn't work out.
Turning Off High Contrast Mode
Turning off high contrast takes you back to the normal Windows colors. Your saved custom themes are not deleted. They stay in the list so you can turn them on again.
- Open Settings (Start button > gear icon, or Windows key + I).
- Click Accessibility.
- Click Contrast themes.
- Open the Contrast themes dropdown and select None.
- Click Apply.
Windows shows a "Please wait" screen for a few seconds while the default colors reload. Then the standard light or dark appearance returns.
Remember the Shortcut: Left Alt + left Shift + Print Screen turns high contrast off just as easily as it turns it on. If the screen is hard to read and you can't navigate the menus, use the shortcut first.
Reference:
https://support.microsoft.com/en-us/accessibility/windows/change-color-contrast-in-windows
Summary
A custom high contrast theme makes day-to-day use of your PC more comfortable. Choosing your own colors lets you reduce eye strain and work around vision limits instead of putting up with the defaults. Try a few palette combinations over several days, and keep the one that is easiest on your eyes. You can always switch back with None or the keyboard shortcut.
Frequently asked questions
How do I turn on high contrast mode in 🪟 Windows 11?
Open Settings, go to Accessibility, then select Contrast themes. You'll see four built-in high contrast options. Click the one you want, then toggle the switch on. Your screen colors will change immediately to make text and buttons stand out more clearly.
Where can I download 🪟 Windows 7 themes for my PC?
Windows 7 themes aren't officially supported in modern Windows versions. However, you can download third-party themes from websites like DeviantArt or WinCustomize, though installation requires manual file placement and carries security risks. Built-in Windows 11 themes are safer and easier to use.
How to make 🪟 Windows 11 dark theme?
Open Settings, go to Personalization, then select Colors. Choose Dark from the dropdown menu next to "Choose your mode." Windows will switch your entire interface to dark colors. You can also set it to follow your system time automatically.
What are some ideas for contrast themes?
Try pairing dark backgrounds with bright text colors like white, yellow, or lime green for maximum contrast. Consider blue text on yellow, or reverse combinations like black text on white. Test each combination for readability and comfort during extended screen time before settling on your choice.
Still have a question?
Answered by AI from this guide. Good questions may be added to this page — please don't include personal details.
Did this guide fix your problem?

About the Author
Richard
Tech Writer, IT Professional
Richard is a writer at Geek Rewind who turns complex IT tasks into clear, step-by-step guides. He draws on years of hands-on experience in system administration and enterprise IT operations, focusing on Windows, Linux and WordPress: the problems people actually run into, and the fixes that work. His server and WordPress guides come from systems he runs himself. Richard builds and maintains the platform behind Geek Rewind, from its Ubuntu servers and Nginx configuration to its custom WordPress plugins. Many new tutorials start with readers' questions, and he's always glad to answer them in the comments.
No comments yet — be the first to share your thoughts!