How to Enable Passkey Managers on Windows 11

Passkeys in Windows 11 replace traditional passwords with secure digital credentials tied to your fingerprint, face scan, or PIN. You sign in to supported websites and apps by confirming it’s you on your PC, so there is nothing to type and nothing to remember.
You can store and manage these credentials directly on your PC, or sync them across devices with a password manager such as 1Password or Bitwarden. Windows Hello handles the on-device side. Because a passkey never leaves your device as a typed secret, there is no password for an attacker to steal in a phishing attempt or guess. This guide shows where the setting lives and how to switch it on or off.
Go to Settings Accounts Passkey settings. Click Advanced options and use the switch to turn saving passkeys on or off. This allows you to manage whether Windows saves your passkeys or if a third-party manager handles them.
What are Passkeys?
A passkey is a digital credential that replaces a password. Instead of typing a secret, you approve the sign-in with your fingerprint, face scan, or PIN. When you set up passkeys on Windows 11 with Windows Hello (the biometric and PIN sign-in feature built into Windows), your device stores them securely. That protects your online accounts from theft and guessing.
Under the hood, a passkey is a pair of cryptographic keys. The website holds the public half, and your device keeps the private half locked behind Windows Hello. A fake site can’t trick you into handing it over, because there is nothing for you to type.
When you use Windows Hello, your passkeys are typically saved directly on your device. This allows for quick sign-ins using your face, fingerprint, or PIN. Windows Hello works with whichever method you have already set up, including a PIN on a PC with no camera or fingerprint reader.
One thing to keep in mind: a passkey saved only on this PC is tied to this PC. If you want the same passkeys on your phone or another computer, a third-party manager that syncs between devices is the usual answer.
Windows 11 also supports third-party tools like 1Password or Bitwarden for managing passkeys. These apps keep your passkeys in their own vault and can sync them across your devices.
Third-party passkey support depends on your Windows 11 build and on the manager itself. You need a recent, fully updated version of Windows 11, and the manager app or browser extension must be a version that supports passkeys on Windows. If you don't see the option later in this guide, run Windows Update first and then update the manager.
Windows leaves passkey saving active by default. Integrating a third-party manager gives you control to turn that feature on or off.
The reason to turn it off is simple. If Windows and your manager both offer to save a passkey, you can end up with some passkeys in one place and some in the other. Pick one home for your passkeys and you will always know where to look. Turning the setting off does not delete passkeys already saved on the device.
How to Turn On or Off Passkey Managers on 🪟 Windows 11
You control passkey saving from the Settings app. The switch decides whether Windows saves your credentials natively or leaves that job to a third-party app. The path is Settings Accounts Passkey settings On some builds the page is labelled Passkeys rather than Passkey settings, so look for either name.
The setting is the same on Windows 11 Home and Pro, and you don't need administrator rights to change it for your own account.
- Open Windows Settings: Click the Start menu (the Windows icon on the taskbar) and select Settings. You can also press Windows key + I to open it directly. The Settings window opens with a list of categories down the left side.
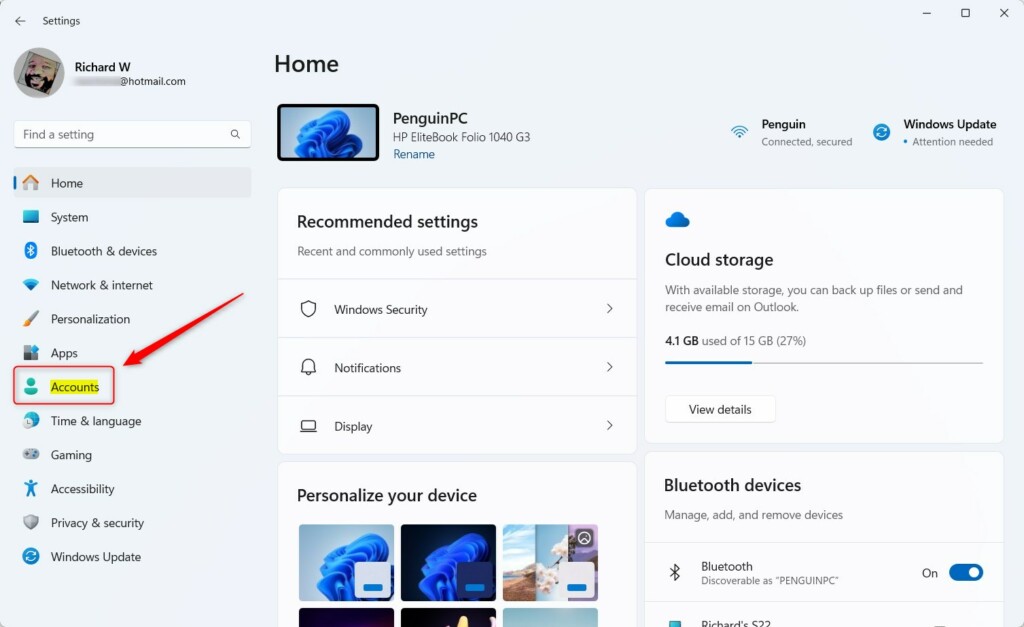
- Go to Accounts: In the Settings window, click Accounts in the left-hand list. The right side now shows your account details and sign-in related options.
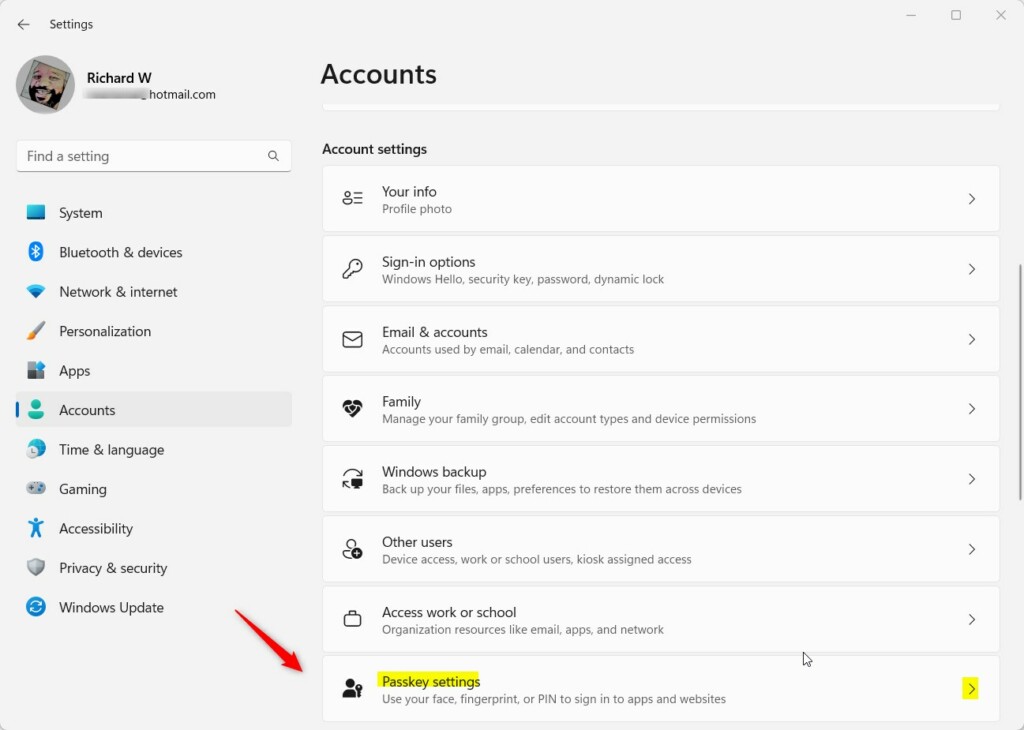
- Find Passkey Settings: On the right side, look for the Passkey settings box (it may read Passkeys on your build) and click it. The passkey page opens. If you can't find it, scroll down the Accounts page, and if it still isn't there, check Settings Windows Update and install any pending updates.
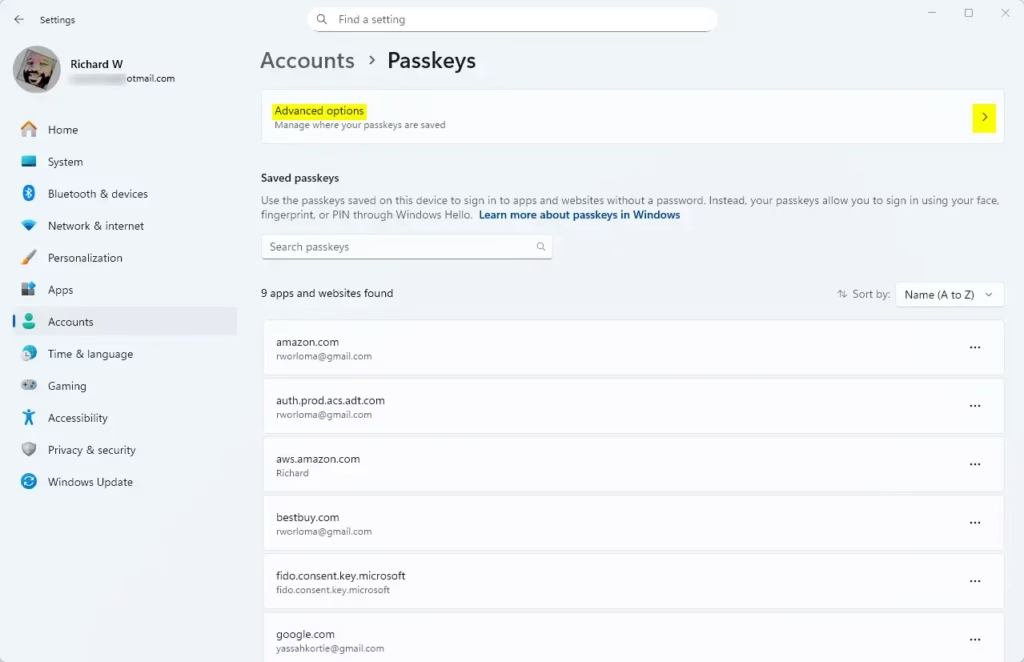
- Open Advanced Options: Inside Passkey settings, click Advanced options. This expands or opens the extra settings, including the switch for saving passkeys.
- Turn Saving Passkeys On or Off: Find the switch for saving passkeys to your device and click it. Set it to On if you want Windows to store passkeys, or Off if a third-party manager will handle them. The switch changes position right away. To undo the change, come back to the same page and click the switch again.
The change normally takes effect immediately. Next time a site offers to create a passkey, check that the prompt comes from the tool you picked. If it still shows the old one, close and reopen your browser.
Use the following screenshots to check each step against your own screen:
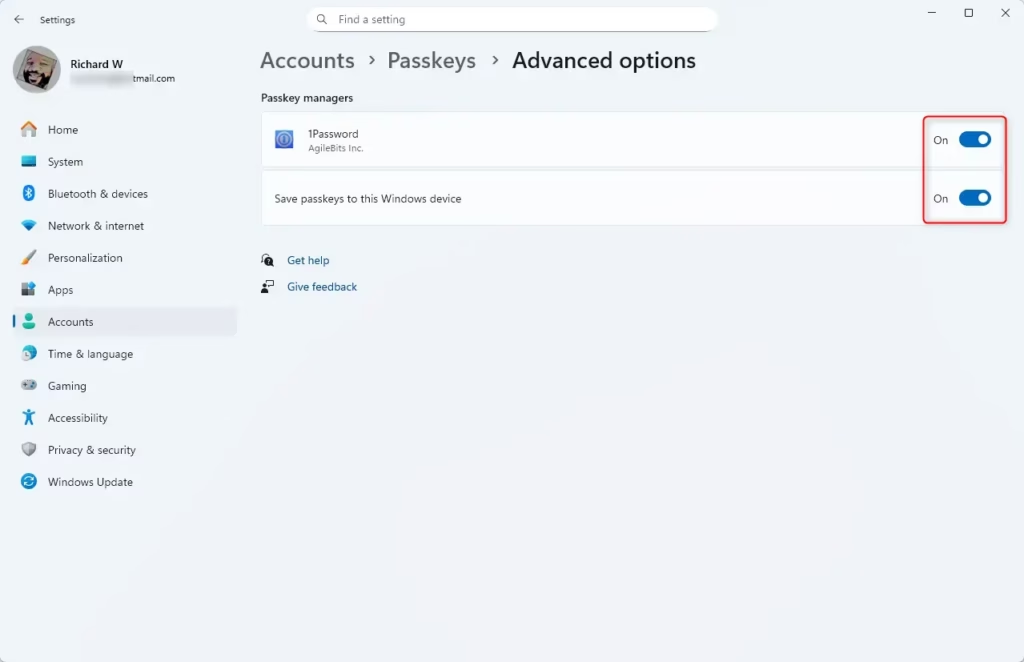
Passkey configurations are now successfully updated. If the switch shows the position you chose, you are done.
Why Use Passkeys?
- Safer than passwords: Passkeys use your face, fingerprint, or PIN instead of typed passwords that can be stolen. They also can't be handed to a fake login page, which is how most phishing works.
- Works with popular apps: You can use tools like 1Password or Bitwarden to keep your passkeys safe and organized, and to carry them between devices.
- Easy to turn on/off: You decide if Windows should save your passkeys or not. This is especially helpful if you use third-party apps and want only one place that stores them.
- Better sign-in experience: Passkeys make signing in faster and smoother. There is no password to type, and no reset emails when you forget one.
- Keep your software updated: For the best security, always keep Windows and your apps up to date. Updates are also what bring newer passkey options, such as third-party manager support, to your PC.
Passkeys are much safer than traditional passwords because they rely on your fingerprint, face scan, or PIN instead of typed words that hackers can steal or guess. They also work with popular apps like 1Password or Bitwarden, which makes it easy to keep your sign-in credentials organized across different devices.
How to sign in with your face on Windows 11
Summary
This walkthrough covered how to configure passkey managers in Windows 11 for faster, safer sign-ins using biometrics or a PIN. You make the change in Settings Accounts Passkey settings Advanced options, and you can reverse it at any time with the same switch. Keep Windows and your passkey manager updated so you get the latest security fixes and passkey features.
Was this guide helpful?

About the Author
Richard
Tech Writer, IT Professional
Richard is a writer at Geek Rewind who turns complex IT tasks into clear, step-by-step guides. He draws on years of hands-on experience in system administration and enterprise IT operations, focusing on Windows, Linux and WordPress: the problems people actually run into, and the fixes that work. His server and WordPress guides come from systems he runs himself. Richard builds and maintains the platform behind Geek Rewind, from its Ubuntu servers and Nginx configuration to its custom WordPress plugins. Many new tutorials start with readers' questions, and he's always glad to answer them in the comments.



No comments yet — be the first to share your thoughts!