How to Enable Recall & Snapshots in Windows 11
This article explains how to turn the new “Recall & Snapshots” feature on or off in Windows 11.
Enable Recall & Snapshots by opening Settings, navigating to Privacy & security, then Recall & snapshots, and toggling “Save snapshots” on. Ensure your Copilot+ PC meets the minimum requirements of 16GB RAM and 50GB free storage.
What is Recall & Snapshots?
Windows 11 Recall & Snapshots is a new feature that acts like your computer’s memory, automatically taking pictures of your screen so you can easily find things you’ve seen before.
Why would you use this? Imagine you saw something on your screen last week but can’t remember where. Recall helps you find it fast.
So, what happens when Recall is active? Your PC will capture a snapshot every five seconds, but it only saves the image if something on your screen has changed. This smart approach helps save storage space.
Do You Meet the Requirements?
Your PC needs these minimum specs to use Recall:
- A Copilot+ PC
- 16 GB RAM
- 8 logical processors
- 256 GB storage capacity
Important: You need at least 50 GB of free storage to start using Recall. Your PC will stop saving snapshots automatically if it drops below 25 GB of free space.
Method 1Turn Recall On or Off Using Settings
You can turn Windows 11 Recall & Snapshots on or off easily using the Settings app by going to Privacy & security and then choosing the Recall & snapshots option.
- Open the Settings app. Click the Start menu and select Settings. Or press the Windows key + I on your keyboard.
- When Settings opens, click Privacy & security on the left side.
- On the right, click Recall & snapshots to open its settings.
- Find the “Save snapshots” tile. Toggle the switch to turn snapshots On or Off.
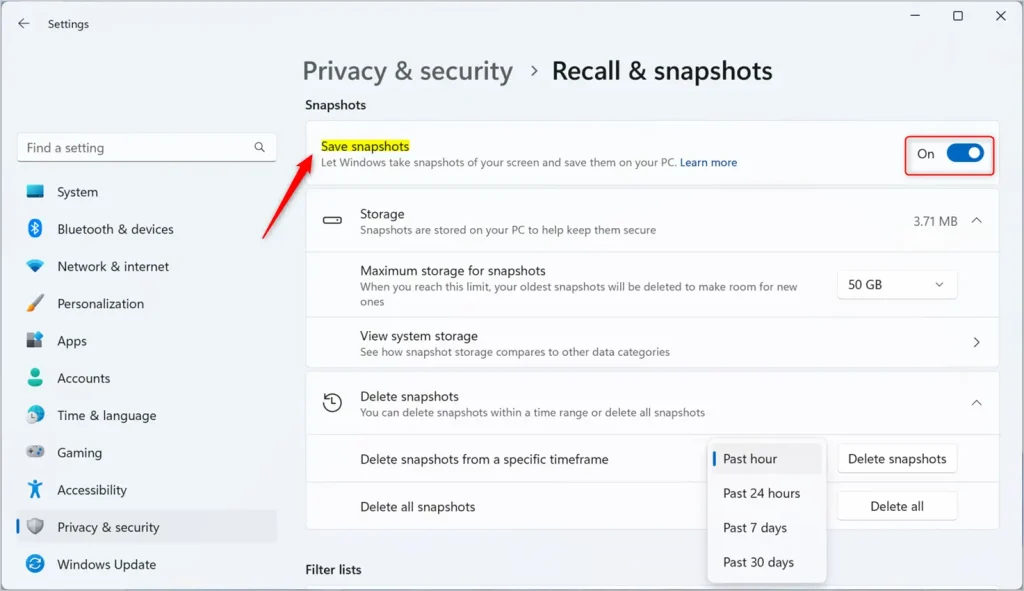
- Close the Settings app when you’re done.
Method 2Turn Recall On or Off Using Group Policy Editor
You can turn off Windows 11 Recall & Snapshots using the Local Group Policy Editor for more control, by going through User Configuration, Administrative Templates, and Windows Components.
- ⚠️ Admin privileges required. Open the Local Group Policy Editor. Search for “Edit group policy” in the Start menu and click it.
- Navigate to these folders in order:
- User Configuration
- Administrative Templates
- Windows Components
- Windows AI
- On the right side, find and double-click “Turn off Saving Snapshots for Windows”.
- A window opens. Choose one of these options:
- Not Configured (default) – Same as Disabled. Snapshots are saved.
- Enabled – Windows stops saving snapshots. You can’t search or browse your activity history.
- Disabled – Windows saves snapshots. You can search and browse your activity history.
- Click OK to save your changes.
- You may need to restart your PC for the changes to take effect.
Summary
Windows 11 Recall & Snapshots is a helpful feature that automatically saves pictures of your screen, letting you search for past content, and it can be turned on or off through Settings or Group Policy Editor.
Reference: Microsoft
How do I turn off Recall and snapshots in 🪟 Windows 11?
You can turn on or off saving snapshots at any time by going to Settings > Privacy & security > Recall & snapshots.
Was this guide helpful?

About the Author
Richard
Tech Writer, IT Professional
Richard, a writer for Geek Rewind, is a tech enthusiast who loves breaking down complex IT topics into simple, easy-to-understand ideas. With years of hands-on experience in system administration and enterprise IT operations, he’s developed a knack for offering practical tips and solutions. Richard aims to make technology more accessible and actionable. He's deeply committed to the Geek Rewind community, always ready to answer questions and engage in discussions.

[…] Recall & Snapshots is an AI feature in Windows 11 that functions like a photographic memory by saving snapshots of your screen. You can then use the Recall feature to quickly search your snapshots and find things you’ve seen on your PC. […]
[…] Recall & Snapshots is an AI feature in Windows 11 that functions like a photographic memory by saving snapshots of your screen. You can then use the Recall feature to quickly search your snapshots and find things you’ve seen on your PC. […]
[…] Recall & Snapshots is an AI feature in Windows 11 that functions like a photographic memory by saving snapshots of your screen. You can then use the Recall feature to quickly search your snapshots and find things you’ve seen on your PC. […]
[…] Recall & Snapshots is an AI feature in Windows 11 that functions like a photographic memory by saving snapshots of your screen. You can then use the Recall feature to quickly search your snapshots and find things you’ve seen on your PC. […]
[…] Recall & Snapshots is an AI feature in Windows 11 that functions like a photographic memory by saving snapshots of your screen. You can then use the Recall feature to quickly search your snapshots and find things you’ve seen on your PC. […]
[…] Recall & Snapshots is an AI feature in Windows 11 that functions like a photographic memory by saving snapshots of your screen. You can then use the Recall feature to quickly search your snapshots and find things you’ve seen on your PC. […]
[…] Microsoft announced this spring, you need a Copilot+ PC to use Cocreator. You must also update the Microsoft Paint app to the latest version available in […]
[…] Recall & Snapshots is an AI feature in Windows 11 that functions like a photographic memory by saving snapshots of your screen. You can then use the Recall feature to quickly search your snapshots and find things you’ve seen on your PC. […]
[…] Recall & Snapshots is an AI feature in Windows 11 that functions like a photographic memory by saving snapshots of your screen. You can then use the Recall feature to quickly search your snapshots and find things you’ve seen on your PC. […]
[…] Recall & Snapshots is an AI feature in Windows 11 that functions like a photographic memory by saving snapshots of your screen. You can then use the Recall feature to quickly search your snapshots and find things you’ve seen on your PC. […]
[…] article explains how to enable or disable the Recall feature in Windows […]
[…] Recall & Snapshots is an AI feature in Windows 11 that functions like a photographic memory by saving snapshots of your screen. You can then use the Recall feature to quickly search your snapshots and find things you’ve seen on your PC. […]
[…] Recall & Snapshots is a smart tool in Windows 11 that works like a camera memory. It saves snapshots (pictures) of your screen so you can quickly search and find things you’ve seen on your PC. […]
[…] 11 versions (build 26120.2415 and later) and is mainly available on special Windows devices called Copilot+ PCs (powered by Snapdragon […]
[…] Recall & Snapshots is a cool AI feature in Windows 11. It works like a camera that takes quick pictures (snapshots) of what’s on your screen. Later, you can search these snapshots to find something you saw before on your PC. […]
[…] Recall & Snapshots saves copies of your screen securely on your PC. You can control how much space it uses and even delete old snapshots if needed. […]
[…] you use Windows 11, you might have heard about Recall & Snapshots. This is a handy feature that works like a memory for your PC. It takes small […]
[…] What are Recall Snapshots? Recall Snapshots are like photos your computer takes of what’s on your screen at different times. Windows saves these snapshots so you can search for things you’ve seen or worked on before. You can learn more about this feature here: Recall & Snapshots explained. […]
[…] Recall & Snapshots is a handy feature in Windows 11. It works like a photo album for your computer, saving pictures (snapshots) of what’s on your screen. Later, you can search through these snapshots to find things you’ve seen before. […]