How to Improve Recall Snapshots Filtering on Windows 11
This guide will show you how to turn on or off the “Help improve Recall Snapshots filtering” feature in Windows 11. Don’t worry—it’s easy to do!
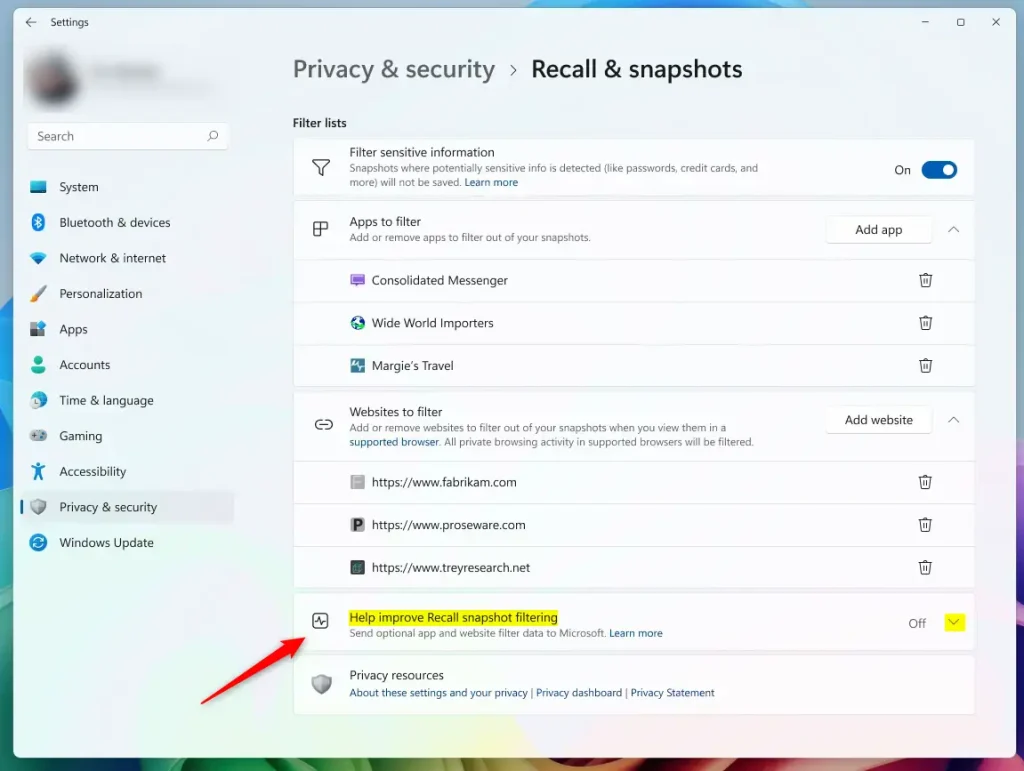
Open Windows Settings and navigate to Privacy & security, then Recall & snapshots. Turn on “Save snapshots” if needed, then toggle “Help improve Recall snapshots filtering” to your desired setting. This option anonymously shares your blocked apps and sites to improve the feature.
What Is Recall & Snapshots?
Windows 11 Recall and Snapshots is a new AI feature that takes pictures of your screen to help you remember what you’ve seen.
To use this, you need to let Windows save these snapshots. Think of it like letting your computer remember what you did, so you can look back whenever you want.
What Can You Do with Recall?
- Pause the snapshots anytime (learn how here).
- Choose which apps or websites you want to exclude from being saved (apps) and (websites).
- Delete all snapshots whenever you want (steps here).
With Windows 11 Recall, you can pause snapshot saving whenever you need privacy, choose which apps or websites to exclude, and delete all your saved snapshots easily.
What Does “Help Improve Recall Snapshots Filtering” Mean?
This option lets you share a list of apps and websites you choose to block from Recall with Microsoft—but don’t worry, it’s anonymous. This helps Microsoft make Recall better for everyone.
How to Turn On or Off “Help Improve Recall Snapshots Filtering”
You can easily turn the ‘Help improve Recall snapshots filtering’ option on or off in Windows 11 Settings by going to Privacy & security, then Recall & snapshots.
- Open the Windows Settings app. Tip: You can click the Start menu and choose Settings, or just press
Windows key + Ion your keyboard. - In Settings, click Privacy & security on the left menu.
- On the right, find and click the Recall & snapshots option.
- Turn on the Save snapshots feature if it’s not already on.
- Click the Help improve Recall snapshots filtering option to open it.
- Toggle the switch to On to enable sharing or Off to disable it .
When done, just close the Settings app.
Extra: How to Turn This Feature On or Off Using the Windows Registry
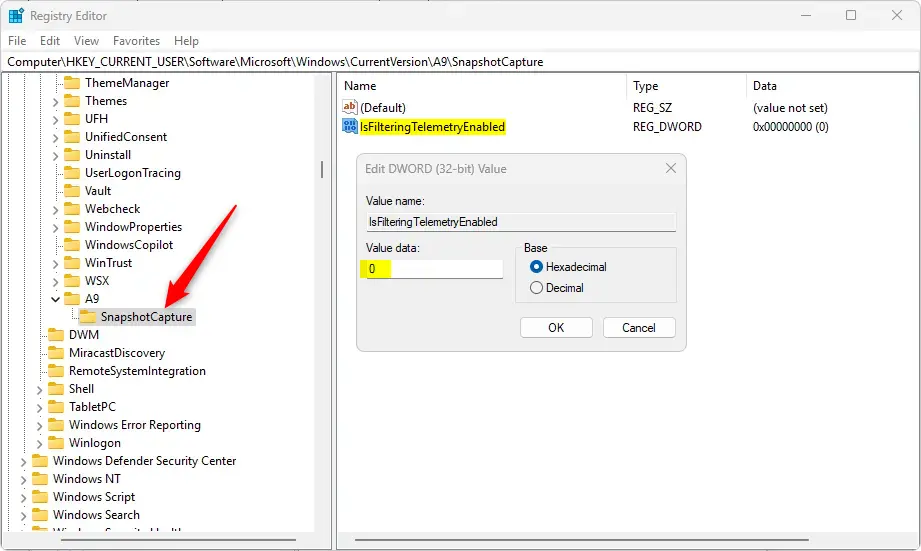
For advanced users, you can control the ‘Help improve Recall snapshots filtering’ setting in Windows 11 using the Registry Editor by navigating to a specific folder and creating a new DWORD value.
- [Admin] Open the Registry Editor (search for “regedit” in the Start menu).
- Go to this folder path:
Computer\HKEY_CURRENT_USER\Software\Microsoft\Windows\CurrentVersion\A9SnapshotCapture - Right-click on SnapshotCapture, select New > DWORD (32-bit) Value.
- Name the new DWORD
IsFilteringTelemetryEnabled. - Double-click this DWORD and set its value to:
1to turn ON the feature.0to turn OFF the feature.
Be careful when using the Registry Editor, and make sure to back up your registry before making changes.
Summary
In summary, managing the ‘Help improve Recall snapshots filtering’ option in Windows 11 is straightforward through Settings, and your snapshot data remains private and encrypted on your device.- Turning on or off the “Help improve Recall snapshots filtering” option is easy from the Windows Settings.
- You can help Microsoft improve Recall by sharing your excluded apps and sites anonymously.
- Your data stays private and safe because snapshots are encrypted and only stored on your device.
- Check your settings regularly to control your snapshot preferences.
- Use the links in this guide if you want more detailed help.
Reference
Learn more from Microsoft Support.
Where are Microsoft recall snapshots stored?
Snapshots and associated data are stored locally on the device. Recall does not share snapshots or associated data with Microsoft or third parties, nor is it shared between different Windows users on the same device.
How to see Windows Recall screenshots?
You can see your Windows 11 Recall screenshots by selecting the timeline in Recall’s navigation bar, which shows segments of your screen activity over time.
Was this guide helpful?

About the Author
Richard
Tech Writer, IT Professional
Richard, a writer for Geek Rewind, is a tech enthusiast who loves breaking down complex IT topics into simple, easy-to-understand ideas. With years of hands-on experience in system administration and enterprise IT operations, he’s developed a knack for offering practical tips and solutions. Richard aims to make technology more accessible and actionable. He's deeply committed to the Geek Rewind community, always ready to answer questions and engage in discussions.


No comments yet — be the first to share your thoughts!