How to Choose Where Windows Search for Files in Windows 11
You can control where Windows 11 searches for files by customizing its indexing options.
Windows Search Indexing creates a database of your files. This makes search results appear almost instantly. This process ensures your PC can quickly find what you need when you type into the search bar. Whether it’s a document from last week or a photo from years ago, your results will appear fast.
If Windows isn’t finding files in specific folders or drives you’ve designated, you need to adjust the indexed locations. For instance, you might store large project files on a secondary SSD or critical data on an external hard drive.
By actively managing these settings, you tell Windows Search where to focus. This significantly speeds up finding your files. This tutorial shows you exactly how to specify these locations in Windows 11.
Access indexing settings via the Windows search bar. Choose “Enhanced mode” to index your entire PC, or “Classic mode” to select specific folders like Documents, Pictures, and Desktop. You can customize Classic mode further by adding or removing specific locations.
How Windows Search Indexing Works
Windows search indexing creates a special database, called an index, that stores information about your files like their names, locations, and even the words inside them, so searching is much faster.
When you search for something, Windows doesn’t look at every file one by one. Instead, it checks this index. Think of it like using the index at the back of a book to find a topic. It’s much faster than reading the entire book! This is why searching your PC feels so quick.
Choosing Your Search Mode: Classic vs. Enhanced
When you go to the search indexing settings, you’ll see a couple of options for how Windows handles indexing. These are the two main ways your PC can search.
1The Classic Mode: Focused and Efficient
Classic mode is the default way Windows search works, focusing its indexing on common places like your Documents, Pictures, Music, and Desktop folders.
- Your Documents folder
- Your Pictures folder
- Your Music folder
- Your Desktop
This mode works well if you keep most of your files in these standard locations. It balances search speed with background PC activity. Plus, it uses less power, which is great for older computers.
Tip: Adding More Places in Classic Mode
Even in Classic mode, you can add more folders. If you have another folder with important files, you can add it to the index. Look for an option like ‘Customize search locations’ or ‘Modify’ within the indexing settings. This lets you pick extra folders to include. Just remember, adding more folders means indexing might use more resources.
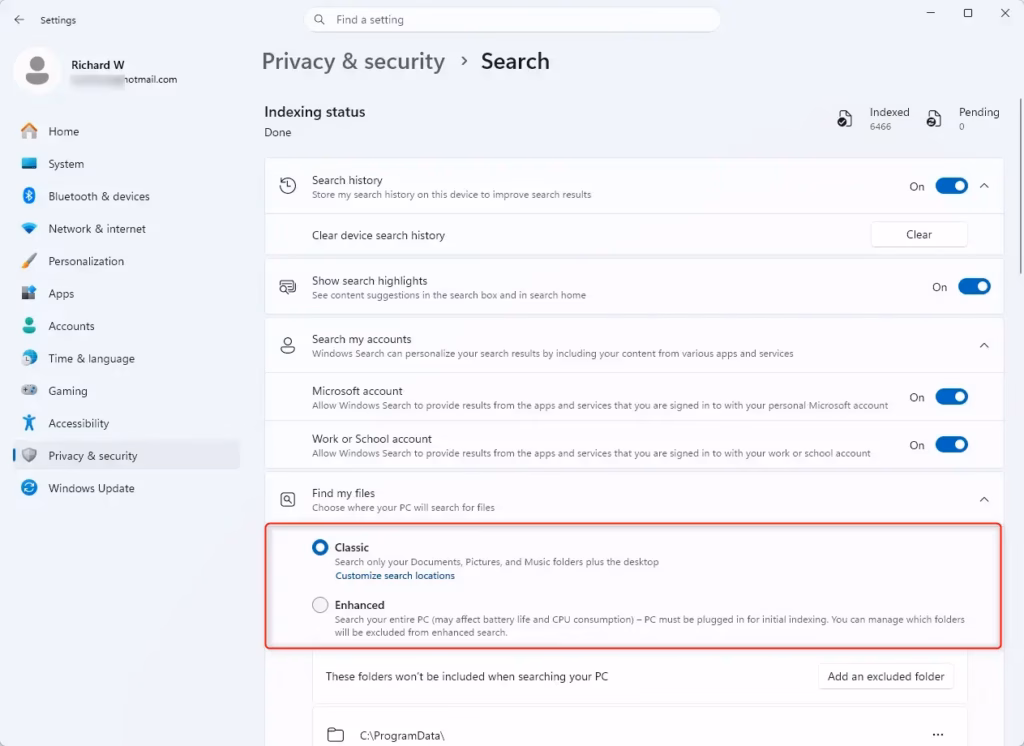
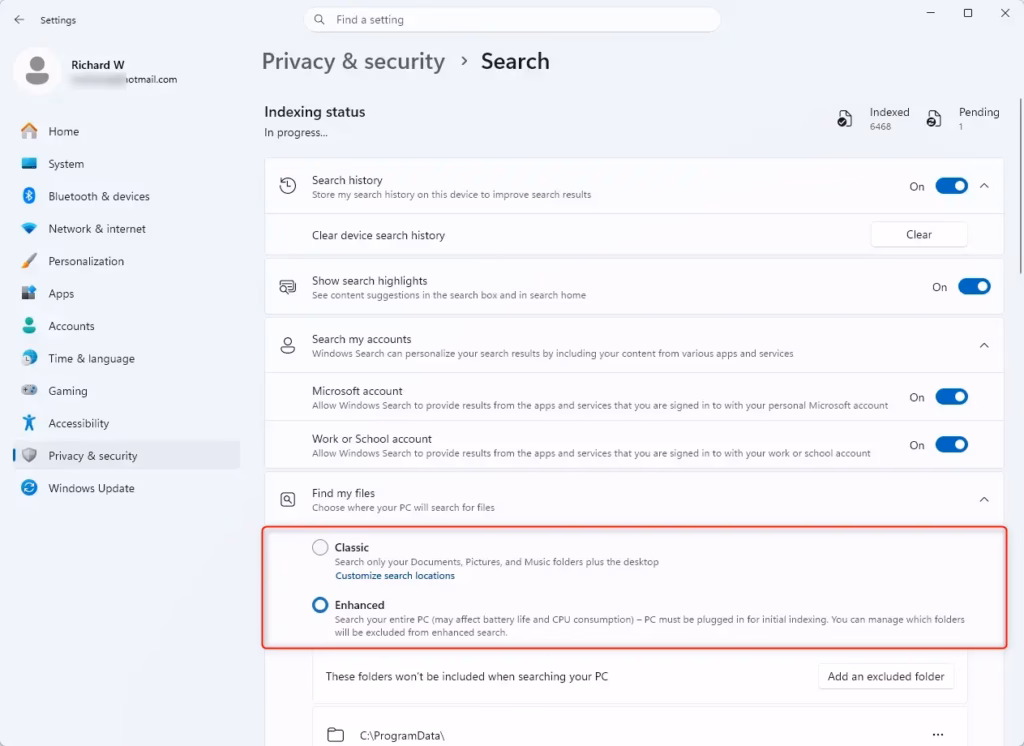
2The Enhanced Mode: The All-Seeing Eye
Enhanced mode tells Windows to index your entire PC, including every file on every connected drive, making it ideal for finding files scattered across your system.
This mode is ideal if your files are scattered. Perhaps you save project files in different folders on a large data drive, or your documents live across multiple user accounts. Enhanced mode makes sure Windows can find anything you’ve saved quickly.
Warning: Enhanced Mode Uses More Power
Enhanced mode provides the most comprehensive search, but it uses more of your computer’s power. Creating and maintaining an index of your entire PC needs processing power and disk activity. If your PC slows down after enabling Enhanced mode, or if your computer isn’t very powerful, you might prefer Classic mode or indexing only specific folders.
Practical Tip: Start with Classic and Add
For most people, I suggest starting with Classic mode. See how it works. If you frequently search for files outside your Documents, Pictures, Music, or Desktop, go back and add those specific folders through “Customize search locations.” This approach gives you more control and prevents your PC from indexing areas you don’t need.
Warning: Indexing Takes Time
When you first turn on indexing or make big changes, Windows needs time to build or update its index. This process can take a few hours, especially with Enhanced mode, depending on how many files you have. During this time, you might not see the full benefits, and your PC might be working harder. Be patient – it’s worth it when the index is ready!
What Information Gets Indexed?
Windows search indexing goes beyond just file names and paths; for text files, it can even scan and index the words inside them to help you find specific content.
- File Names: The most basic and important info.
- File Paths: Where the file is on your drive.
- File Contents: For text files (like documents, code, or emails), Windows can even index the words *inside* the file. This lets you search for specific phrases or words in your documents, not just their titles.
- File Properties: This includes details like the author of a document, when it was created or changed, tags, and other file information.
Apps you use can also add to the index. For example, Microsoft Outlook indexes your emails so you can search your inbox quickly, even when you’re offline. This helps you search different kinds of data much better.
Summary
Adjusting your Windows search indexing settings, whether using Classic mode or Enhanced mode, helps you find your files faster and more easily.
Can you modify where Windows searches for files and folders?
Yes, you can modify where Windows 11 searches for files and folders. By customizing the indexing options, you can add or remove specific locations, ensuring Windows Search focuses on the drives and directories most relevant to your needs. This significantly speeds up finding your files.
How to make 🪟 Windows 11 search like 🪟 Windows 10?
To make Windows 11 search more like Windows 10, you can adjust indexing options. Windows 10’s search was less integrated and relied more on traditional folder searches. In Windows 11, you can achieve a similar effect by carefully selecting which folders are indexed, effectively limiting the scope of Windows Search.
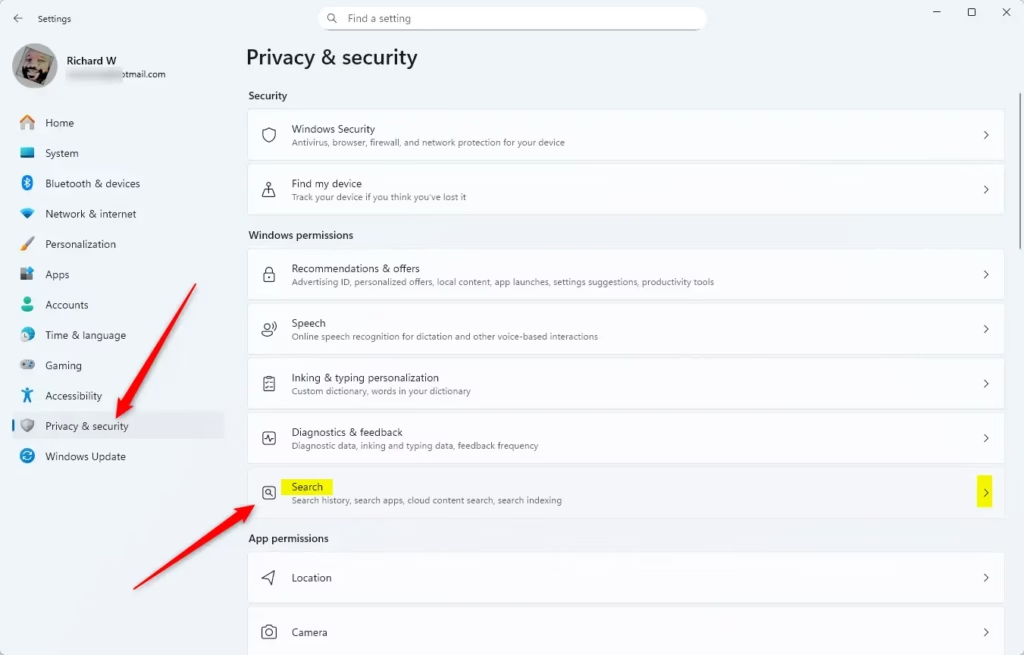
How do I change 🪟 Windows 11 search settings?
To change Windows 11 search settings, navigate to ‘Indexing Options’ via the Control Panel or by searching for it. Here, you can modify the indexed locations by adding or removing specific folders and drives. This ensures Windows Search prioritizes the areas where you keep your important files.
How to do an advanced file search in 🪟 Windows 11?
For advanced file searches in Windows 11, utilize File Explorer’s search bar. You can refine your search by adding search filters like ‘date modified,’ ‘type,’ ‘size,’ and ‘other properties.’ Combining these with specific keywords allows for highly targeted and advanced file finding beyond basic searches.
Was this guide helpful?

About the Author
Richard
Tech Writer, IT Professional
Richard, a writer for Geek Rewind, is a tech enthusiast who loves breaking down complex IT topics into simple, easy-to-understand ideas. With years of hands-on experience in system administration and enterprise IT operations, he’s developed a knack for offering practical tips and solutions. Richard aims to make technology more accessible and actionable. He's deeply committed to the Geek Rewind community, always ready to answer questions and engage in discussions.


No comments yet — be the first to share your thoughts!