How to Enable Energy Efficient Ethernet in Windows 11

Energy Efficient Ethernet (EEE) is a built-in Windows 11 feature based on the IEEE 802.3az standard. It lowers your computer’s power use by putting your network connection into a low-power sleep state when you are not actively downloading or uploading data. The link wakes up again when traffic starts.
Turning this setting off can help fix stubborn internet drops and slow speeds on your PC. On some adapters, the wake-up from sleep causes short stalls or brief disconnects, especially when the switch or router on the other end handles EEE poorly. You need an administrator account to change these network adapter settings.
EEE only applies to wired Ethernet adapters. Wi-Fi adapters do not have it. For EEE to work, the device on the other end of the cable (your router or switch) must also support 802.3az. If it does not, turning EEE on in Windows changes nothing noticeable.
Open Device Manager, expand Network adapters, double-click your wired Ethernet adapter, click the Advanced tab, select Energy Efficient Ethernet, and set the Value to On or Enabled. The connection briefly reconnects, and the setting takes effect without restarting.
Option 1Use Device Manager
You can enable energy efficient ethernet through Device Manager by finding your network adapter properties and changing the power saving settings. This built-in Windows tool gives you direct access to your hardware settings, so you can turn on power-saving features for your wired internet connection without installing extra software. The same steps work on Windows 11 Home and Pro.
Use it to locate your network adapter and adjust the EEE setting. Expect your connection to drop for a second or two when you save the change. That is normal, because the adapter resets itself.
- Open Device Manager. Search for it in the Windows search bar, or right-click the Start button and pick it from the list. The Device Manager window opens with a list of hardware categories.
- Find and expand the Network adapters section. You will see every network adapter in the PC, including Wi-Fi , Bluetooth and virtual adapters.
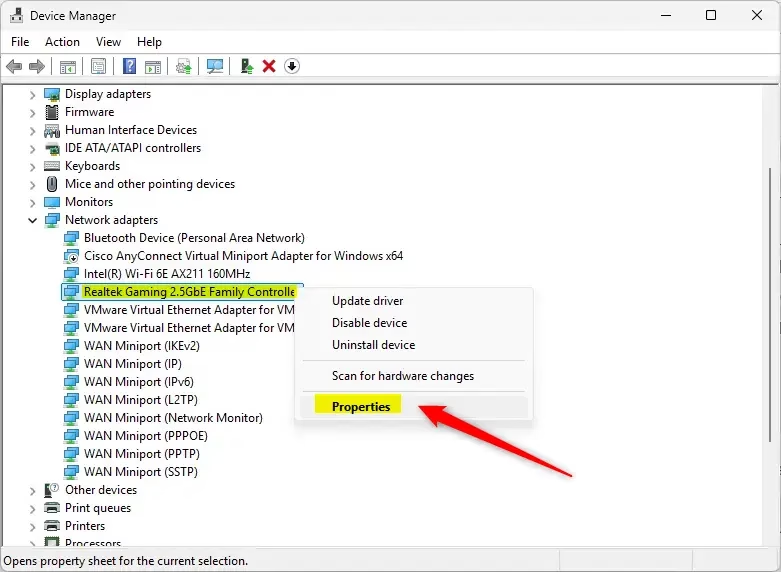
- Double-click the wired network adapter you want to change. It might have a name like “Intel(R) Ethernet Connection” or “Marvell AQC111C”. You can also right-click it and choose Properties. Do not pick a Wi-Fi or virtual adapter, because those will not have an EEE setting. A Properties window for that adapter opens.
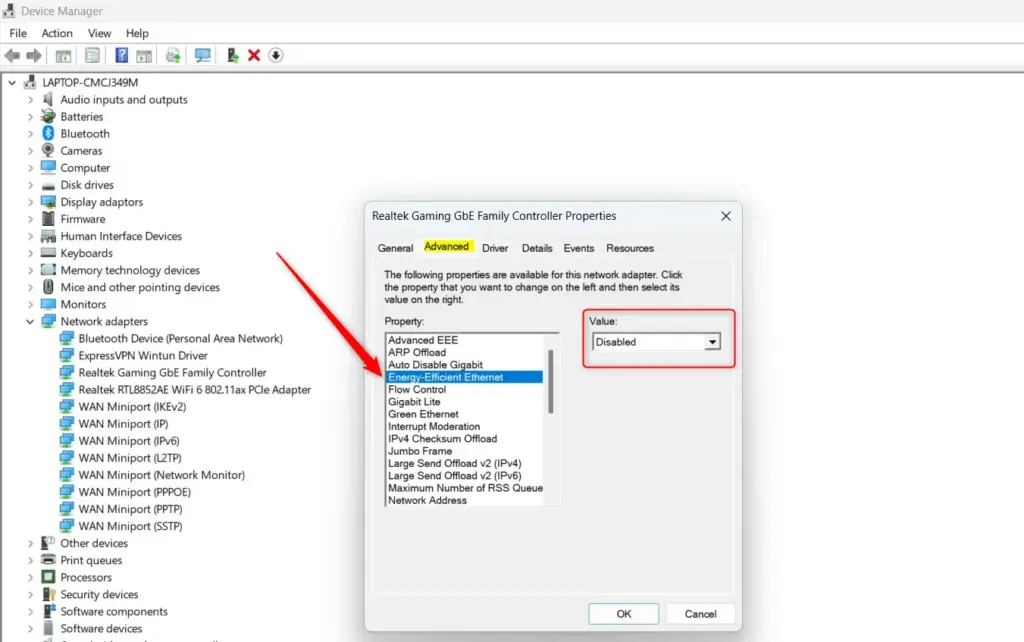
- Click the Advanced tab. If there is no Advanced tab, you opened the wrong device or the driver does not expose any extra settings.
- In the list of properties, find and select Energy Efficient Ethernet. The name might be slightly different depending on your network adapter. It could also say “EEE”, “Green Ethernet”, or “Power Saving Mode”. The list is usually sorted alphabetically, so you may need to scroll. When you select the property, its current setting appears in the Value box on the right.
- In the Value box, choose On or Enabled to turn it on, or Off or Disabled to turn it off. Some adapters offer other choices, such as Maximum Power Savings or Minimum Power Savings. Use the highest saving level if you want the most power reduction.
- Click OK to save your changes. The network icon in the taskbar may briefly show that the connection is reconnecting. It should then return to normal.
- You can now close Device Manager. You do not need to restart the PC.
If the property is missing from the list, your adapter or its driver does not support EEE under that name. Updating the driver from the PC or motherboard maker sometimes adds it. To undo any change, reopen the same property and set the Value back to what it was before.
Option 2Use PowerShell
You can enable energy efficient ethernet using PowerShell if you prefer command-line tools over graphical menus. This method lets you run specific commands to change your network adapter power settings quickly. It is helpful if you manage multiple computers or want to skip clicking through the standard Windows settings windows. You need an elevated (administrator) session for this to work.
- First, you need to know the exact name of your network adapter. Open Network Connections by pressing Windows key + R, typing
ncpa.cpl, and pressing Enter. A window opens listing your connections. Note down the name of the adapter you want to change (e.g., "Ethernet"). Spelling and spaces matter, so copy the name exactly. - Open Windows Terminal as an administrator. Search for "Windows Terminal", right-click it, and select "Run as administrator". Click Yes if User Account Control asks for permission. Make sure PowerShell is the active tab in the terminal window. In Windows 11 it normally is by default, but if you see a Command Prompt tab, open a new PowerShell tab from the drop-down arrow at the top.
- To find the exact name of the EEE setting for your adapter, type the following command and press Enter. Replace
Ethernetwith the name of your network adapter from step 1:
Get-NetAdapterAdvancedProperty -Name "Ethernet" | Format-Table
The terminal prints a table of the advanced properties for that adapter. - Look at the DisplayName column in the results. Find the exact name for Energy Efficient Ethernet. It might be listed as "Energy-Efficient Ethernet", "EEE", "Green Ethernet", or "Power Saving Mode". If nothing like this appears, the adapter driver does not offer the setting, and the commands in the next step will not work for it.
- Now, type one of the following commands and press Enter to turn EEE on or off. The command normally prints nothing if it succeeds, and your connection may drop for a moment.
- To turn EEE on:
Set-NetAdapterAdvancedProperty -Name “Ethernet” -DisplayName “Energy-Efficient Ethernet” -DisplayValue “Enabled” - To turn EEE off:
Set-NetAdapterAdvancedProperty -Name “Ethernet” -DisplayName “Energy-Efficient Ethernet” -DisplayValue “Disabled”
- To turn EEE on:
- Remember to replace
Ethernetwith your network adapter's name andEnergy-Efficient Ethernetwith the exact EEE property name you found in step 4. A typo in either one causes an error message in red text. If that happens, check both names against the earlier steps and run the command again. - Run the command from step 3 again to confirm the new value is in place, then close Windows Terminal. No restart is needed.
Summary
Toggle Energy-Efficient Ethernet (EEE) using either Device Manager or PowerShell, depending on your preference. EEE helps save power, but disabling it might fix connection issues. If you are chasing drops or slow speeds, turn it off first, test the connection for a day or so, and turn it back on if nothing improves. Administrator rights are required to make these changes.
Frequently asked questions
What does Windows device manager network adapters energy-efficient ethernet do?
In Device Manager, the Energy Efficient Ethernet setting lets your wired network adapter save power when no data is moving. The adapter then wakes up when traffic resumes. On some adapters and routers, that wake-up causes brief pauses or disconnects. Turning the setting off keeps the adapter fully active, which can stop those drops.
Can haing power saving ethernet cause my fps to lag aswell as ping? what about other settings so how?
Power saving on Ethernet rarely lowers your FPS, since frame rate depends mainly on your graphics card and processor. It can cause ping spikes or short network stalls during online games, though. If you see those, turn off Energy Efficient Ethernet and the Power Management checkbox on the adapter, then test again.
How to open ethernet properties in 🪟 Windows 11 energy efficient?
Right-click the Start button and open Device Manager. Expand Network adapters and double-click your wired Ethernet adapter. Select the Advanced tab, then find Energy Efficient Ethernet in the Property list. You need an administrator account to change these settings.
How do I turn off power saving for ethernet?
Open Device Manager, expand Network adapters, and double-click your wired Ethernet adapter. On the Advanced tab, set Energy Efficient Ethernet to Disabled. Then open the Power Management tab and clear the checkbox for Allow the computer to turn off this device to save power. Click OK. Your PC will use slightly more power.
Still have a question?
Answered by AI from this guide. Good questions may be added to this page — please don't include personal details.
Did this guide fix your problem?

About the Author
Richard
Tech Writer, IT Professional
Richard is a writer at Geek Rewind who turns complex IT tasks into clear, step-by-step guides. He draws on years of hands-on experience in system administration and enterprise IT operations, focusing on Windows, Linux and WordPress: the problems people actually run into, and the fixes that work. His server and WordPress guides come from systems he runs himself. Richard builds and maintains the platform behind Geek Rewind, from its Ubuntu servers and Nginx configuration to its custom WordPress plugins. Many new tutorials start with readers' questions, and he's always glad to answer them in the comments.
Hello,
I noticed a possible technical error in the PowerShell section of the article about managing Energy-Efficient Ethernet (EEE).
The article currently shows:
To turn EEE on:
Get-NetAdapterAdvancedProperty -Name “Ethernet” | Format-Table
However, this command only displays the advanced properties of the network adapter and does not change the EEE setting.
To modify the EEE status, the command should use Set-NetAdapterAdvancedProperty instead. For example:
To enable EEE:
Set-NetAdapterAdvancedProperty -Name “Ethernet” -DisplayName “Energy-Efficient Ethernet” -DisplayValue “Enabled”
To disable EEE:
Set-NetAdapterAdvancedProperty -Name “Ethernet” -DisplayName “Energy-Efficient Ethernet” -DisplayValue “Disabled”
It may also be helpful to verify the change afterward using:
Get-NetAdapterAdvancedProperty -Name “Ethernet” -DisplayName “Energy-Efficient Ethernet”
It appears that the Get-NetAdapterAdvancedProperty command may have been mistakenly used instead of Set-NetAdapterAdvancedProperty in the “To turn EEE on” section.
Thank you for providing useful technical content. I hope this helps improve the accuracy of the article.
Thanks, updated the post.