
This article explains how to enable or disable “Noise suppression” in Microsoft Teams to reduce unwanted ambient sounds and improve communication.
Microsoft Teams is a collaboration platform developed by Microsoft that integrates chat, video meetings, file storage, and application integration.
The free version is installed on Windows with its icon on the Taskbar.
There are many settings one can enable in the Microsoft Teams app. You can connect your Google calendar, turn the camera and mic on or off on the lock screen, turn read receipts on or off, auto start Teams, disable Teams chat, sync contacts with Teams, connect to Google Calendar, link your mobile device, turning message preview on or off, manage teams notifications during calls, set default speakers, set default microphone, enable high fidelity sound, change mic sensitivity, set default camera, enable auto-brightness, and more.
The new Microsoft Teams also has a “Noise suppression” feature that helps enhance audio quality.
Noise suppression refers to techniques and technologies to reduce unwanted ambient sounds, often to enhance audio quality or improve communication clarity.
The steps below walk you through enabling or disabling Noise suppression in Microsoft Teams.
Turn on “Noise suppression” in Microsoft Teams
As mentioned, users can turn on a “Noise suppression” feature to improve communication clarity when using Microsoft Teams.
Here’s how to do it.
First, launch the Microsoft Teams app by clicking the Start menu and selecting it on the All Apps list.

You can also launch the app from the Taskbar or Taskbar overflow.

In the full Teams window, click the Settings and more ( …) button next to your profile picture and select Settings from the menu.

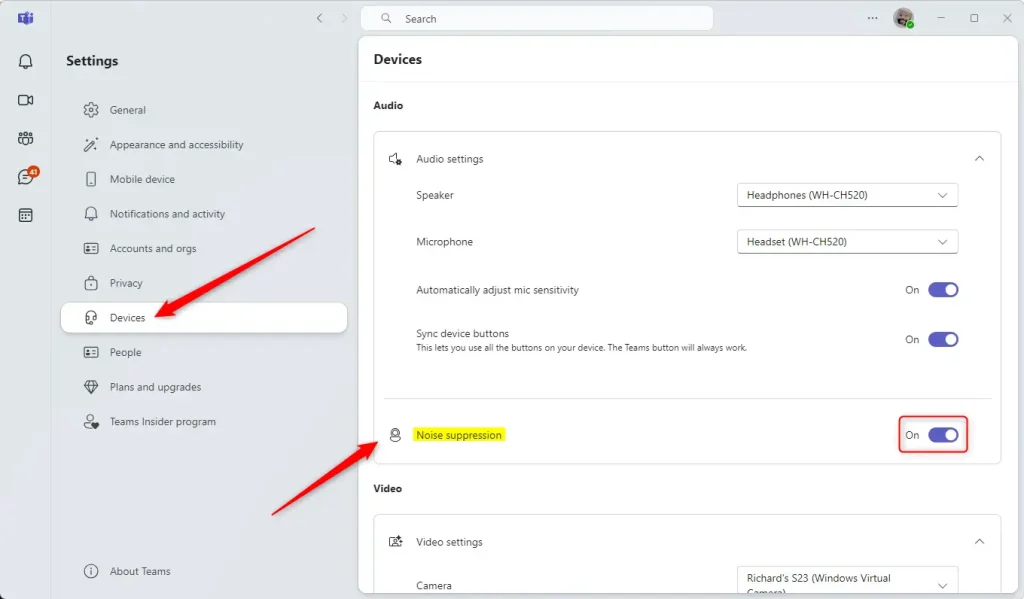
Next, click the Devices tab on the left of the Settings page. Then, under “Audio Settings,” choose one of the microphones on the drop-down menu if multiple devices are connected to Windows.
Then, turn on ‘Noise suppression‘ to enable the feature. To disable it, toggle the button to the Off position.
That should do it!
Conclusion:
The Noise suppression feature in Microsoft Teams can significantly enhance your audio experience during calls and meetings. Here are some key takeaways:
- Improved communication clarity: Reduces background noise, allowing for clearer conversations.
- Easy to enable or disable: Simple toggling in Settings makes it user-friendly.
- Variety of device compatibility: Works with multiple connected microphones for flexible user choices.
- Enhanced meeting experience: Helps maintain focus and professionalism in remote communications.
- Accessible support: Microsoft Teams provides ample resources for troubleshooting and feature exploration.
By leveraging this feature, you can ensure your interactions are as effective and distraction-free as possible.
Frequently Asked Questions
How do I enable noise suppression in Microsoft Teams?
What is noise suppression in Microsoft Teams?
Can I disable noise suppression in Microsoft Teams?
What devices are compatible with noise suppression in Microsoft Teams?
Does noise suppression affect call quality in Microsoft Teams?

Leave a Reply