How to Set Your Default Camera in Microsoft Teams

Setting a default camera in Microsoft Teams tells the app which webcam to open for every meeting, so you don’t have to switch by hand each time. It applies to built-in laptop cameras and external USB webcams on Windows 11 and Windows 10.
The change takes under 30 seconds, and you make it in the Teams device settings. You can reverse it at any time by picking a different camera in the same place.
Open Microsoft Teams, click the three dots next to your profile picture in the top right, select Settings, then click Devices on the left. Under Camera, click the dropdown menu and select your preferred camera from the list. The change applies immediately to all future meetings.
What is Microsoft Teams?
Microsoft Teams is a free communication platform that combines chat, video meetings and file sharing. Its icon usually sits on the taskbar , the strip along the bottom of the screen. If you use Teams through work or school, your IT department may manage some settings, so a few options can look different from what this guide describes.
Why Set a Default Camera?
Many laptops have a built-in camera, and plenty of people also plug in an external webcam. With both connected, Teams can pick the wrong one, usually the built-in lens with its poorer image and awkward angle. Setting a default tells Teams which camera to load automatically.
A well-chosen camera also makes meetings look sharper and more professional. An external webcam is often better than a laptop lens, especially in dim rooms.
How to Choose Your Default Camera in Microsoft Teams
Step 1Open Microsoft Teams
First, open the app. You can do this from the Start menu or the taskbar .
- Click the Start button, or press the Windows key on your keyboard.
- Type Teams. The Teams app should appear at the top of the results.
- Click the Teams result, or press Enter. The Teams window opens, and you may need to sign in if you were signed out.
If you can't find Teams in search, check that it is installed. You can also try the taskbar method below.

Or launch from your taskbar: If the Teams icon is on the taskbar, click it once. If you don't see it, the icon may be hidden in the overflow area.
- Click the small arrow near the clock on the right side of the taskbar. This opens the hidden icons menu.
- Look for the Teams icon in the pop-up and click it. The Teams window opens or comes to the front.
If Teams isn't in the overflow menu either, it isn't running. Use the Start menu method above instead.

Step 2Go to Settings
Once the Teams window is open, go to its settings.
- Look at the top right corner of the Teams window and find your profile picture.
- Click the three dots (…) next to your profile picture. A dropdown menu opens.
- Click Settings. The settings panel opens.
If you don't see the three dots, make the window larger. In some Teams versions the menu sits in a slightly different spot, but it is always near your profile picture.

Step 3Select the Camera
Camera options sit in the device settings, on the left side of the Settings window.
- In the list on the left side of the Settings window, click Devices.
- Look for the Camera section on the right. It shows the camera Teams currently uses, and a preview may appear below it.
Teams only lists cameras that Windows can see. Also check that Windows hasn't blocked camera access for apps in its privacy settings.
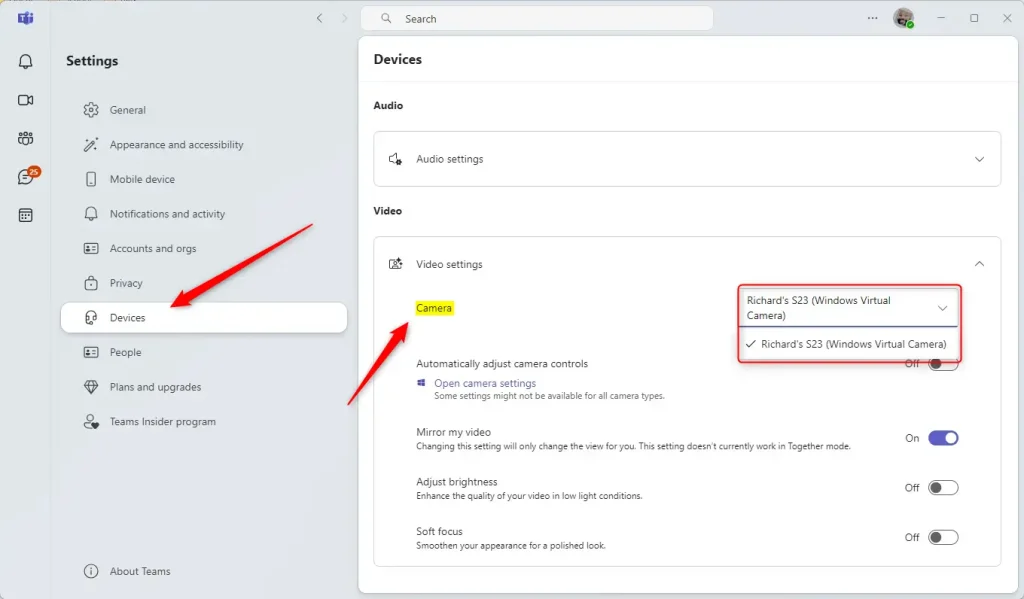
Now choose the camera you want Teams to use.
- Click the Camera dropdown menu.
- Select the camera you want from the list. Built-in cameras usually have names such as "Integrated Camera", while external webcams show the brand or model name.
- Check the preview. You should see your own image from the camera you picked. If it looks wrong, choose a different entry.
You don't need to restart Teams. To undo the change, return to the same dropdown and choose another camera. You can also switch cameras temporarily during a call from the device settings in the meeting.
Summary
- Easy to start: Open Teams from the Start menu or the taskbar, including the hidden icons menu if the icon isn't visible.
- Simple settings: Find camera options under Settings Devices
- Multiple cameras supported: Choose whichever camera you prefer, and change it later whenever you like.
- Better meetings: Using the right camera helps your video calls look sharper and more professional.
Setting your default camera in Microsoft Teams takes just a few clicks. Open the device settings inside Teams, pick your preferred camera from the Camera dropdown menu, and check the preview. Your video calls will then use that device whenever you join a meeting. If the wrong camera ever comes back, repeat the same steps.
Have a question about this guide?
Answered by AI from this guide. Good questions may be added to this page — please don't include personal details.
Did this guide fix your problem?

About the Author
Richard
Tech Writer, IT Professional
Richard is a writer at Geek Rewind who turns complex IT tasks into clear, step-by-step guides. He draws on years of hands-on experience in system administration and enterprise IT operations, focusing on Windows, Linux and WordPress: the problems people actually run into, and the fixes that work. His server and WordPress guides come from systems he runs himself. Richard builds and maintains the platform behind Geek Rewind, from its Ubuntu servers and Nginx configuration to its custom WordPress plugins. Many new tutorials start with readers' questions, and he's always glad to answer them in the comments.
No comments yet — be the first to share your thoughts!