How to Clean Up Windows 11 System Recommendations and Offers

System recommendations and offers in Windows 11 are built-in ads, tips, and cloud storage prompts that Microsoft places inside the Start menu , Settings app , and File Explorer on every PC by default. Turning them off takes less than 5 minutes and requires no extra software or technical skills.
Open the Settings app and switch off the specific toggles that control these tips and ads. Your screen will look cleaner right away. Every change below is reversible: if you miss a feature, come back to the same screen and switch it on again. None of these changes needs a restart. The steps are the same on Windows 11 Home and Pro, though exact option wording shifts a little between builds.
Open Settings , click Personalization and select Start, then turn off Show recently added apps, Show most used apps, and Show recommendations for tips. Next, go to System Notifications, scroll to Additional settings, and uncheck Show me the welcome experience and Get tips and suggestions when using Windows.
Step 1Clean Up the Start Menu Recommendations
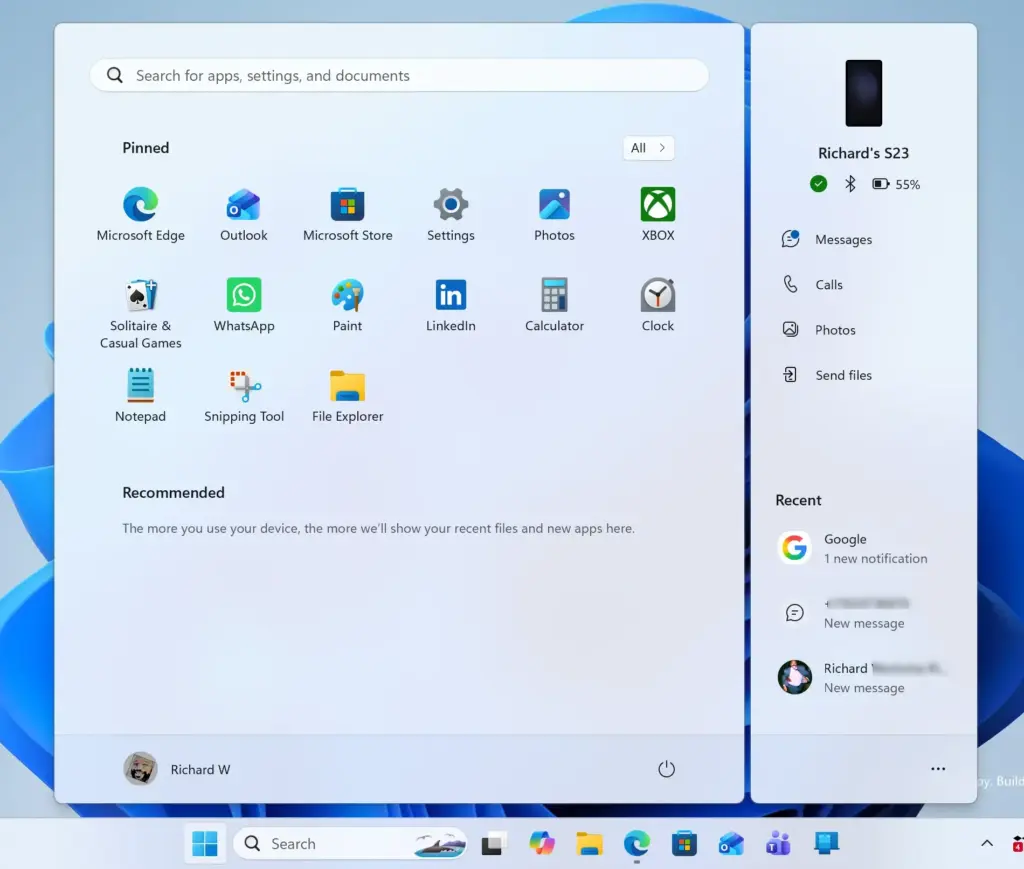
Open Settings , click Personalization, select Start, and turn off the switches for showing recently added apps, most used apps, and recent items. This stops Windows from cluttering your menu with suggested files and apps you do not use.
- Click the Start button on your taskbar and open Settings (the gear icon), or press Win+I on your keyboard. The Settings window opens with a list of categories on the left.

- Select Personalization from the menu on the left side of the screen. The personalization options appear on the right.
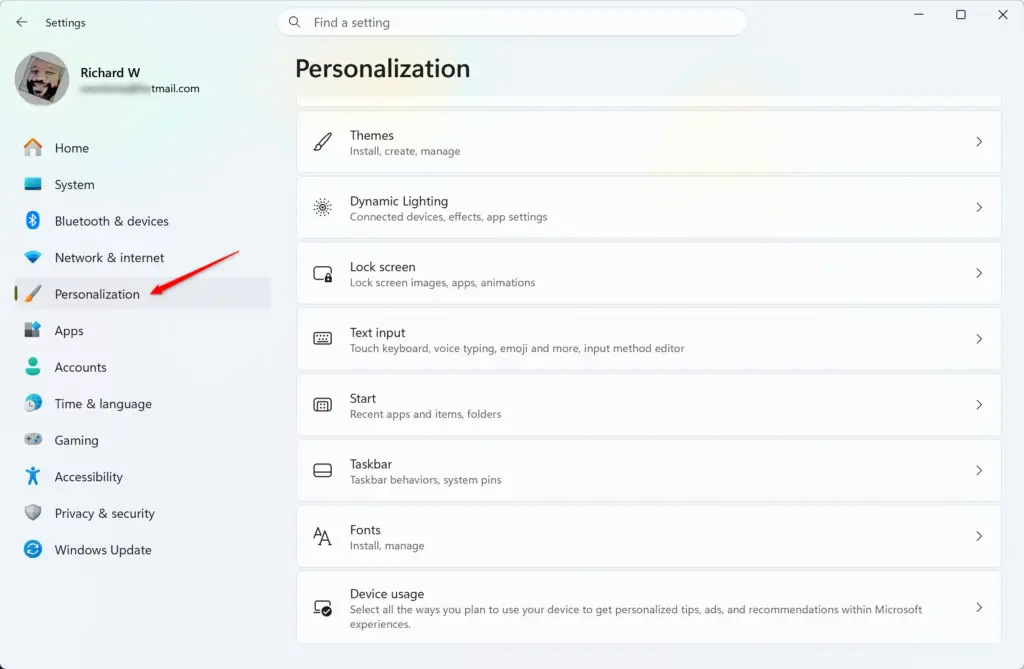
- Click Start from the available options on the right.
- Turn off the toggle switches next to Show recently added apps, Show most used apps, and Show recommendations for tips, shortcuts, new apps, and more. Each switch should now read Off.
- If you see a toggle for recommended files, such as Show recommended files in Start, recent files in File Explorer , and jump lists, turn that off too. Newer builds of Windows 11 include it, and older ones do not, so don’t worry if you can’t find it.
- Open the Start menu again to check the result.
Once you turn these off, the Recommended area at the bottom of your Start menu shows little or nothing, so the menu is dominated by your pinned applications. The Recommended heading itself stays on most builds. If you want more room for pins, look for a Layout option on the same page (on recent builds) and choose More pins. To undo any of this, return to the Start page and switch the toggles back on.
Step 2Stop Promotional Notifications in the Settings App
To stop promotional notifications in the Windows 11 Settings app , open Settings, go to System, click Notifications, scroll to the very bottom, and uncheck the boxes for getting suggestions and welcome tips. This gets rid of annoying banners asking you to finish setup or back up files.

- Open the Settings app by pressing Win+I.
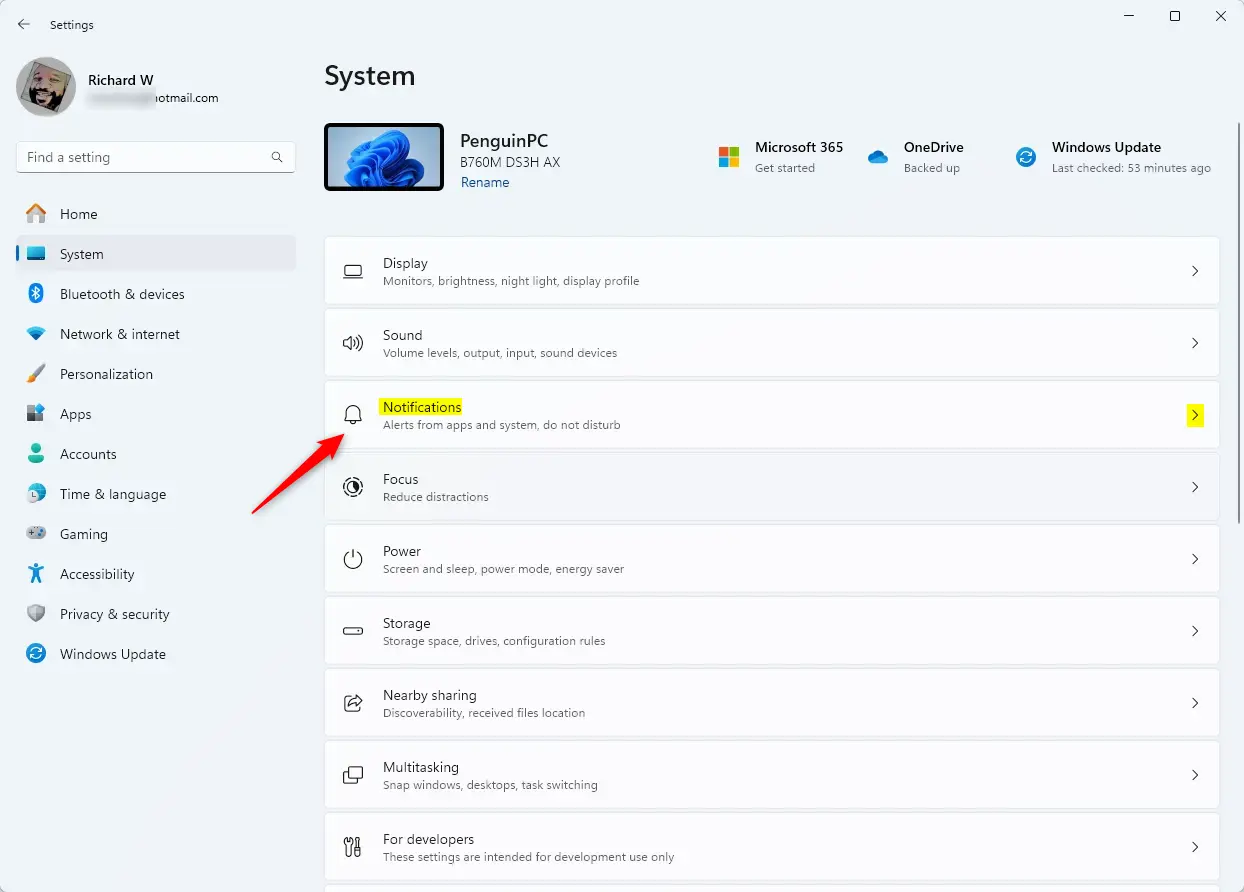
- Go to the System tab on the left, then click Notifications on the right. The page lists the apps that can send you notifications.
- Scroll all the way down to the bottom of the Notifications page and click to expand the Additional settings section. A short list of checkboxes appears.
- Uncheck the box next to Show me the welcome experience after updates and occasionally when I sign in to highlight what’s new and suggested.
- Uncheck the box next to Get tips and suggestions when using Windows.
The wording of these checkboxes differs slightly between Windows 11 versions. Some builds also have a box about suggesting ways to finish setting up your device. Uncheck that one as well if you see it. The changes apply straight away. To bring the tips back, tick the boxes again.
Step 3Remove Ads and Tips from File Explorer
To remove ads and tips from File Explorer in Windows 11, open any folder, click the three dots at the top, select Options, go to the View tab, and uncheck the box for showing sync provider notifications. This stops annoying cloud service prompts from appearing above your drives.
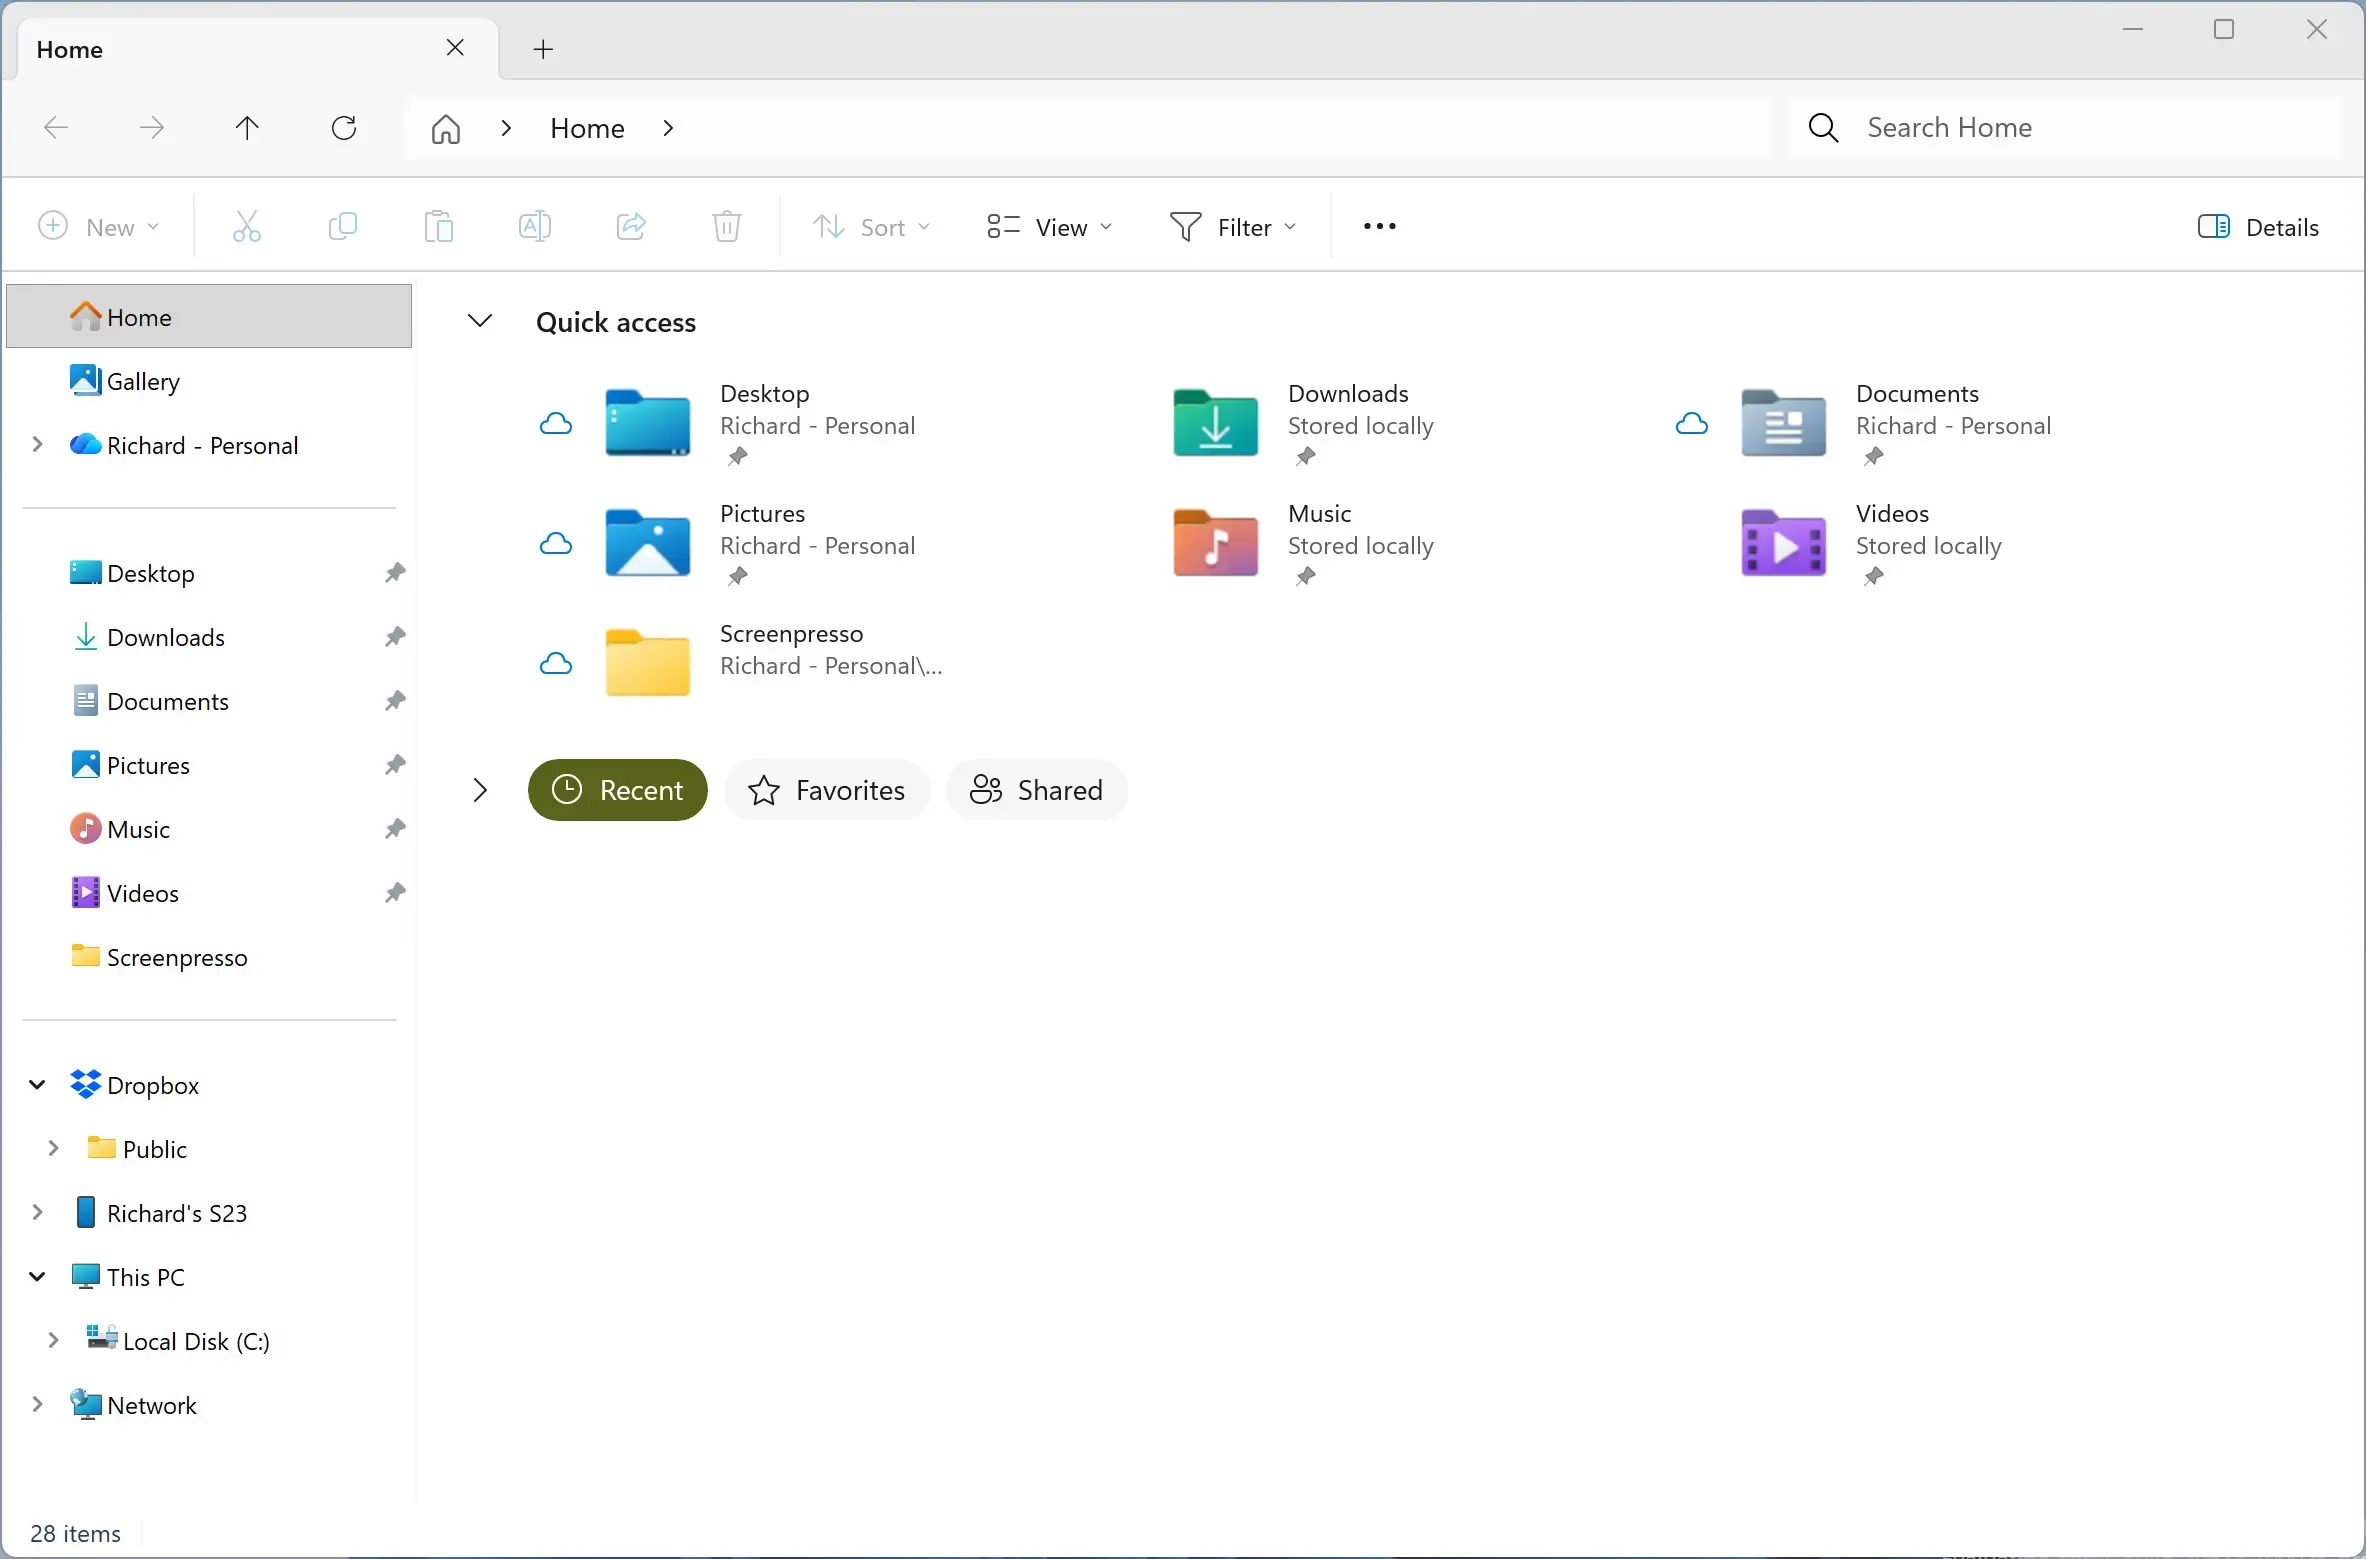
- Launch File Explorer by clicking its taskbar icon or pressing Windows Key + E.
- Click the three horizontal dots (See more) icon at the top of the window, then select Options. The Folder Options window opens.
- In the Folder Options window, click the View tab at the top.
- Scroll down the list of advanced settings until you find Show sync provider notifications.
- Uncheck the box next to Show sync provider notifications.
- Click Apply, then click OK to save your changes.
Open a new File Explorer window to confirm the cloud storage banners are gone. If you ever want them back, repeat the steps and tick the box again.
Step 4Clear Up Lock Screen Suggestions
To clear up lock screen suggestions in Windows 11, open Settings, click Personalization, select Lock screen, and change the background from Windows Spotlight to a picture or slideshow. This stops promotional pictures, fun facts, and weather updates from showing up every time your computer locks.
- Open the Settings app by pressing Windows Key + I.
- Select Personalization from the left menu, then click Lock screen on the right.
- Look for the setting labeled Personalize your lock screen.
- Change the drop-down menu from Windows spotlight to Picture or Slideshow. A preview of your new lock screen appears above the drop-down.
- Uncheck the box next to Get fun facts, tips, tricks, and more on your lock screen if it remains visible.
Press Windows Key + L to lock the PC and check the result. If you choose Picture, pick one of the suggested images or use the browse option to select your own. To go back to the rotating Microsoft images, set the drop-down to Windows spotlight again.
Step 5Disable Tailored Experiences and Diagnostic Data
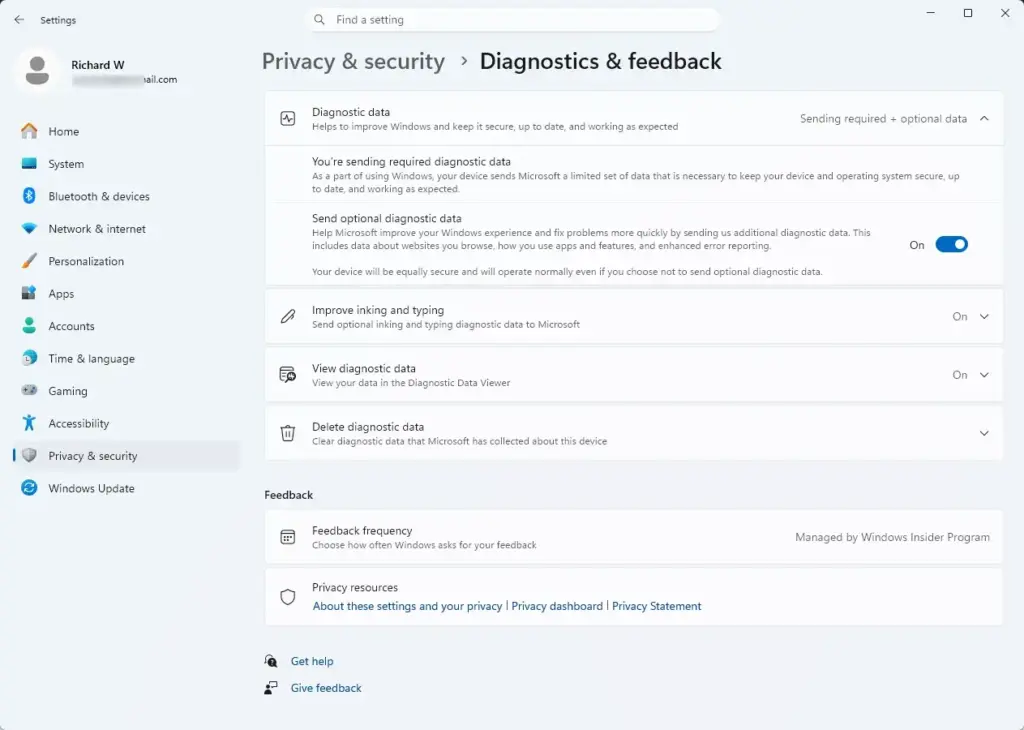
To disable tailored experiences and diagnostic data in Windows 11, open Settings, click Privacy & security, go to Diagnostics & feedback, and turn off the switch for tailored experiences. This stops Microsoft from using your computer usage history to generate targeted offers and tips.
- Open the Settings app by pressing Windows Key + I.
- Select Privacy & security from the left-hand menu.
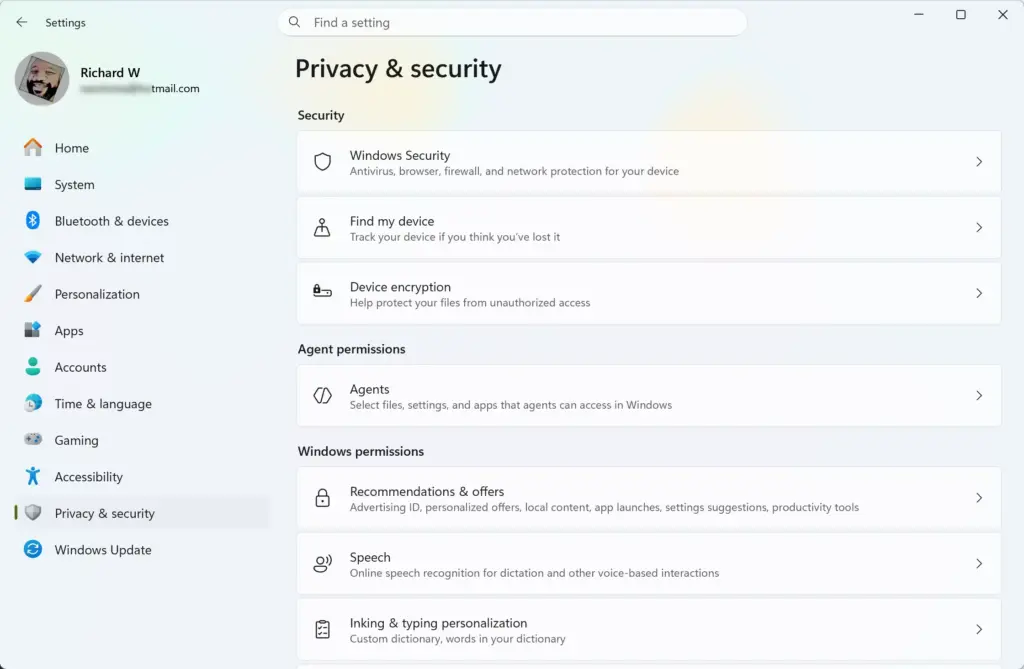
- Click Diagnostics & feedback on the right.
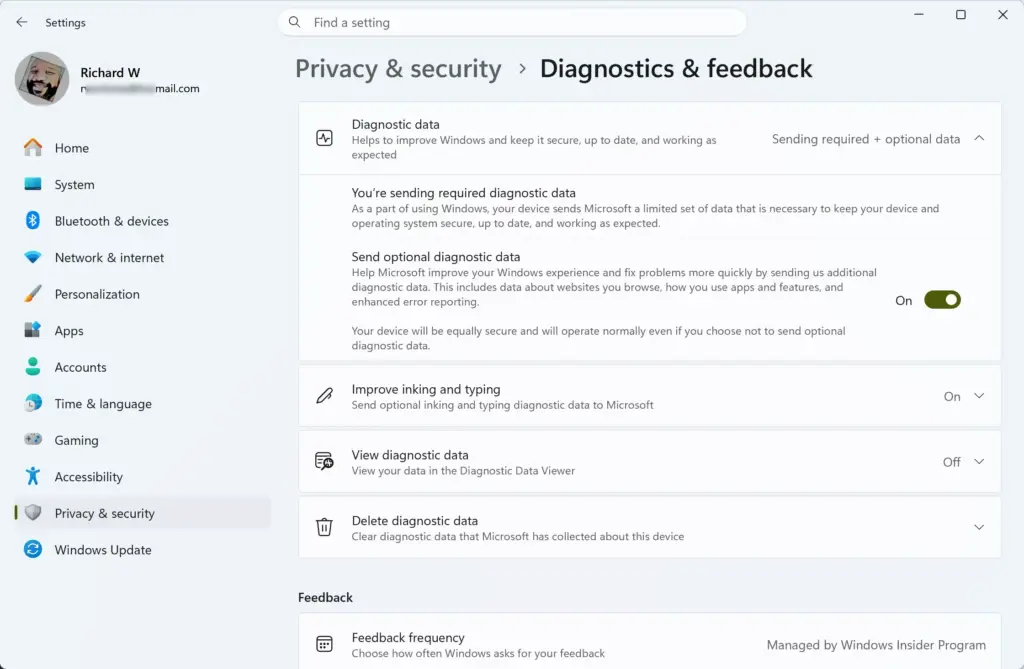
- Expand the Tailored experiences section.
- Turn off the toggle switch next to Let Microsoft use your diagnostic data—excluding info about your browser—to provide you with personalized tips, ads, and recommendations. The switch should now read Off.
If this setting is greyed out or missing on a work or school PC, an administrator has probably set it through policy, and you will need to ask your IT team. You can turn the toggle back on at any time.
Step 6Unique Expert Tip — Managing Background Apps and Startup Programs
To manage background apps and startup programs in Windows 11, open Task Manager by pressing Ctrl + Shift + Esc, click the Startup apps tab on the left, and disable any programs you do not need to run automatically. This stops unnecessary software from slowing down your computer when it turns on.
To stop unnecessary programs from running as soon as your computer turns on:
- Press Ctrl + Shift + Esc on your keyboard to open Task Manager.
- Click Startup apps. Its icon looks like a small gauge or speedometer, and you will find it in the menu on the left side of the Task Manager window. If the left menu shows only icons, click the three-line menu icon at the top to expand it. The startup apps list lets you stop unwanted programs from running in the background when your computer turns on, which helps your PC run faster.
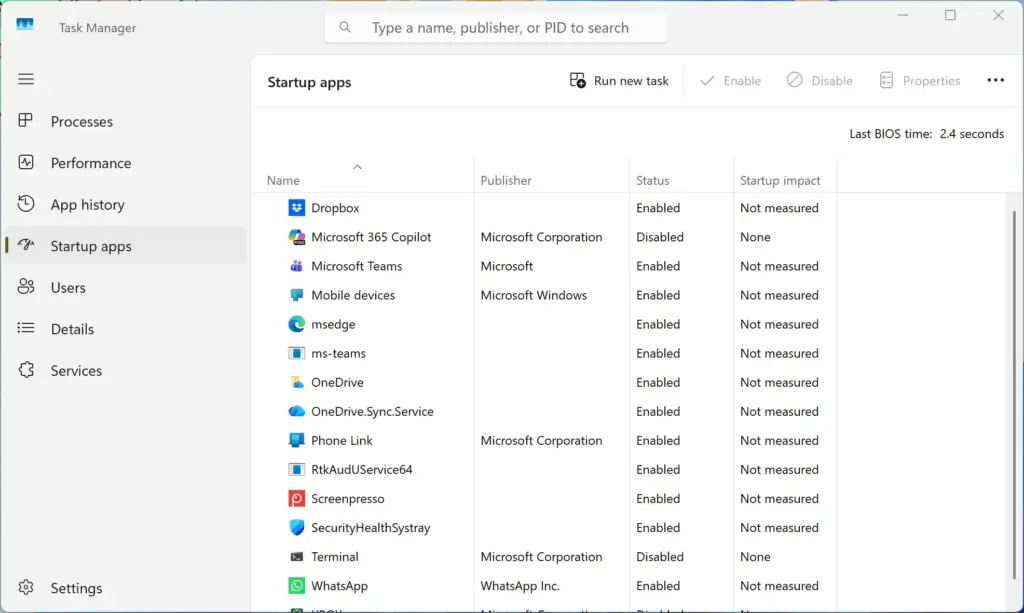
- Review the list of applications that launch automatically when you turn on your PC. The Startup impact column shows which ones slow down sign-in the most.
- Right-click any app you do not need running immediately in the background and select Disable. The Status column for that app changes to Disabled.
You can still open it by hand, and you can right-click it and choose Enable to reverse the change. Leave security software and hardware drivers alone unless you know what they do. The change takes effect the next time you restart or sign in.
Turning off Windows 11 system recommendations keeps your system resources free and stops annoying pop-up ads from appearing right after you sign in to your computer. Stopping these unwanted offers matters because disabling Windows 11 system recommendations frees up memory and stops distractions, letting you get to work right away without closing extra windows.
Step 7Unique Expert Tip — Clearing the System Clipboard
This deletes the stored history of everything you recently copied and pasted to protect your privacy and reduce clutter.
- Open the Settings app by pressing Windows Key + I.
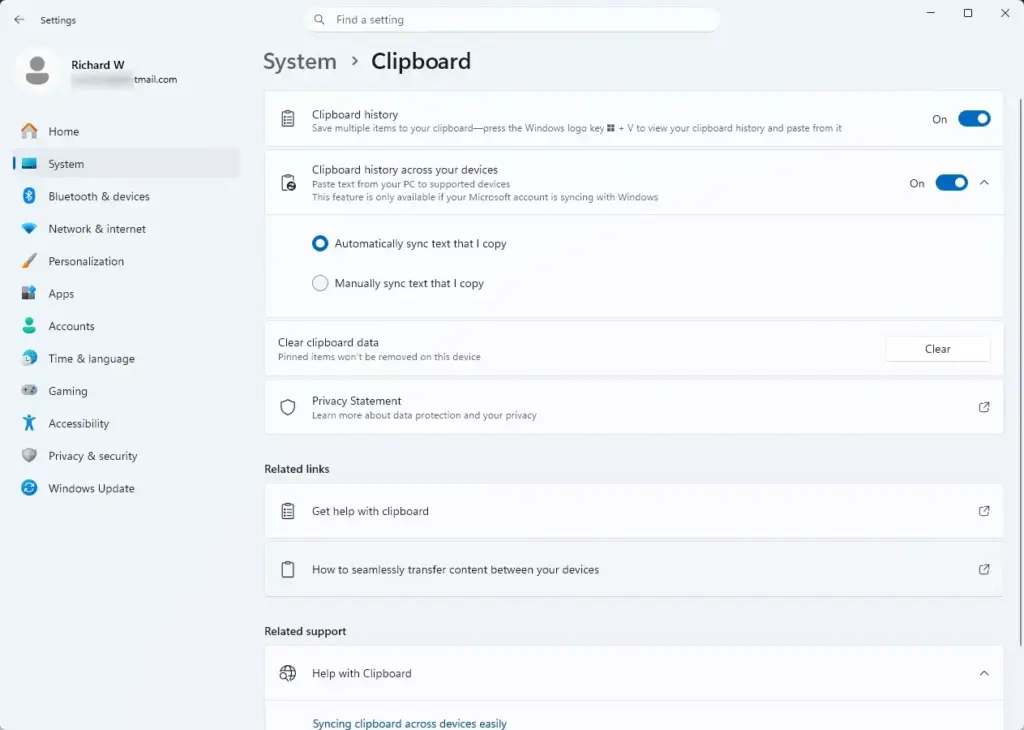
- Select System from the left menu, then click Clipboard on the right.
- Locate the Clipboard data section and click the Clear button next to Clear clipboard data. Your copied history is wiped. Items you have pinned in the clipboard history are normally kept.
- Optional: turn off the Clipboard history toggle switch entirely if you prefer not to store multiple copied items. Windows will then keep only the most recent item you copied.
Summary
Windows 11 system recommendations and promotional offers can easily be turned off if you find built-in ads and tips distracting while using your computer. Adjusting your Start menu preferences, notification settings, and File Explorer options gives you a much cleaner, quieter experience without extra Microsoft suggestions getting in your way. If a new Windows feature update brings some prompts back, run through the same screens again, because major updates can reset a few of these switches.
What is the best free PC cleaning software?
Windows itself includes free tools like Disk Cleanup and Storage Sense that remove temporary files and unused apps. For most people, these built-in options work well. Paid software often promises more but rarely delivers extra value. Focus on deleting files you don't need and uninstalling unused programs first.
Can I upgrade to 🪟 Windows 11 for free?
If you own a genuine Windows 10 license, you can upgrade to Windows 11 free through Windows Update. Go to Settings, select System, then About, and click Check for updates. Without an existing license, you'll need to purchase Windows 11.
Why is my 🪟 Windows 11 PC running slow?
Check Task Manager for apps using high CPU or disk usage. Disable startup programs you don't need, run Windows Update, and scan for malware with Windows Defender. Low storage space also slows things down—delete unused files or apps. Restart your PC regularly.
How do I clean up my desktop in 🪟 Windows 11?
Right-click unused desktop icons and delete them. Use Storage Sense in Settings to remove temporary files automatically. Organize remaining files into folders. Disable animated wallpapers and visual effects in Settings under System, then Display for a cleaner, faster desktop.
Did this guide fix your problem?

About the Author
Richard
Tech Writer, IT Professional
Richard is a writer at Geek Rewind who turns complex IT tasks into clear, step-by-step guides. He draws on years of hands-on experience in system administration and enterprise IT operations, focusing on Windows, Linux and WordPress: the problems people actually run into, and the fixes that work. His server and WordPress guides come from systems he runs himself. Richard builds and maintains the platform behind Geek Rewind, from its Ubuntu servers and Nginx configuration to its custom WordPress plugins. Many new tutorials start with readers' questions, and he's always glad to answer them in the comments.
No comments yet — be the first to share your thoughts!