How to Check If Your PC Can Upgrade to Windows 11

Windows 11 checks are quick, and the PC Health Check app gives a clear pass or fail answer in about a minute. Microsoft’s PC Health Check is a free app that tests whether your computer meets the Windows 11 requirements. On Windows 10, you can also check from Settings Update & Security Windows Update
Both checks give a simple pass or fail result. If your PC fails, this guide shows which requirement is missing and whether you can fix it. Common blockers include the TPM (a security chip built into most modern PCs), Secure Boot, and the processor generation.
Running a check changes nothing on your PC, so you can repeat it as often as you like. The only risky steps are the firmware changes near the end. Each one is marked before you reach it.
You can check whether your PC can upgrade to Windows 11 in under a minute by opening Settings Update & Security Windows Update on Windows 10, or by running Microsoft’s PC Health Check app. Windows Update shows a pass or fail result, and PC Health Check names the specific requirement that failed, such as TPM 2.0 or Secure Boot. Running either check changes nothing on your PC.
What 🪟 Windows 11 requires
Windows 11 is stricter than Windows 10 about hardware. Most failed upgrades come down to TPM, Secure Boot, or the processor, which are the last three items below. Your PC must have:
- Processor: 1 GHz or faster, with 2 or more cores, on Microsoft’s list of supported 64-bit processors.
- RAM: 4 GB or more.
- Storage: 64 GB or more.
- Graphics: DirectX 12 or later, with a WDDM 2.0 driver (the driver model Windows uses to talk to the graphics card).
- Display: larger than 9 inches diagonally, with at least 720p resolution.
- Firmware: UEFI (the modern replacement for the old BIOS) with Secure Boot capability. Secure Boot is a startup feature that blocks untrusted software from loading before Windows.
- TPM: version 2.0. A Trusted Platform Module (TPM) is a security chip, or a firmware feature that acts like one, that stores encryption keys.
To upgrade through Windows Update , you also need Windows 10 version 2004 or later. Windows 11 Home needs an internet connection and a Microsoft account during first-time setup.
Microsoft’s list of supported processors changes over time, so check your exact model on Microsoft’s site. As a general rule, Intel Core 8th generation and newer, and AMD Ryzen 2000 series and newer, are supported. Some exceptions go each way, so do not rely on the generation alone.
Check with Windows Update on 🪟 Windows 10
This is the quickest method. Windows 10 runs the compatibility check itself and shows the result in Windows Update.
- Open Settings by pressing Windows key + I.

Windows 11 Start menu with Settings gear icon highlighted. - Select Update & Security, then select Windows Update.

Settings › Windows Update - Look at the banner near the top of the page.
You will see one of three results:
- The upgrade is ready. You see "Windows 11 is ready for you" or a similar message with a Download and install button. Your PC passes the check, and Microsoft is offering the upgrade now.
- The PC passes but the upgrade is not offered yet. You see a message that the PC meets the requirements and the upgrade will be offered later. Microsoft rolls the upgrade out in stages. This is not an error, and the check you ran is still valid.
- The PC fails. You see "This PC doesn't currently meet Windows 11 system requirements". This message does not say which requirement failed, so continue with PC Health Check below.
If the banner is missing, your Windows 10 version may be older than 2004. Install all pending updates, restart, and open the page again.
Check with the PC Health Check app
PC Health Check is Microsoft's own compatibility tool. Unlike the Windows Update banner, it tells you which requirement failed. It is the right tool when your PC fails and you need to know why.
- On Windows 10, download PC Health Check from Microsoft's Windows 11 page and install it. On Windows 11, search the Start menu for Windows PC Health Check, because it is usually already installed.
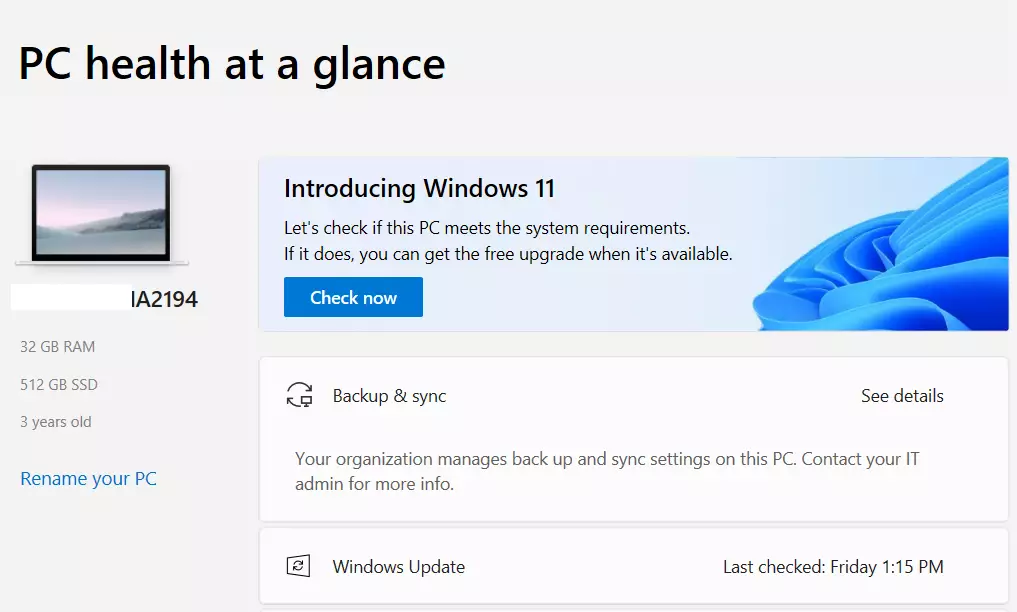
windows 10 check now pc health app - Open the app.
- Find the banner labelled Introducing Windows 11 and select Check now.
A result window opens. If it says This PC can run Windows 11, every requirement passes. If it says This PC can't run Windows 11, the window lists each failing requirement.
If the app installs but never shows the Check now button, restart the PC and open it again. Make sure you downloaded the app from Microsoft's own site and not from a third-party mirror.
Read the failure message
The wording names the problem directly. Typical messages are:
- This PC must support TPM 2.0 or TPM 2.0 must be enabled on this PC. The first means the hardware lacks it. The second means it exists but is switched off in firmware, which you can usually fix.
- This PC must support Secure Boot or Secure Boot must be enabled on this PC. The same split applies: unsupported hardware, or a setting that is turned off.
- The processor isn't currently supported for Windows 11. The CPU is not on the list. You cannot fix this with a setting.
- There isn't enough disk space or a message about storage. Free up space or use a larger drive.
Use the sections below to confirm each item yourself and fix the ones that can be fixed.
Check each requirement by hand
Check the requirements yourself when PC Health Check gives an unclear result, or when you want to know before you buy or repurpose a PC.
Check the processor and RAM
This step shows your CPU model and installed memory so you can compare them with the requirements.
- Open Settings.
- Go to System About
- Under Device specifications, read the Processor and Installed RAM lines.
The processor line shows the full model name, for example "Intel(R) Core(TM) i5-8250U". Look that model up on Microsoft's list of supported processors. Installed RAM must be 4 GB or more.
The same page shows System type. It must say 64-bit operating system. A 32-bit Windows install on 64-bit hardware cannot upgrade in place, so a PC that shows 32-bit here needs a clean install.
Check storage
The drive Windows is installed on must be 64 GB or larger. Free space matters too, because the upgrade needs room to work.
- Open Settings.
- Go to System Storage
- Check the used and total space of the C: drive.
If the drive is large enough but nearly full, free some space before you upgrade. Storage Sense on the same page (a tool that deletes temporary files automatically) can help.
Check TPM 2.0
This step tells you whether a TPM is present, enabled, and version 2.0.
- Press Windows key + R to open Run.
- Type
tpm.mscand press Enter. Approve the prompt if one appears. - Read the status message in the middle of the TPM Management on Local Computer window.
- Under TPM Manufacturer Information, read the Specification Version line.
You want to see The TPM is ready for use and a specification version of 2.0. A version of 1.2 does not meet the requirement.
If you see Compatible TPM cannot be found, either the PC has no TPM or the TPM is turned off in firmware. See "Turn on TPM in firmware" below.
Administrator required: you can also check from PowerShell. Right-click Start and select Terminal (Admin) or Windows PowerShell (Admin). Then run:
Get-TpmTpmPresent should read True, and TpmReady should read True. This command does not show the version number, so use tpm.msc to confirm 2.0.
Check UEFI and Secure Boot
This step shows whether your PC starts in UEFI mode and whether Secure Boot is on.
- Press Windows key + R, type
msinfo32, and press Enter. - In System Information, select System Summary in the left pane.
- Find the BIOS Mode and Secure Boot State lines in the right pane.
Here is how to read them:
- BIOS Mode: UEFI is what you need. Legacy means the PC starts in the old BIOS mode, which fails the check even if the hardware supports UEFI.
- Secure Boot State: On passes. Off means the hardware supports it but it is switched off. Unsupported means the hardware cannot do it.
Administrator required: you can confirm Secure Boot in a PowerShell window opened as administrator with Confirm-SecureBootUEFI. It returns True or False. If it returns an error saying the cmdlet (a PowerShell command) is not supported on this platform, the PC is running in Legacy BIOS mode.
Check graphics and DirectX
This step confirms the DirectX version and graphics driver model.
- Press Windows key + R, type
dxdiag, and press Enter. Select Yes if Windows asks to check your drivers. - On the System tab, read the DirectX Version line. It must be DirectX 12.
- Select the Display tab, then read the Driver Model line under Drivers. It must be WDDM 2.0 or higher.
If your graphics driver is old, update it from Windows Update or from the manufacturer, then check again. Most PCs that pass the other requirements also pass this one.
Fix a requirement that fails
Some failures are settings, not hardware. TPM and Secure Boot are the two most common, and both are often switched off by default on PCs from before 2018 or so.
Without that key you cannot get into your files. Back up the key before you continue. Go to Settings Privacy & security Device encryption, or sign in to your Microsoft account's recovery keys page to see whether a key is stored there. Device encryption is not available on every edition, so if the page is missing, check your account's recovery keys page.
Open the UEFI firmware settings
Both fixes below happen in the firmware settings screen. Windows can take you there without needing the right key at startup.
- Open Settings.
- On Windows 11, go to System Recovery On Windows 10, go to Update & Security Recovery
- Next to Advanced startup, select Restart now.
- After the restart, select Troubleshoot, then Advanced options, then UEFI Firmware Settings.
- Select Restart. The PC restarts into the firmware screen.
If UEFI Firmware Settings does not appear in step 4, the PC is not starting in UEFI mode. See "If BIOS Mode says Legacy" below.
Every manufacturer lays out the firmware screen differently, and the mouse may not work. Use the keyboard and the on-screen key legend.
Turn on TPM in firmware
Look in the security or advanced sections for a TPM option. The label depends on your processor and manufacturer. On Intel systems it is usually called Intel Platform Trust Technology or PTT. On AMD systems it is usually called AMD fTPM. Some boards just call it TPM Device or Security Device. Set it to enabled, save, and exit. When Windows starts, run tpm.msc again to confirm The TPM is ready for use.
If you cannot find any TPM option, the firmware may not offer one. Check the manufacturer's support page for your exact model.
Turn on Secure Boot
Look in the boot or security sections for Secure Boot and set it to enabled. Some firmware keeps the option greyed out until you set a supervisor password or switch the boot mode to UEFI. If the option is greyed out, check those two settings first. Save and exit, then run msinfo32 to confirm Secure Boot State reads On.
To undo either change, return to the same firmware screen and set the option back to disabled.
If BIOS Mode says Legacy
Older drives use the MBR style instead. Changing this on a working install is risky. Microsoft provides a tool called MBR2GPT for it, but make a full backup before you attempt it, and follow Microsoft's documentation for the tool. If you are not comfortable doing this, a clean install of Windows 11 on a GPT drive is the safer route.
Why the result may not match what you expect
Several things can make a PC look eligible when it is not, or ineligible when it should work.
- The PC passes but Windows Update shows no upgrade. Microsoft offers the upgrade in waves, based on hardware and driver compatibility data. Check again in a few weeks, or use Microsoft's Installation Assistant once your PC passes PC Health Check.
- Home needs an account. Windows 11 Home needs an internet connection and a Microsoft account during first-time setup. This affects setup, not the hardware check, so PC Health Check does not flag it.
- Old Windows 10 builds. Windows Update only offers Windows 11 to Windows 10 version 2004 or later. Update Windows 10 first if the banner does not appear.
- Virtual machines. A virtual machine needs a virtual TPM and Secure Boot set up in the hypervisor (the software that runs virtual machines). The check reflects the virtual hardware, not the physical PC.
- Unsupported processors. If the processor is the only failure, no setting fixes it. Your options are to keep using Windows 10, or to replace the PC. Windows 10 support ends on October 14, 2025, so after that date it stops receiving security updates unless you enrol in Microsoft's extended security updates.
What to do next
If your PC passes, back up your files, then start the upgrade from Settings Update & Security Windows Update, or with Microsoft's Installation Assistant. After the upgrade, Windows 11 keeps your previous version for 10 days. During that time you can go back from Settings System Recovery, so nothing is permanent until that window closes. If your PC fails on the processor, plan to keep Windows 10 running securely or to replace the PC before support ends.
How can I tell if my PC is compatible with 🪟 Windows 11?
Download Microsoft's PC Health Check app and run it. It tests your PC against the Windows 11 requirements and gives a clear pass or fail result in about a minute. If it fails, the app names the missing requirement. Running the check changes nothing on your PC, so you can repeat it as often as you need.
Can I still upgrade my 🪟 Windows 10 to 11 for free?
Not through the standard free offer. Microsoft ended the free Windows 10 to 11 upgrade in October 2025. If your PC is eligible, you can still buy a Windows 11 license. Windows 10 users can also enroll in Extended Security Updates to keep receiving security fixes for a time.
Can a 10 year old PC run 🪟 Windows 11?
Possibly. Age matters less than hardware. A 10-year-old PC can run Windows 11 if it has a supported processor, TPM 2.0, and Secure Boot. Many PCs from that period lack one or more of these. Run PC Health Check to find out. If it fails only on TPM or Secure Boot, check your BIOS settings first.
What are the minimum system requirements for installing 🪟 Windows 11 on a PC?
Windows 11 needs a 64-bit processor with 1 GHz speed or faster and at least 2 cores, on Microsoft's supported list. You also need 4 GB of RAM, 64 GB of storage, UEFI firmware with Secure Boot, and a TPM 2.0 security chip. The graphics card must support DirectX 12, and the display must be at least 9 inches with 720p resolution.
Was this guide helpful?

About the Author
Richard
Tech Writer, IT Professional
Richard is a writer at Geek Rewind who turns complex IT tasks into clear, step-by-step guides. He draws on years of hands-on experience in system administration and enterprise IT operations, focusing on Windows, Linux and WordPress: the problems people actually run into, and the fixes that work. His server and WordPress guides come from systems he runs himself. Richard builds and maintains the platform behind Geek Rewind, from its Ubuntu servers and Nginx configuration to its custom WordPress plugins. Many new tutorials start with readers' questions, and he's always glad to answer them in the comments.


No comments yet — be the first to share your thoughts!