How to Upgrade to Windows 11 on for Unsupported PCs
You can upgrade unsupported PCs to Windows 11 by bypassing Microsoft’s official hardware requirements, such as TPM 2.0 or specific CPU generations.
This process allows you to install and run Windows 11 on older hardware that doesn’t meet the standard criteria, like many PCs manufactured before 2018.
You’ll get the full Windows 11 experience, keeping all your existing files and installed applications without issue.
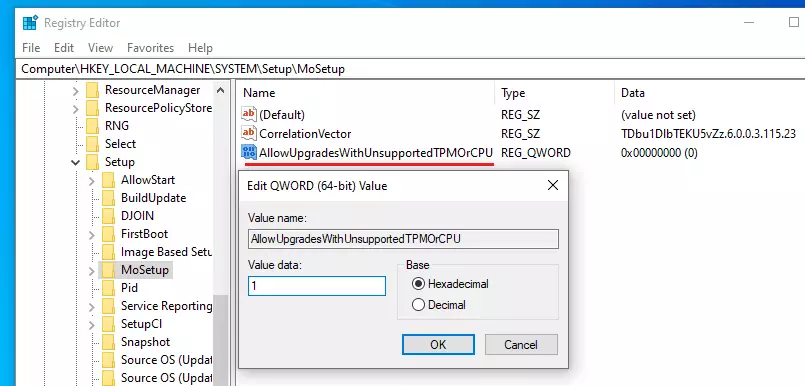
You can bypass Windows 11 hardware requirements by editing the registry or using tools like Rufus. Navigate to Computer\🗝️HKEY_LOCAL_MACHINE\SYSTEM\Setup\MoSetup in regedit, create a new DWORD value named AllowUpgradesWithUnsupportedTPMOrCPU, and set its data to 1 for an in-place upgrade.
Check Your PC Health
Before you start, you need to know why your PC is unsupported. Download the official Microsoft PC Health Check tool. Run it to see if you’re missing TPM 2.0, Secure Boot, or if your processor is on the unsupported list. This helps you understand exactly what you’ll be bypassing.
Data Backup Necessity
Method 1The Registry Hack
You can upgrade Windows 11 on unsupported PCs using a registry hack, which involves making a small change in your computer’s settings.
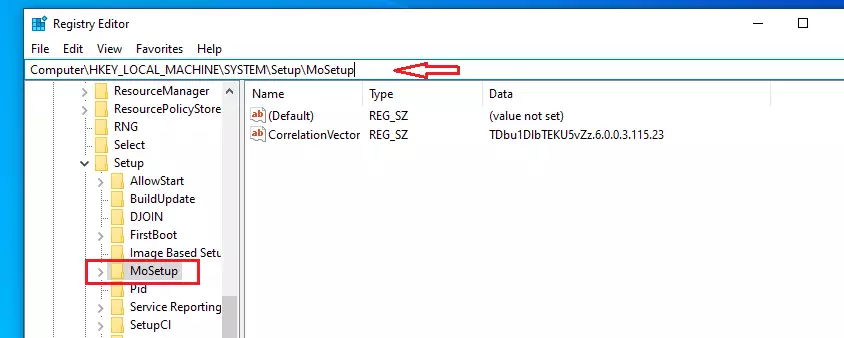
Open the Registry Editor by searching for "regedit" in your start menu. Navigate to the `🗝️HKEY_LOCAL_MACHINE\SYSTEM\Setup\MoSetup` path for Windows 11 upgrades. This location holds settings that bypass hardware checks.
Computer\HKEY_LOCAL_MACHINE\SYSTEM\Setup\MoSetup
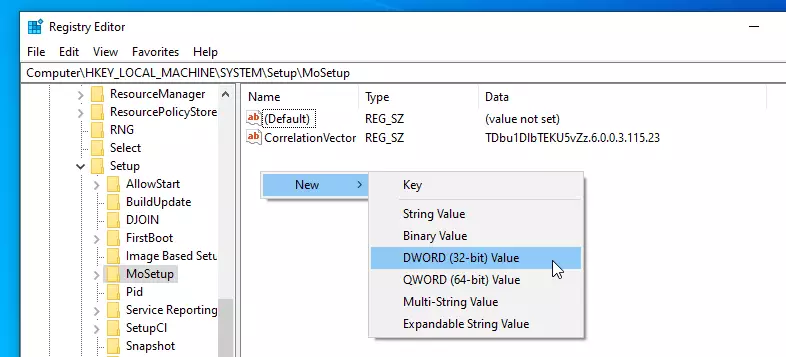
Right-click in the empty space on the right side. Select New > DWORD (32-bit) Value. Name this new item exactly like this:
AllowUpgradesWithUnsupportedTPMOrCPU
Double-click the new item. In the “Value data” box, type 1 and click OK. Close the editor.
Method 2Using Rufus for a Bootable USB
Using Rufus to create a bootable USB is a popular way to upgrade to Windows 11 on unsupported PCs, especially if you want a fresh start.
Alternative Tool: FlyBy11
In-Place Upgrade vs. Clean Install
An in-place upgrade preserves applications, settings, and files on your computer. A clean install erases the hard drive for a new beginning. Most users choose an in-place upgrade, but a clean install is better for fixing current system issues.
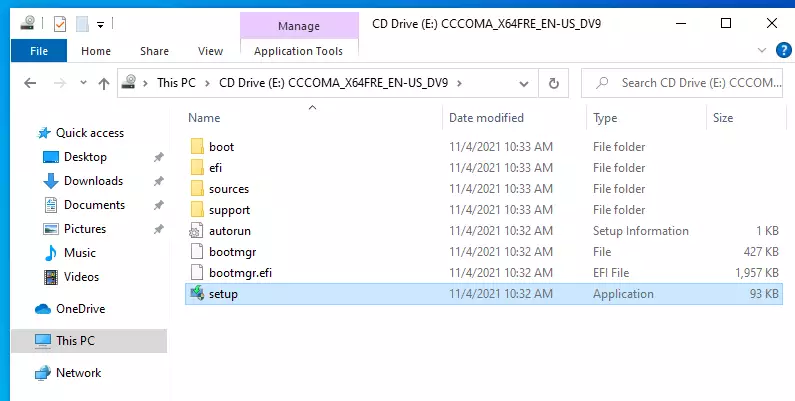
Upgrading to 🪟 Windows 11
After getting your PC ready, you can start the actual upgrade to Windows 11 on your unsupported computer by running the setup file from the Windows 11 disk image.
Click Next when the installer opens.
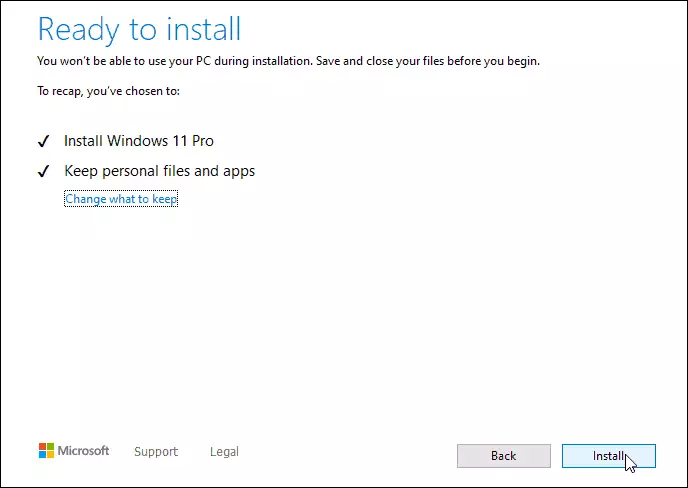
If you did everything correctly, you will see a warning message instead of an error. You can now proceed with the installation while keeping your files and programs safe.
Summary
To upgrade Windows 11 on unsupported PCs, you can use registry edits or tools like Rufus, but remember to back up your important files first and know that future updates might be tricky.- Use the PC Health Check tool to identify hardware gaps.
- Always back up your data before starting.
- Use the Registry Editor to create the
AllowUpgradesWithUnsupportedTPMOrCPUvalue for in-place upgrades. - Use Rufus or FlyBy11 for easier, automated bypass methods.
- Remember that unsupported PCs may face stability risks with future Windows updates.
Will 🪟 Windows 11 updates work on unsupported hardware?
Yes, for now. You will receive standard security updates and feature patches through Windows Update. However, Microsoft does not guarantee this will continue indefinitely. Future major updates might require a clean install or could potentially block unsupported hardware from receiving specific system-level patches, so proceed with caution.
Is it safe to upgrade an unsupported PC for daily use?
It is generally stable for daily tasks like web browsing and office work. However, because your hardware does not meet the official security requirements, your system may be slightly more vulnerable to certain threats. Always keep your antivirus software updated and maintain regular backups of your personal data.
What happens if I don’t upgrade before 🪟 Windows 10 end of support?
Once Windows 10 reaches its end of support, Microsoft will stop providing security updates. This leaves your computer exposed to new viruses and hackers. Upgrading to Windows 11, even on unsupported hardware, is safer than staying on an outdated operating system that no longer receives critical security patches.
Was this guide helpful?

About the Author
Richard
Tech Writer, IT Professional
Richard, a writer for Geek Rewind, is a tech enthusiast who loves breaking down complex IT topics into simple, easy-to-understand ideas. With years of hands-on experience in system administration and enterprise IT operations, he’s developed a knack for offering practical tips and solutions. Richard aims to make technology more accessible and actionable. He's deeply committed to the Geek Rewind community, always ready to answer questions and engage in discussions.


No comments yet — be the first to share your thoughts!