How to Change Your Desktop Background in Windows 11

Desktop backgrounds in Windows 11 let you put a favorite photo, a rotating picture slideshow, or a solid color behind your app icons and taskbar. This background is often called wallpaper, and it is the quickest way to personalize your PC screen. The change takes effect immediately, you don’t need to restart, and it works the same on Windows 11 Home and Pro.
You can change your wallpaper in under 30 seconds. Right-click any empty space on your desktop and pick Personalize. This opens the Windows 11 Settings app on the personalization page. If you would rather get there through Settings yourself, the steps below walk you through it.
Right-click an empty area of your desktop and select Personalize, then click Background. Open the “Personalize your background” dropdown, choose Picture, click Browse photos, select your image, and click Choose picture. The background changes with no restart needed.
How to Change Your Desktop Background Using Your Own Photos
To change your desktop background in Windows 11 using your own photos, open the Settings app and go to Personalization. Click Background, choose Picture from the dropdown menu, and click Browse photos to select any image saved on your computer. The steps below cover each screen in order, plus the slideshow and fit options.
- Open Settings : Press
Windows key + Ion your keyboard at the same time. Or click the Start button (the Windows icon on the taskbar ) and then click Settings. If Settings isn’t in the pinned apps, click All apps and find it in the list. The Settings window should now open, with a list of categories down the left side.

- Go to Personalization: In the Settings window, click Personalization in the list on the left side. Then click Background on the right side. The page should now show a preview of your current desktop and a dropdown labeled “Personalize your background”. If the Personalization page is greyed out or shows a message about activation, Windows 11 on that PC has not been activated yet. Activate it first, then try again. On a work or school PC, an administrator may also lock these settings, and in that case you can’t change them yourself.
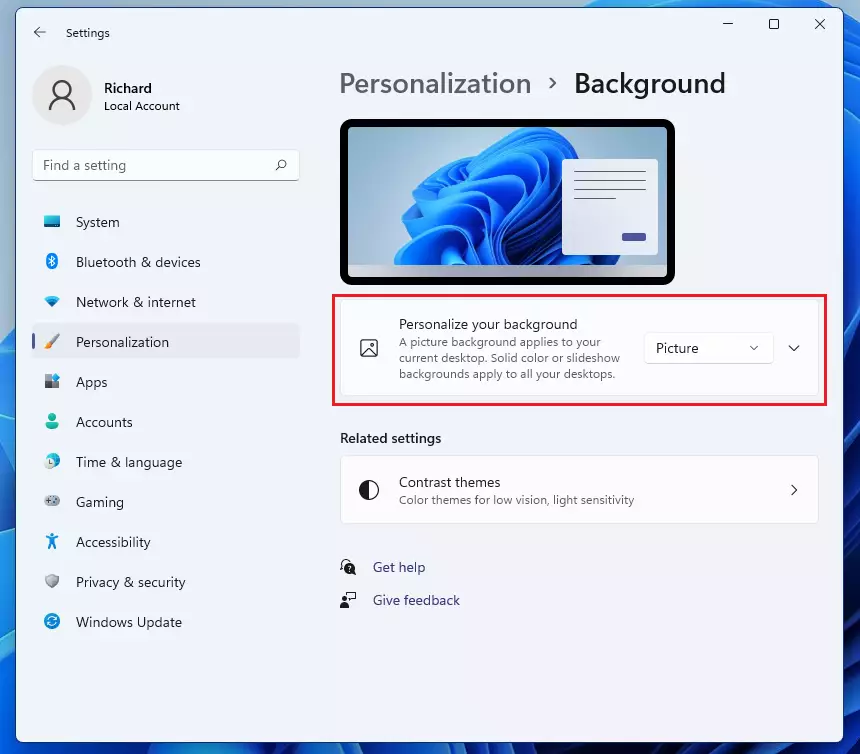
- Choose your new background: Under the “Background” section, open the Personalize your background dropdown menu. Select Picture if you want just one photo, or Slideshow if you want to cycle through multiple photos automatically. The same menu also offers Solid color, and on newer builds of Windows 11 it may offer Windows spotlight, which pulls in pictures from Microsoft. After you pick an option, the settings below the dropdown change to match it.
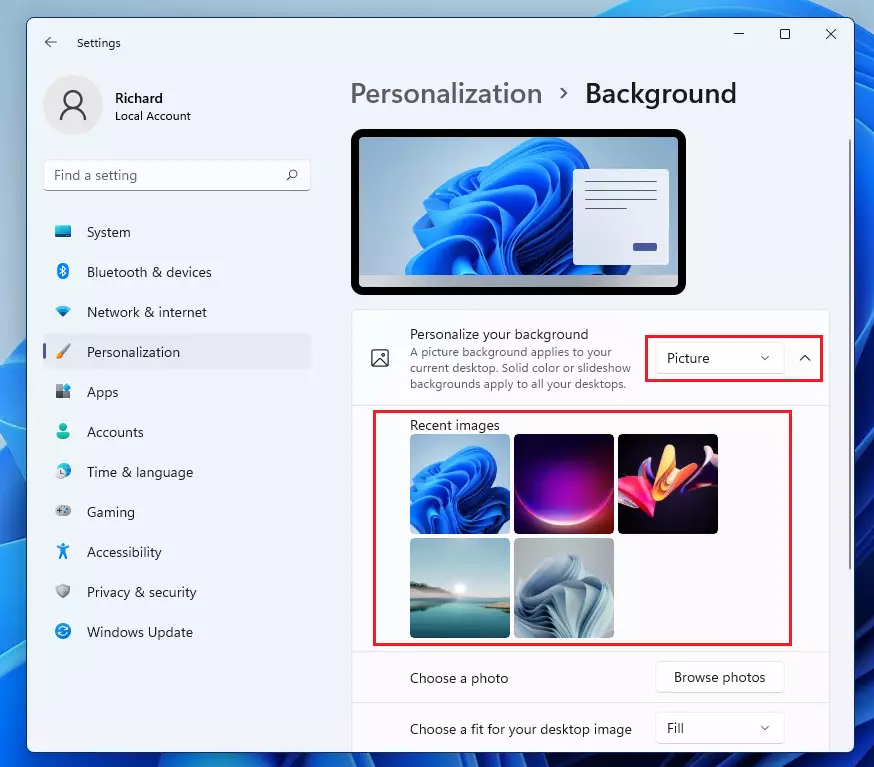
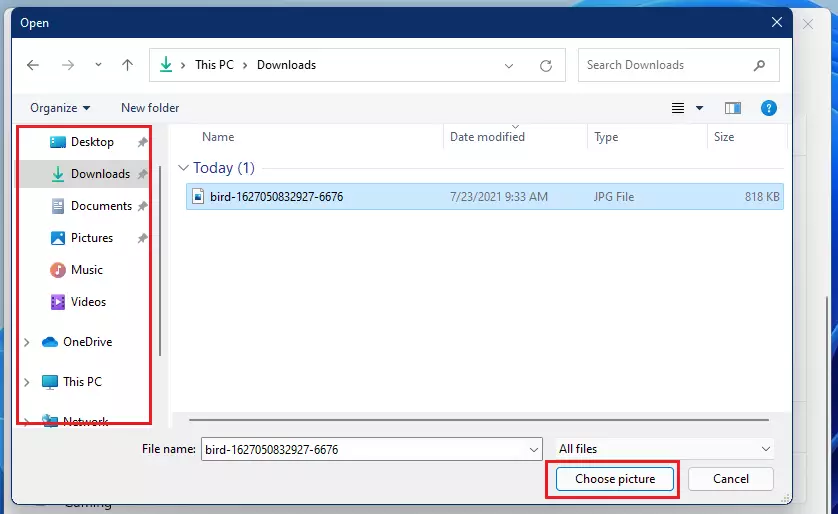
- Select a photo: If you want to use your own photo, click Browse photos next to “Choose a photo” and find the picture you want on your computer. Above that button you will see a few recent images, and clicking one of them applies it straight away. If you chose Slideshow instead, the button reads Browse under “Choose albums for your slideshow”. Use it to pick a folder of pictures, then set how often the picture changes in the “Change picture every” dropdown.
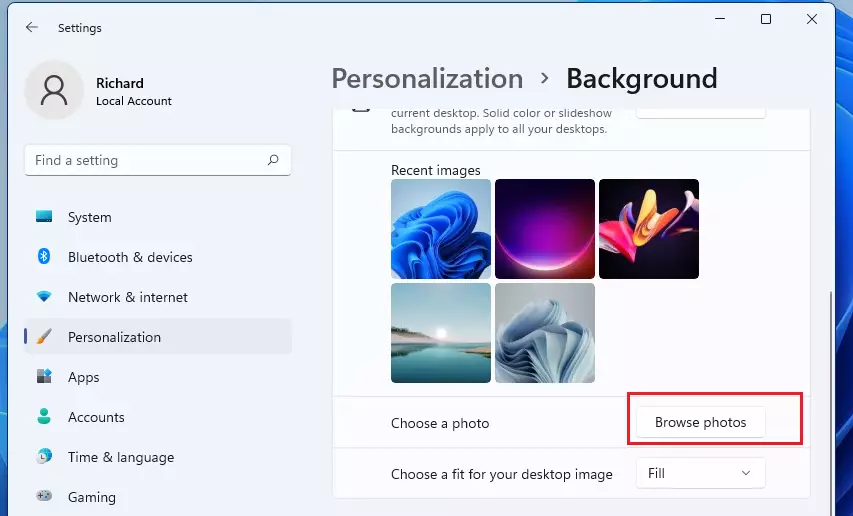
- Pick your picture: In the file window that opens, find your photo file (it can be a JPG, PNG, GIF, or BMP file) and click Choose picture. Your desktop background will change right away, and the preview on the Background page updates too. If you pick an animated GIF, Windows shows it as a still image rather than playing it. For slideshows, pick a folder that holds only the pictures you want, because every image inside it goes into the rotation.
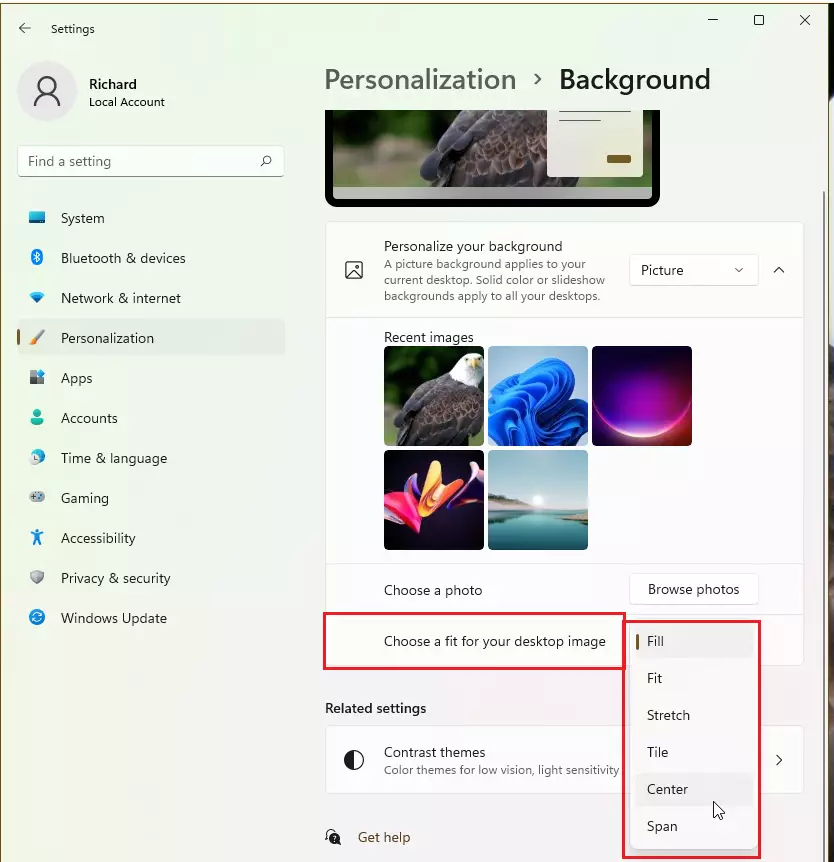
- Adjust how the picture fits: Sometimes pictures don’t fit the screen perfectly. Open the Choose a fit for your desktop image dropdown and select an option such as Fill, Fit, or Stretch. Fill covers the whole screen and crops the edges if needed. Fit shows the whole picture and leaves bars of color where it doesn’t reach. Stretch forces the picture to the screen size and can distort it. Tile, Center, and Span are also available. Fill is usually the best choice for a photo that has the same shape as your screen. To undo any change, go back to the Background page and pick another image, such as one of the recent pictures.
The Windows 11 desktop background now displays the selected photo or a rotating slideshow. Close the Settings window and minimize a few apps to check how it looks behind your icons. If the icons are hard to read against the picture, go back to the Background page and try another fit or a less busy image. This quick change adds some personality to your screen.
Why Change Your Desktop Background?
- It makes your computer feel more personal and unique.
- You can use any photo you want: family pictures, pets, nature, or artwork.
- A slideshow lets you enjoy lots of pictures without changing them yourself.
- Adjusting the fit makes sure your background looks good on your screen.
- It helps you quickly recognize your computer if you have more than one.
Changing your desktop background in Windows 11 allows you to personalize your workspace with family photos, pets, or artwork. It also helps you set up a rotating photo slideshow and ensures your display matches your personal style. You can repeat the steps at any time to switch back to an earlier picture or try something new.
Summary
All it takes is Settings Personalization Background, a choice of Picture or Slideshow, and a fit that suits your screen.
Was this guide helpful?

About the Author
Richard
Tech Writer, IT Professional
Richard is a writer at Geek Rewind who turns complex IT tasks into clear, step-by-step guides. He draws on years of hands-on experience in system administration and enterprise IT operations, focusing on Windows, Linux and WordPress: the problems people actually run into, and the fixes that work. His server and WordPress guides come from systems he runs himself. Richard builds and maintains the platform behind Geek Rewind, from its Ubuntu servers and Nginx configuration to its custom WordPress plugins. Many new tutorials start with readers' questions, and he's always glad to answer them in the comments.


[…] Desktop background (the picture on your screen) […]