How to Change the location of your OneDrive folder
Moving your OneDrive folder lets you choose where your files are stored on your PC. This is helpful if your main drive is running low on space, or if you want to keep your documents and photos on a separate, larger hard drive.
OneDrive is Microsoft’s cloud storage service that syncs files across your devices. By default, it usually installs on your C: drive. This guide shows you how to change that location to a different drive, like a D: drive, ensuring your files remain synced.
To change your OneDrive folder location, first unlink your PC from OneDrive via the Account tab in settings. Then, use File Explorer to move your entire OneDrive folder to the desired new location. Finally, sign back into OneDrive and select the new folder location during setup.
Step 1Disconnect Your Current OneDrive Link
You must first unlink your computer from OneDrive to change your OneDrive folder location. This stops your PC from syncing with the cloud for now but doesn’t delete your files. Look for the small OneDrive cloud icon in your system tray, usually in the bottom-right corner of your screen, to begin this process.
Here’s how to do it:
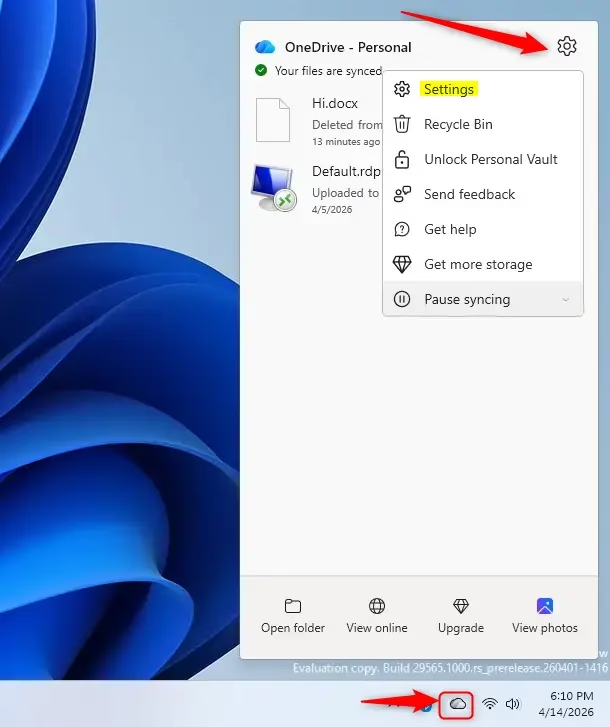
- Find the OneDrive Cloud Icon: Look for the small blue (or sometimes white) cloud icon in your system tray. This is usually in the bottom-right corner of your screen, near the clock. If you don’t see it, you might need to click the small arrow pointing up to show hidden icons.
- Open OneDrive Settings: Click the cloud icon. A small window will appear. In this window, look for the “Help and Settings” icon. It often looks like a gear or a question mark. Click it, then choose “Settings” from the menu.
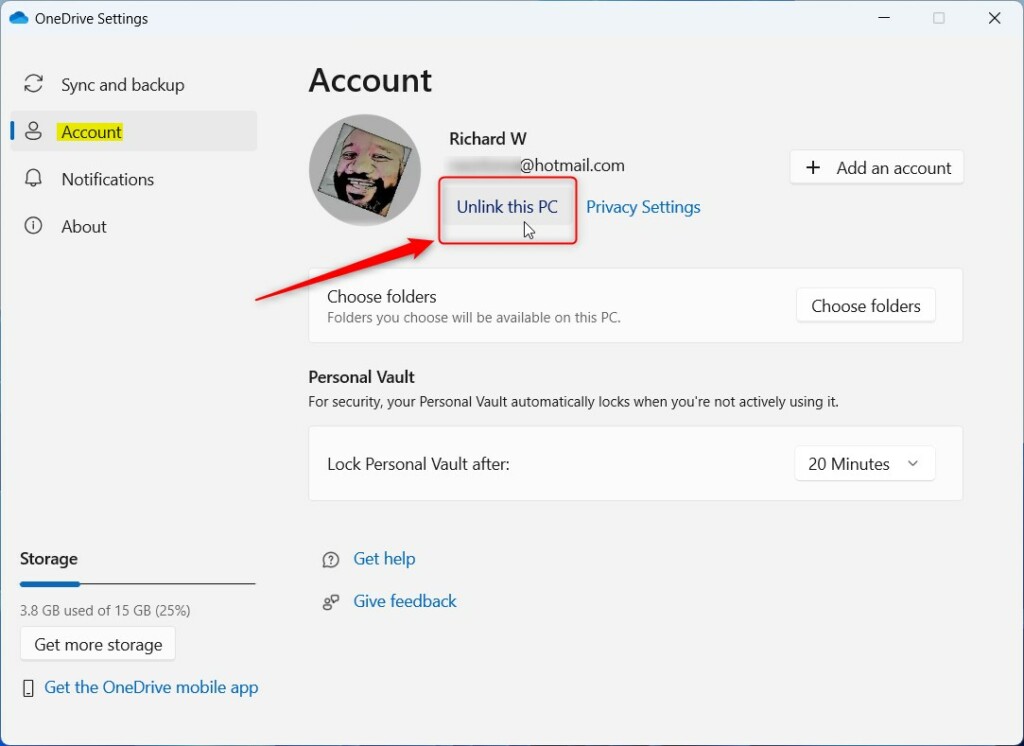
- Go to the Account Tab: Once the OneDrive settings window opens, you’ll see a few tabs across the top. Click the “Account” tab.
- Unlink Your PC: On the Account tab, find the option that says “Unlink this PC.” Click it. A box will pop up asking if you’re sure. Click “Unlink account” to confirm.
Step 2Move Your OneDrive Folder
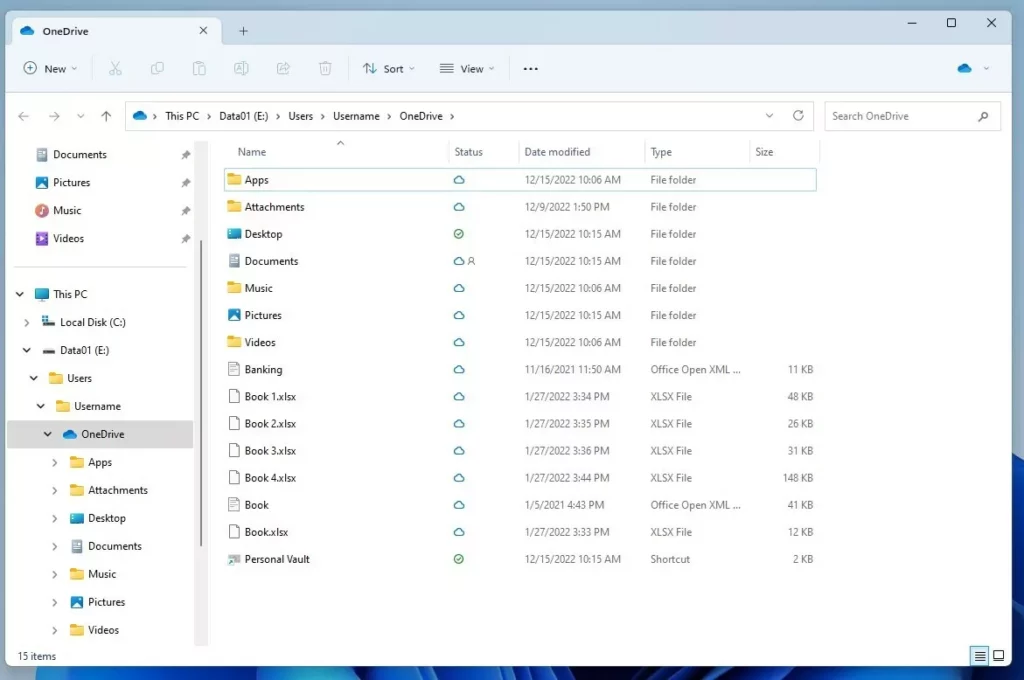
Once your PC is unlinked from OneDrive, you can move your actual OneDrive folder to a new spot. Use Windows File Explorer, the tool for managing your files, to cut and paste the entire OneDrive folder to your desired drive or directory. This makes sure all your documents and data are moved safely.
You’ll use Windows File Explorer for this. File Explorer is the program you use to see and manage your computer’s files and folders.
- Open File Explorer: Click the folder icon on your taskbar, or press the Windows key + E on your keyboard.
- Find Your Current OneDrive Folder: By default, your OneDrive folder is usually found in your user profile. It might look like this:
C:\Users\YourUsername\OneDrive
Go to this folder.
- Cut and Paste (or Drag and Drop): Select the entire OneDrive folder. You can then right-click on it and choose “Cut.” Go to the new location you want (like
D:\MyCloudFiles\OneDrive
or a folder on a different drive). Right-click in the new spot and choose “Paste.” You can also just click and drag the whole OneDrive folder to its new destination.
Step 3Connect OneDrive to Its New Location
After you move your OneDrive folder to its new location, you must inform the OneDrive app of the OneDrive folder's new address. You reconnect OneDrive by restarting its setup process, often by searching for 'OneDrive' in Windows. The OneDrive app then guides you to select the folder location, where you point the OneDrive app to the new directory where you moved your files.
- Start OneDrive Setup: If you closed the OneDrive setup window earlier, you might need to find it again. Sometimes, after unlinking, Windows will automatically offer to set up OneDrive again. If not, search for “OneDrive” in the Windows search bar and open it.
- Sign In: You’ll be asked for your Microsoft account email and password. Sign in like you normally do.
- Find the Location Screen: As you go through the setup, you’ll reach a screen showing where OneDrive wants to create its folder by default. This is the important part!
- Change the Location: Look for an option that says “Change location.” Click it.
- Select Your New Folder: A window will open for browsing. Go to the exact folder where you moved your OneDrive files in Step 2. For example, if you moved it to
D:\MyCloudFiles\OneDrive
, select that
OneDrive
folder.
- Confirm and Finish: After selecting the new folder, click “OK.” You’ll probably see a message saying the folder you chose already has files. This is what we want! Click “Use this location” (or a similar button).
- Complete Setup: Finish any other setup steps. OneDrive will now look at the files in your new location and start syncing any changes.


Reference:
https://support.microsoft.com/en-us/onedrive/change-the-location-of-your-onedrive-folder
Summary
Changing your OneDrive folder location involves three main steps. First, unlink your PC from your current OneDrive account. Second, use File Explorer to move your entire OneDrive folder to a new drive or directory. Finally, reconnect OneDrive to the application, pointing it to the new folder location you selected, ensuring all your files sync correctly.
- First, unlink your PC from OneDrive through its settings. Your files remain safe in the cloud.
- Next, use File Explorer to move your entire OneDrive folder from its old location to your desired new location.
- Finally, start the OneDrive setup again, sign in, and choose the “Change location” option to point OneDrive to the folder you just moved.
Was this guide helpful?

About the Author
Richard
Tech Writer, IT Professional
Richard, a writer for Geek Rewind, is a tech enthusiast who loves breaking down complex IT topics into simple, easy-to-understand ideas. With years of hands-on experience in system administration and enterprise IT operations, he’s developed a knack for offering practical tips and solutions. Richard aims to make technology more accessible and actionable. He's deeply committed to the Geek Rewind community, always ready to answer questions and engage in discussions.


No comments yet — be the first to share your thoughts!