How to Add Programs to Startup in Windows 11

Startup programs in Windows 11 are applications that open automatically right after you sign in to your PC. Setting up a program to launch at boot saves you from opening your favorite tools manually every time you turn on your computer.
Windows 11 includes three built-in ways to manage startup items, including the Task Manager interface (a tool that shows running apps and system performance) and the user Startup folder. You can add desktop apps, background utilities, and Microsoft Store apps to boot with your system depending on the method you choose. All of these methods work the same on Windows 11 Home and Pro, and none of them needs a restart to save. You will only see the result the next time you sign in.
Open Task Manager with Ctrl+Shift+Esc, select the Startup apps tab, right-click the program, and choose Enable. Alternatively, go to Settings Apps Startup and toggle the app on. For programs not listed there, open the Startup folder with Win+R, type shell:startup, and paste the app shortcut inside.
Using Task Manager to Manage Startup Apps
Task Manager helps you control which programs open automatically when you turn on your PC by letting you enable or disable startup apps in a few clicks. This built-in tool shows you how much each program slows down your boot time so you can speed up your computer. It only manages entries that already exist. If a program is not in the list, use one of the folder methods below to add it.
- Press Ctrl+Shift+Esc to open Task Manager . You should see the Task Manager window. If it opens in a compact view, click More details at the bottom.
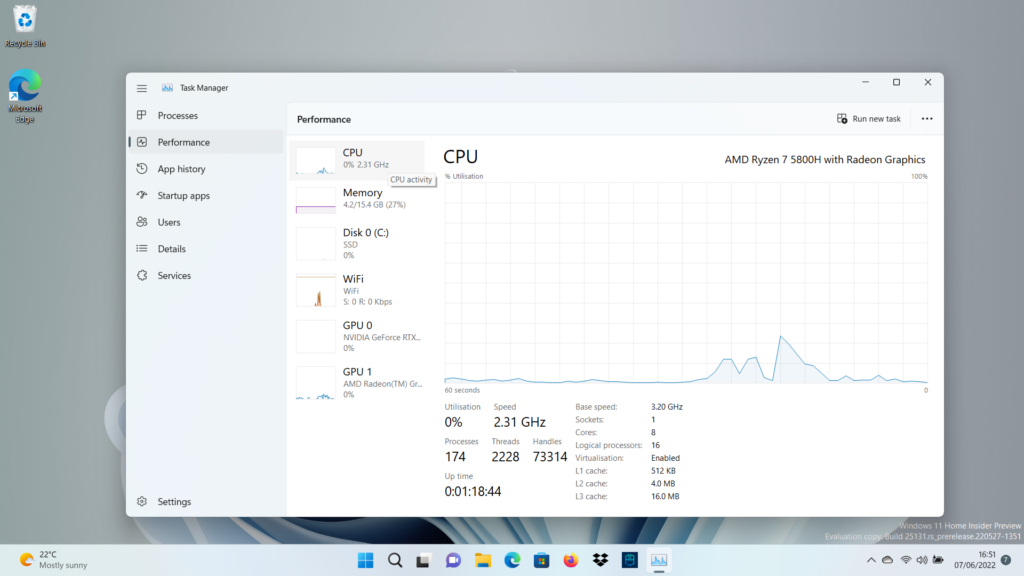
Windows 11 Task Manager dashboard showing startup applications list. - Select the Startup apps icon (represented by a speedometer gauge) on the left sidebar. On Windows 11 versions before 22H2, this is a Startup tab across the top instead. You should now see a list of programs with Status and Startup impact columns.
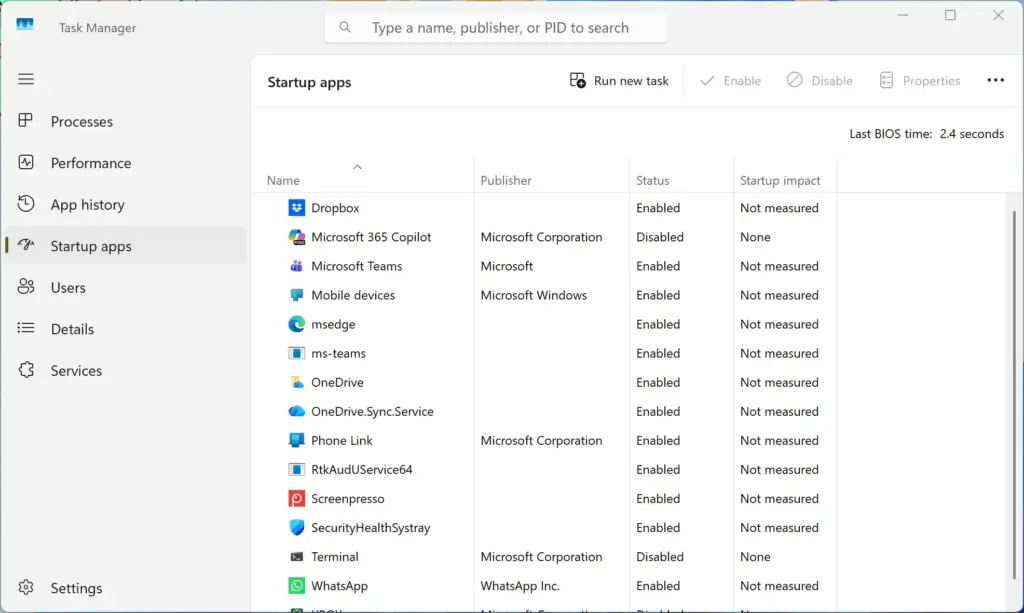
Task Manager › Startup - Locate the application you want to modify in the list. Click the Startup impact column header to sort by the programs that slow your boot the most.
- Right-click the application and select Enable to make it run at startup, or select Disable to stop it from launching automatically. The Status column should change to Enabled or Disabled right away.
To undo the change, right-click the same entry and choose the opposite option.
Using the Settings App
The Windows Settings app provides an alternative interface for managing automatic startup software, displaying a clean list of installed packages and toggle switches. It works on the same entries as Task Manager , so a change in one place shows up in the other.
- Open Settings. The quickest way is to press Win+I.
- Select Apps from the left menu.
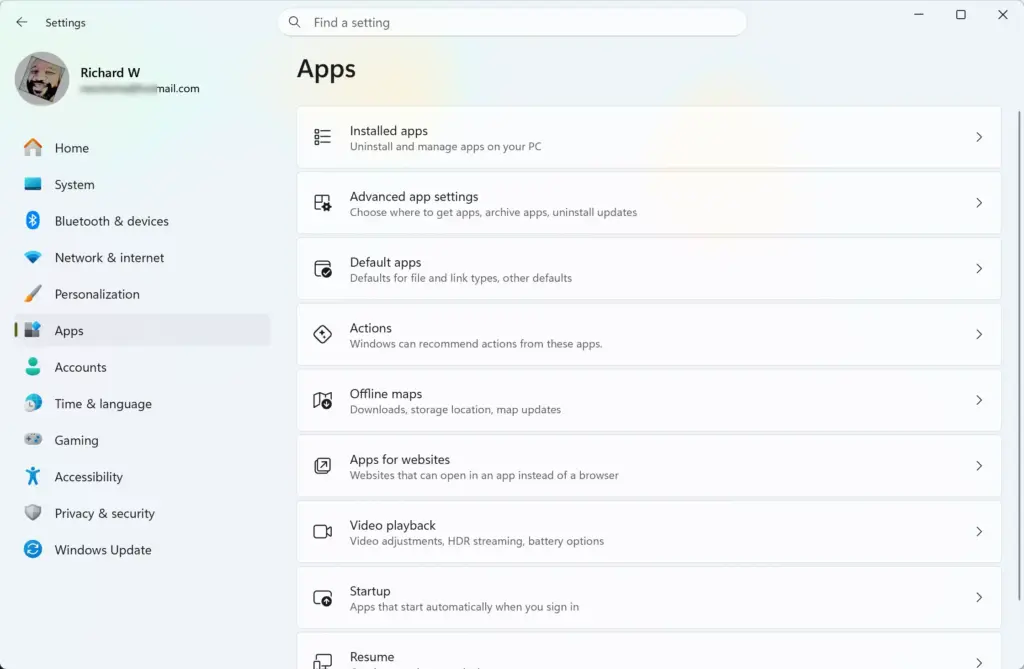
Settings › Apps - Click Startup. You should see a list of apps with a toggle and a startup impact label (Low, Medium or High) next to each one. You can sort the list by name, status or startup impact.
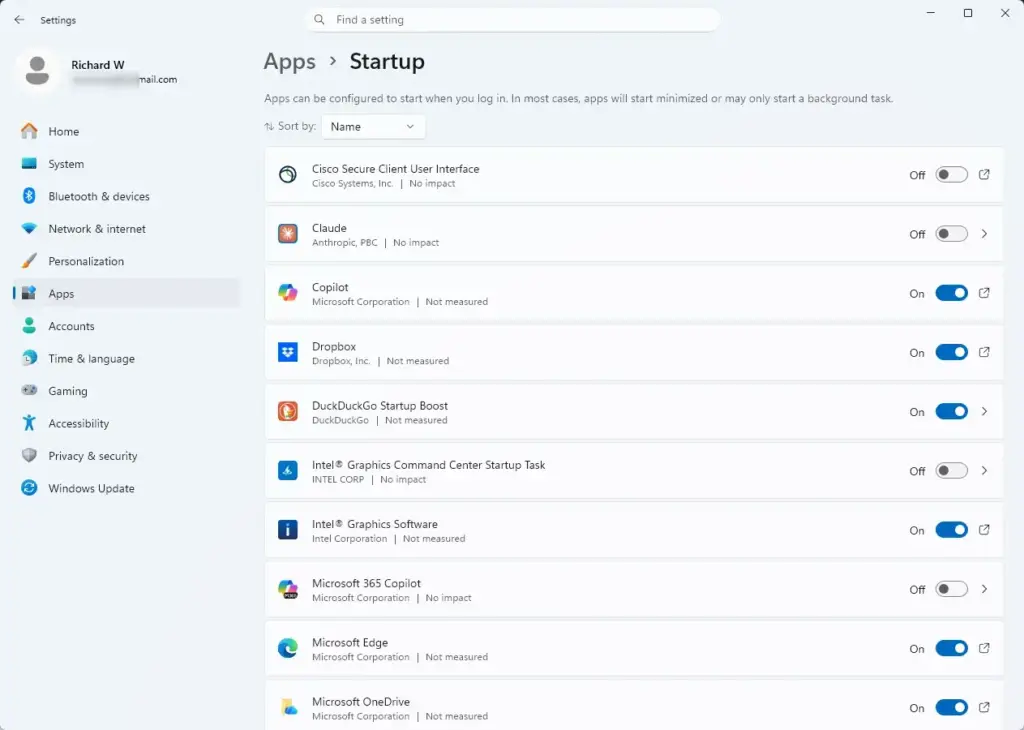
Settings › Apps › Startup - Toggle the switch next to any application to the On or Off position. The change applies from your next sign-in.
If an app you expect is missing from this list, it probably does not register itself as a startup app. Use the Startup folder method instead.
Using the Startup Folder for Win32 Applications
The user Startup folder forces Windows to open any desktop shortcut you place inside it whenever you log into your user account. Adding programs to startup using this folder works well for standard desktop software that does not show up in the normal settings menus. Only your account is affected, and you do not need administrator rights.
- Press Windows Key + R to open the Run dialog box.

Run dialog - Type
shell:startupand press Enter to open the user-specific Startup folder. A File Explorer window opens, usually empty. - Open a second file window and locate the application shortcut you want to add. If the app has no shortcut yet, open the Start menu, choose All apps, right-click the app, and look for More and then Open file location. You can also right-click the app's .exe file and choose Show more options and then Create shortcut.
- Drag and drop, or copy and paste, the application shortcut directly into the
shell:startupfolder. The shortcut should now appear in the folder.
To undo this, delete the shortcut from the folder. Shortcuts placed here also appear in Task Manager and in Settings under Apps and Startup, where you can switch them off without deleting them.
Accessing the All Users Startup Folder
The common startup folder lets you launch programs automatically for every user account on your computer at the same time. Adding programs to startup using this global directory requires administrator permission so the shortcut applies to everyone who signs in. Use it on shared PCs where every user needs the same tool.
- Press Windows Key + R to open the Run dialog box.
Run dialog - Type
shell:common startupand press Enter to open the global Startup directory. - Provide administrator credentials if prompted by User Account Control. If you are signed in as a standard user, you will need an administrator's password. Click Continue or Yes after you enter it.
- Copy and paste the application shortcut into this folder to enable it for all system users. The shortcut should now appear in the folder, and the program will start for each person who signs in.
To remove it later, open the same folder and delete the shortcut. This also needs administrator approval.
Adding UWP and Microsoft Store Apps to Startup
Microsoft Store apps and other Universal Windows Platform (UWP) apps do not use traditional desktop shortcuts, so you cannot drag them into the standard startup folder. Adding programs to startup from the store requires changing background settings or using the main Windows settings menu instead. Only apps that support starting at sign-in will offer this option, so some Store apps will have no startup toggle at all.
- Open Settings.
- Navigate to Apps and select Installed apps.
- Find the Microsoft Store app in the list, click the three-dot menu next to its name, and select Advanced options if available. If the option is missing, the app does not expose extra settings, so go to step 4 and use the Startup page.
- Check for a startup configuration toggle within the app permissions, or use the Settings Apps Startup menu to enable it. If the app appears on the Startup page, switch it to On.
If the app supports neither option, check its own in-app settings for a "start at sign-in" choice. To undo the change, turn the same toggle off.
Using the Registry Editor for Advanced Startup Control
Adding programs to startup through the registry gives you deep control over your PC, but making mistakes here can cause serious system instability. Try the earlier methods first, and only use this one if they did not work.
- Press Windows Key + R, type
regedit, and press Enter to open Registry Editor. - Approve the User Account Control prompt with administrator privileges.
- Before changing anything, back up the registry. Click File and then Export, choose All as the export range, name the file, and save it somewhere safe. Double-clicking that file later restores the saved settings.
- Navigate to the following location using the left sidebar:
HKEY_CURRENT_USER\Software\Microsoft\Windows\CurrentVersion\Explorer\Startup\Approved\Run. The entries for programs that already start with Windows appear in the right pane. - Verify or modify your startup entries according to your system requirements. To add a program, right-click an empty area in the right pane, choose New and then String Value, and name it after the program. Double-click the new value and enter the full path to the program's executable in Value data, then click OK. To remove an entry, right-click it and choose Delete.
If something goes wrong, restore the backup you exported.
Troubleshooting Common Startup Issues
Troubleshooting startup apps helps you fix programs that fail to launch automatically even when they are turned on in your settings. Interference from security software, outdated app files, or permission errors usually cause these launch failures on Windows 11. Work through the checks below in order, and sign out and back in after each fix to test it.
- Open Windows Defender (called Windows Security in Windows 11) or your third-party antivirus interface to verify that the startup application is not being blocked. Look at the protection history or the quarantine list for the program.
- Check the application's internal settings menu, as many modern programs feature an independent "Start when Windows starts" toggle that overrides operating system controls. If that toggle is off, the program may ignore the Windows setting.
- Verify that the user account running the application possesses read and execute permissions for the target executable file path. To check, right-click the program file, select Properties, open the Security tab, and look at your account's permissions.
- Confirm the entry is still enabled in Task Manager. If the program was moved or updated, the shortcut or registry path may now point to a file that no longer exists. In that case, delete the old entry and add it again.
What to do next
You should now see your configured applications launching automatically the next time you restart your computer. Some apps open a few seconds after the desktop appears, because Windows staggers startup programs to keep sign-in fast. To further optimize your system performance, you can proceed to configure background app permissions or manage scheduled tasks using Task Scheduler.
Was this guide helpful?

About the Author
Richard
Tech Writer, IT Professional
Richard is a writer at Geek Rewind who turns complex IT tasks into clear, step-by-step guides. He draws on years of hands-on experience in system administration and enterprise IT operations, focusing on Windows, Linux and WordPress: the problems people actually run into, and the fixes that work. His server and WordPress guides come from systems he runs himself. Richard builds and maintains the platform behind Geek Rewind, from its Ubuntu servers and Nginx configuration to its custom WordPress plugins. Many new tutorials start with readers' questions, and he's always glad to answer them in the comments.


No comments yet — be the first to share your thoughts!