How to Hide Last User Sign-In on Windows 11

- 2 ways to do it
- Needs administrator rights
- Includes a restart or sign-out
Hiding the last user sign-in on Windows 11 stops your sign-in screen from showing the name or profile picture of the person who used the PC last. It is a built-in privacy setting. Anyone walking past the screen cannot see which account signed in before you.
Windows 11 Pro, Enterprise, and Education include the Local Security Policy editor (part of the built-in policy tools for managing system settings), so you can turn this on without touching the registry. Home edition does not include that editor, but a registry change does the same job. Either way it takes about two minutes. The setting applies each time the PC starts up, restarts, or returns to the sign-in screen after sleep.
What is the Lock Screen and Sign-In Screen?
The lock screen and sign-in screen appear whenever you start your computer or wake it from sleep. By default, Windows shows the name and profile picture of the person who used it last. That is convenient on a personal PC, but it also tells anyone nearby which account to try or who the machine belongs to. Hiding those details helps keep your account information private.
With the default setting, Windows shows the full name and picture of the previous person who signed in. Other accounts on the PC stay available for selection when you switch users.
Once you turn the policy on, the last user’s name is no longer filled in for you. Expect to type your username as well as your password when you sign in. Make sure you know the exact username before you apply the change.
Why Hide the Last Signed-In User?
Hiding the last sign-in name is most useful on shared or public computers, such as a front-desk PC, a lab machine, or a family computer in a common room. Restricting this detail stops onlookers from seeing who last used the PC. Anyone trying to guess a password also loses a free piece of information, because they now have to know the username too.
How to Hide or Show the Last Signed-In User Name
You can change this setting two ways: the Local Security Policy editor or the Registry Editor. Which one you use depends on your edition of Windows. Pro, Enterprise, and Education have both. Home has only the Registry Editor. Use the policy editor if you have it, because it is harder to get wrong. Both methods need an administrator account.
Method 1Using Local Security Policy Editor
The Local Security Policy editor (a built-in Windows tool for managing system security rules) lets you hide last user sign-in details on Windows 11 Pro, Enterprise, and Education editions. It controls system-wide security rules. You open it by searching for secpol.msc, then change one policy setting so Windows stops displaying the previous user’s name on the sign-in screen.
- Press Win+S, type
secpol.msc, and press Enter. The Local Security Policy window should open. - If nothing opens or search finds nothing, your version of Windows does not have this tool. This is the normal result on Home editions. Use the Registry Editor method below instead.
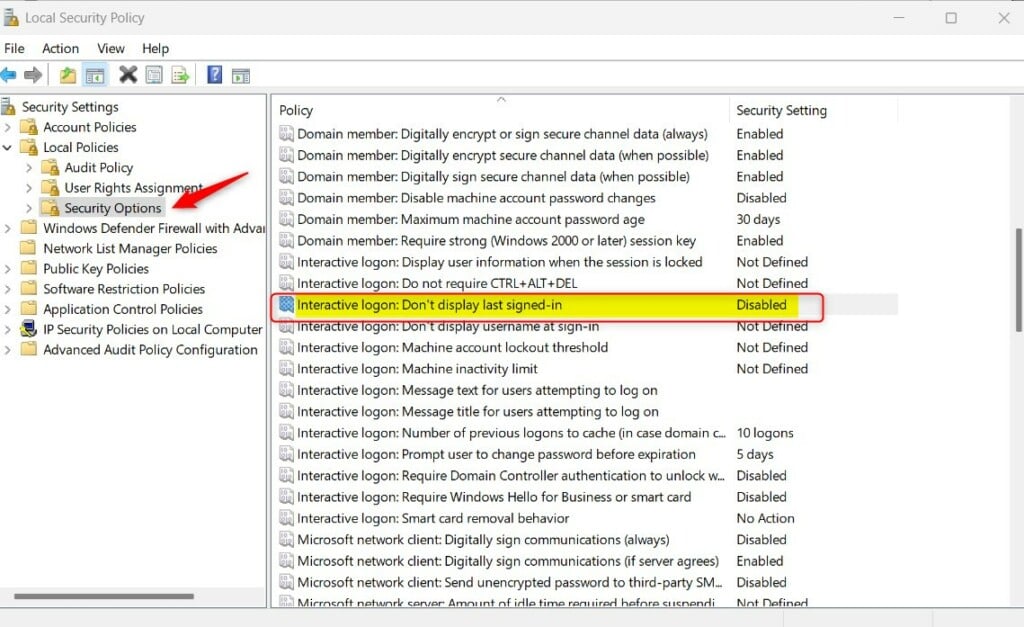
- In the left pane, click the arrow next to Local Policies to expand it. Then click Security Options. The right pane fills with a long list of policies.
- In the right pane, scroll down and double-click Interactive logon: Don’t display last signed-in. The list is sorted alphabetically, so look in the “Interactive logon” group. A Properties window opens.
- In the Properties window, choose one of these:
- Enabled to hide the last signed-in user’s name.
- Disabled to show the last signed-in user’s name (this is the default).
- Click OK to save. ⚠️ Admin privileges required for this step. If you are signed in with a standard account, the change will not be saved.
- Restart your computer to apply the change. At the sign-in screen, the previous user’s name should no longer appear. To undo the change later, set the policy back to Disabled and restart again.
Method 2Using Windows Registry Editor
The Registry Editor (an advanced database that stores low-level settings for Windows and apps) is the alternative when your edition of Windows does not include the policy editor. This method works on Windows 11 Home. You add a registry value that blocks the previous user’s name from showing up on the sign-in screen. It has the same effect as the policy above, but you make the change by hand.
Open the Registry Editor:
- Press Win+R, type
regedit, then press Enter. - If User Account Control prompts you, click Yes. ⚠️ Admin privileges required for this step. The Registry Editor window should now be open.
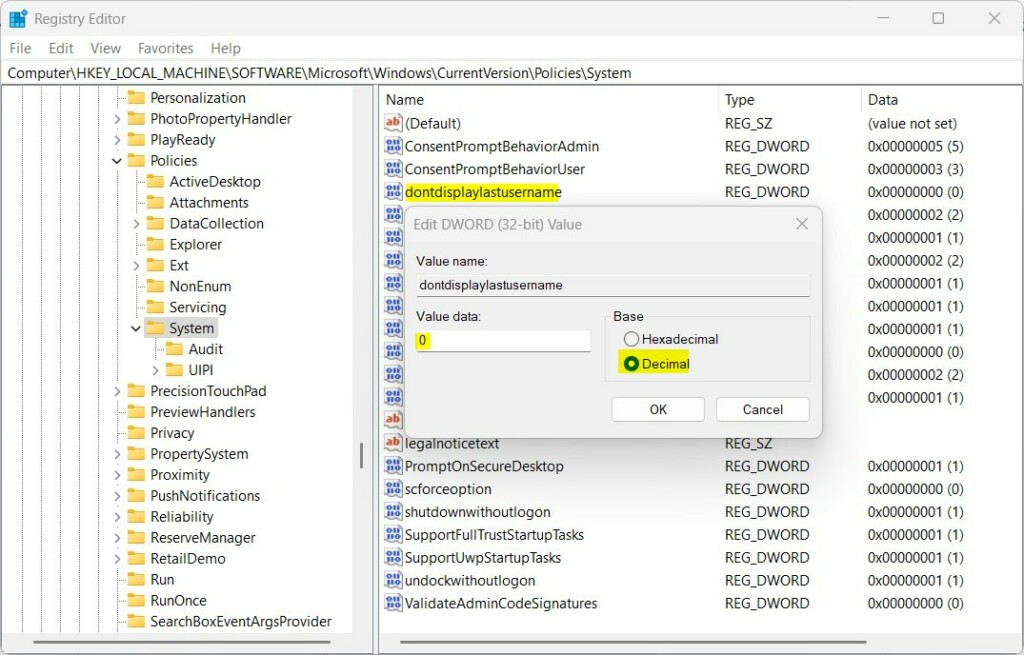
- In the Registry Editor, go to this folder (called a key in the left pane):
HKEY_LOCAL_MACHINE\SOFTWARE\Microsoft\Windows\CurrentVersion\Policies\System. You can expand the keys one at a time, or paste the path into the address bar at the top of the window. - If you don’t see the System folder, create it:
- Right-click the key that comes just before System in that path, choose New Key, and name it System. The new key appears in the left pane.
- Click the System folder. In the right pane, right-click an empty area and choose New DWORD (32-bit) Value. A new entry appears with its name highlighted for editing.
- Name the new value:
dontdisplaylastusername. Press Enter to confirm the name. - Double-click this new value. Set the Base to Decimal. Then set the Value data to:
1to hide the last signed-in user name.- Delete the
dontdisplaylastusernamevalue to show the last signed-in user name again. To delete it, right-click the value, choose Delete, and confirm.
- Click OK, close the Registry Editor, and restart your computer. After the restart, the sign-in screen should no longer show the previous user’s name.
Before you start, review the instructions on how to back up your registry. A backup lets you roll back if something goes wrong.
Summary
- You can hide the last signed-in user's name on the Windows 11 sign-in screen to protect your privacy.
- The easiest way is through the Local Security Policy editor. If that's not available, as on Home editions, use the Registry Editor instead.
- After making changes, always restart your PC to see the effect.
- Once the setting is on, you must type your username as well as your password at sign-in, so make sure you know it.
- For more details, check the official Microsoft page: Interactive logon: Do not display last user name - Microsoft Docs
Hiding the last signed-in user on Windows 11 protects your privacy by keeping personal account names off the sign-in screen. Use the Local Security Policy editor on Pro, Enterprise, and Education editions, or the Registry Editor on Home. Once you apply either fix and restart your computer, Windows stops showing the previous account holder's details to anyone nearby. If you want the old behavior back, set the policy to Disabled or delete the registry value, then restart.
Have a question about this guide?
Answered by AI from this guide. Good questions may be added to this page — please don't include personal details.
Did this guide fix your problem?

About the Author
Richard
Tech Writer, IT Professional
Richard is a writer at Geek Rewind who turns complex IT tasks into clear, step-by-step guides. He draws on years of hands-on experience in system administration and enterprise IT operations, focusing on Windows, Linux and WordPress: the problems people actually run into, and the fixes that work. His server and WordPress guides come from systems he runs himself. Richard builds and maintains the platform behind Geek Rewind, from its Ubuntu servers and Nginx configuration to its custom WordPress plugins. Many new tutorials start with readers' questions, and he's always glad to answer them in the comments.
No comments yet — be the first to share your thoughts!