How to Enable or Disable Sign-In on Wake In Windows 11


Sign-in on wake is a Windows 11 security feature that asks for your password, PIN or other sign-in method the moment your PC wakes from sleep. With it on, anyone who walks up to your PC while you are away sees the sign-in screen instead of your files.
You can also turn it off, so your PC goes straight back to the desktop when it wakes. The main option is in the Settings app under Accounts Sign-in options This guide covers that method first. It then covers the Registry Editor and Group Policy routes, and what to check when the option is greyed out.
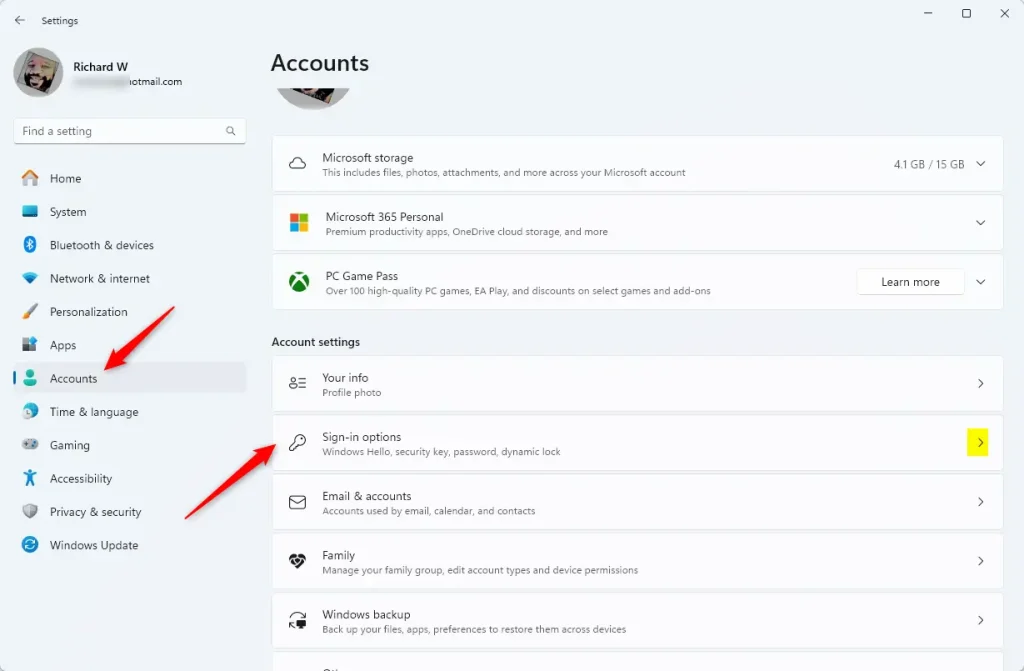
Go to Settings Accounts Sign-in options Under Additional settings, choose how often Windows should require you to sign in again after being away. You can select a time frame or choose “Never” for immediate access.
Why do this?
Leave this setting on if there is any chance someone else could get to your PC while you are away. That includes a shared office, a classroom, a café or a family room. Without it, anyone can open your mail, files and signed-in apps.
Setting it to Never sends your PC straight to the desktop on wake. That is fine on a home PC that only you use, but it removes a layer of protection anywhere else. You can undo the change at any time by choosing the other option in the same menu.
What happens when done?
Think about where the PC lives before you choose. A desktop in a locked room is a low risk. A laptop that travels with you is a high risk, because sleep mode is often all that stands between a thief and your data. If you share the machine with others, keep sign-in on wake enabled and use a PIN so it is quick to type.
Comparison: When to Enable vs. Disable
| User Persona | Recommended Setting | Reasoning |
|---|---|---|
| Home User | Disable (Optional) | Convenience in a private space. |
| Enterprise/Office | Enable | Compliance and data security. |
| Public/Shared PC | Enable | Prevents unauthorized access. |
How to Change Sign-in Settings
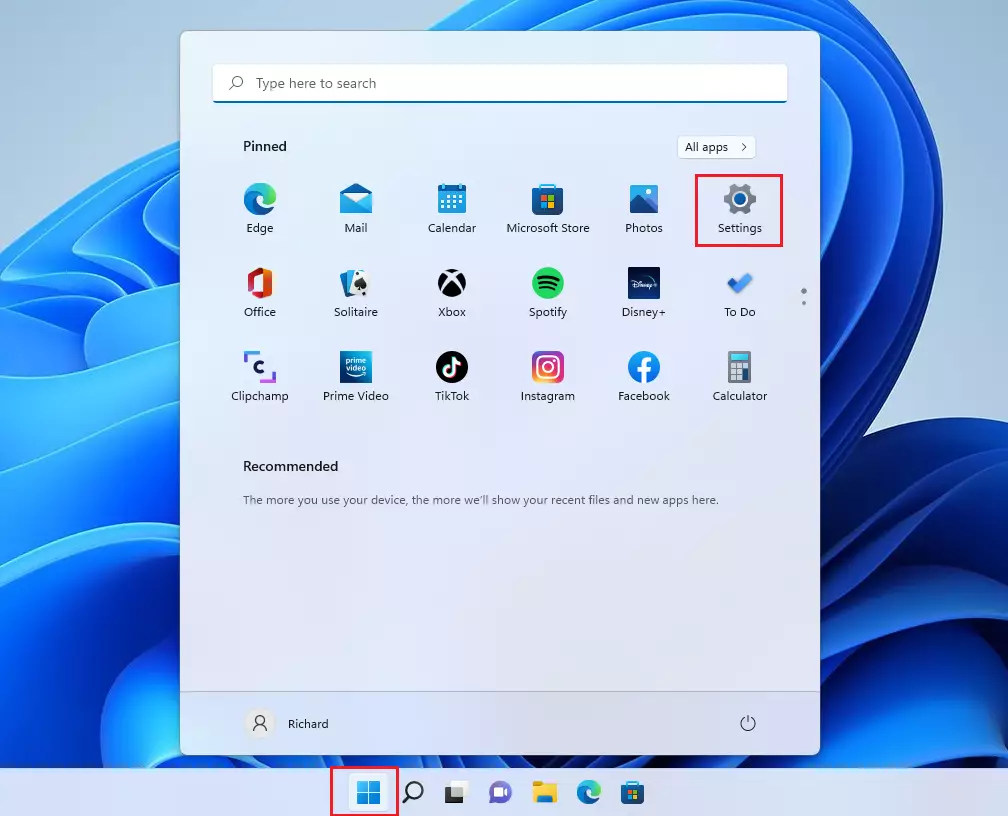
The Settings app is the easiest way to control whether Windows 11 asks for a sign-in after sleep. It works on both Home and Pro, and it needs no restart. The change applies the next time the PC wakes.
- Press Windows key + I to open Settings.
- Go to Accounts Sign-in options The page lists your sign-in methods, such as PIN, fingerprint or password.
- Scroll down to Additional settings.
- Find the question "If you've been away, when should Windows require you to sign in again?" The drop-down menu is next to it.
- Open the drop-down and pick your choice. Never turns sign-in on wake off. When PC wakes up from sleep turns it on. On some builds and devices you may see other options, such as a set number of minutes. The list depends on your Windows 11 version and hardware.
- Check that the drop-down now shows your choice. There is no Save button, because the change applies straight away.
To test it, put the PC to sleep from Start Power Sleep, then wake it with a key press or the power button. You should see either the sign-in screen or your desktop, depending on what you chose.
Advanced Configuration Methods
Registry Editor (Admin Required)
The Registry Editor is a database of system and app settings. Use it if the Settings drop-down is missing or greyed out and you are on Windows 11 Home, which has no Group Policy Editor. The key involved is HKEY_LOCAL_MACHINE\SOFTWARE\Microsoft\Windows NT\CurrentVersion\Winlogon. You need an administrator account to edit it, because it sits under HKEY_LOCAL_MACHINE and affects every user on the PC.
Registry edits can break Windows if you change the wrong thing. Before you start, create a restore point, or export the key so you can import it back later. Follow only the values shown in the steps below. If a policy from your organization controls this setting, it may overwrite your registry change.
HKEY_LOCAL_MACHINE\SOFTWARE\Policies\Microsoft\Windows\Personalization\NoLockScreen
Group Policy Editor (Admin Required)
Windows 11 Pro, Enterprise and Education include the Group Policy Editor (gpedit.msc). It is meant for managed or networked environments. It is not available on Windows 11 Home.
- Open the Group Policy Editor as an administrator.
- In the left pane, go to Computer Configuration Administrative Templates System Power Management Sleep Settings
- In the right pane, find Require a password when a computer wakes (plugged in). There is a matching policy for when the PC runs on battery.
- Double-click the policy. A settings window opens.
- Choose Enabled to always require a sign-in on wake, or Disabled to not require one. Not Configured hands control back to the Settings app.
- Click Apply, then OK.
The policy usually takes effect on the next wake or after a restart. To undo it, set the policy back to Not Configured.
Troubleshooting and Edge Cases
If the option in Settings is greyed out, a policy is most likely controlling it. On a work or school PC, that is usually your organization's Group Policy or device management. On your own Pro PC, check the policies above. If you are on Home, check the registry for a leftover change. You may see the message "Some settings are managed by your organization" at the top of the page, which confirms it.
Also check Dynamic Lock, which is on the same Sign-in options page under Additional settings. It can lock your PC when a paired phone moves out of Bluetooth range. This is a separate lock from the wake setting. If your PC asks for a sign-in when you did not expect it, Dynamic Lock may be the cause, so turn it off to test.
Summary
Sign-in on wake is a balance between security and speed. For most people, the Settings app is all you need. Use Group Policy or the registry only when Settings will not let you change the option. Whichever route you use, pick the setting that fits where the PC is used and who can reach it.
Was this guide helpful?
100% of readers found this helpful (1 votes)

About the Author
Richard
Tech Writer, IT Professional
Richard is a writer at Geek Rewind who turns complex IT tasks into clear, step-by-step guides. He draws on years of hands-on experience in system administration and enterprise IT operations, focusing on Windows, Linux and WordPress: the problems people actually run into, and the fixes that work. His server and WordPress guides come from systems he runs himself. Richard builds and maintains the platform behind Geek Rewind, from its Ubuntu servers and Nginx configuration to its custom WordPress plugins. Many new tutorials start with readers' questions, and he's always glad to answer them in the comments.




No comments yet — be the first to share your thoughts!