Install Visual Studio Code Web on Ubuntu 24.04


Visual Studio Code Web runs the popular code editor directly inside your web browser on Ubuntu 24.04. You don’t install anything on the machine you browse from. The editor itself runs on your Ubuntu server, and your browser acts as the screen. This gives you the core editing tools of desktop Visual Studio Code, including the file explorer , the integrated terminal and extensions, so you can write and edit code quickly.
GitHub integration lets you connect your projects from anywhere for fast coding sessions on Ubuntu 24.04. Because the code stays on the server, you can pick up the same session from a laptop, a tablet or any other device with a browser.
Visual Studio Code Web on Ubuntu 24.04 runs the editor on your server and shows it in any browser, so nothing needs installing on the device you browse from. Install curl with sudo apt install curl, run the official code-server install.sh script, then start it with sudo systemctl enable –now code-server@$USER. Set a password in ~/.config/code-server/config.yaml.
Download the installer script
The script is the official one for code-server, the open-source project that serves VS Code in a browser. Before you start, make sure you are logged in as a user with sudo rights and that the server has internet access.
- Open your terminal.
- Run the update command and the curl installation command shown in the next blocks. Updating first makes sure the package list is current. Curl is the tool that downloads the script.
- Fetch the official setup script with curl, then run the installation command to finish setting up the environment.
You should see the package manager print its progress after each command. If a command stops with an error, fix that before you move on.
sudo apt update
sudo apt install curl
The installer script has to be executed before anything is installed. Downloading it only saves a file, and nothing changes on the system until you run it.
- Run the command below in the same terminal.
- Wait for the script to detect Ubuntu and print its progress. You should see it choose a package-based install.
curl -fsSL https://code-server.dev/install.sh | sh -s -- --dry-run
Executing this command performs the actual installation. The previous step only prepared things, and this one puts the editor on your system.
- Run the command below.
- Let it finish. Depending on your connection, this can take a minute or two. When the prompt returns with no error message, the install is done.
curl -fsSL https://code-server.dev/install.sh | sh
Enter your administrative password when prompted to continue the installation. Package installs need root rights, so the script asks for your sudo password.
- Type your password at the prompt. Nothing appears on screen as you type, and that is normal.
- Press Enter. If the password is accepted, the installation continues. If you see "sorry, try again", your account may not be in the sudo group, or you mistyped the password.
Enabling the application and verifying service status happens through the command shown below. Enabling the service makes it start automatically each time the server boots. The same command also shows whether it is running now.
- Run the command below.
- Read the output. It lists the service name, its state and the most recent log lines.
sudo systemctl enable --now code-server@$USER
sudo systemctl status code-server@$USER
Active status should appear in the terminal output for the application, usually shown as active (running) in green. If it says inactive or failed, read the log lines under the status line, because they normally explain the problem. A common cause is another program already using the port.
For security, the Visual Studio Code for the Web session on Ubuntu requires a password. Set it by editing the config.yaml file in the .config/code-server/ folder, which sits in your home directory. In that file, the auth: password line turns on password login, and the password: line below it holds the password itself. Put your chosen password there to protect the workspace.
The editor has a built-in terminal and full access to your files, so anyone who gets in can act as your user. Choose a long, unique password.
Opening the default configuration file at ~/.config/code-server/config.yaml inside the nano editor allows for quick edits.
- Run the command below as the same user who will use the editor, not as root. The file belongs to your own account.
- Check that nano opens and shows the contents of the file. If the file is empty or missing, start the service once and try again, because code-server creates it on first run.
nano ~/.config/code-server/config.yaml
Authentication requires defining a password inside this configuration.
- Find the line that starts with password:.
- Replace the existing value with your own password. The generated one is random, so you can swap it out or keep it if you copy it somewhere safe.
- Leave the auth: password line as it is.
- Leave the other lines alone for now. The default address is the one used later in this guide.
bind-addr: 127.0.0.1:8080
auth: password
password: 6fd97c37c251428ed0f3c74e
cert: false
The running service reads this file only at startup, so a restart is required for your changes to apply.
- Press Ctrl+O, then Enter to save.
- Press Ctrl+X to leave nano.
- Run the restart command below.
To undo the change later, edit the file again, set the old value and restart the service once more.
sudo systemctl restart code-server@$USER
Use a Reverse Proxy Server
You should use a reverse proxy server (an intermediary that routes client requests to a backend service) to improve access when running Visual Studio Code Web on Ubuntu. By default the editor only listens on the local machine, so a proxy is the usual way to reach it from other computers under a proper hostname. Setting up a tool like Nginx or Apache helps manage your network connections efficiently and gives you a much smoother web coding experience.
The proxy also gives you a place to add HTTPS later. If you only use the editor from the server itself, you can skip this part.
Two articles detail proxy server deployment on Ubuntu Linux. Pick the one that matches the web server you already run, or the one you are more comfortable with.
Set up Let's Encrypt SSL Certificate
You need to set up a Let's Encrypt SSL certificate to secure your Visual Studio Code Web connection on Ubuntu and protect your online coding environment. Without HTTPS, your password and your code travel over the network in plain text. Encrypting that traffic keeps your remote connection safe from prying eyes, and you can configure the certificate to work with either Apache or Nginx.
Let's Encrypt only issues certificates for a real domain name that points to your server, so it will not work with a bare IP address. Use the guide that matches the proxy you set up in the previous section.
- How to set up Let's Encrypt SSL certificate with Apache on Ubuntu
- How to set up Let's Encrypt SSL certificate with Nginx on Ubuntu
You can reach the Visual Studio Code for Web portal once the environment configuration finishes. Open a browser on the machine you want to code from and go to the address described next.
If you configured a reverse proxy, enter the hostname you set up for it. Standard setups without a proxy use the default endpoint below:
http://localhost:8080
The localhost address only works in a browser on the Ubuntu machine itself. From another computer, use the proxy hostname instead. If the page does not load, check that the service is still active.
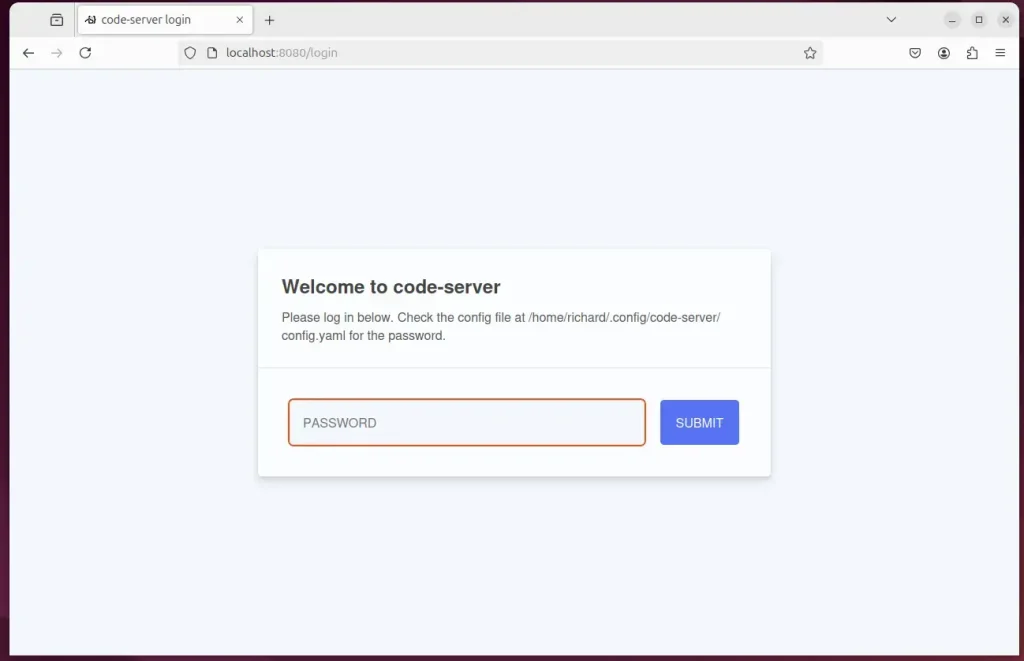
Supplying the previously created authentication password grants access.
- Type the password you saved in config.yaml into the login page.
- Click Submit. If the password is wrong, the page shows an error and you can try again. If you forgot it, open the config file and read or change it.
You can begin writing code immediately after logging in. The editor opens in the browser with the familiar VS Code layout. Open a folder, create a file, or open the integrated terminal to work on your projects, and sign in to GitHub from inside the editor if you want to pull or push repositories.
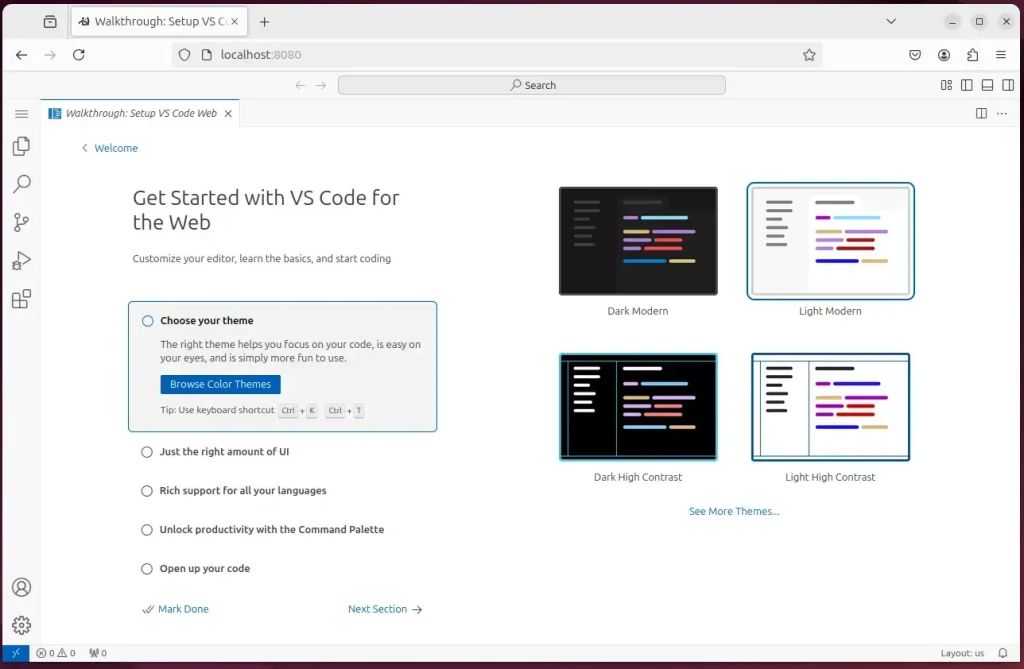
Configuration is complete. You now have a browser-based code editor running on Ubuntu 24.04 with password protection. If you added the proxy and certificate, it is also reachable over HTTPS.
Summary:
Browser-based coding provides a streamlined environment for writing and testing code on Ubuntu 24.04. Key takeaways include:
- Visual Studio Code for Web allows for lightweight, browser-based coding without installation.
- Effective for rapid coding sessions and collaboration on various devices.
- Supports integration with cloud services like GitHub for real-time collaboration.
- Installation is straightforward using the provided installer script.
- Configuring authentication enhances the security of your coding environment.
- Setting up a reverse proxy (using Nginx or Apache) optimizes accessibility.
- Implementing Let's Encrypt SSL certificates secures your service.
- Access your development environment via
http://localhost:8080after setup. - Start coding and take advantage of the flexibility that this platform offers!
Have a question about this guide?
Answered by AI from this guide. Good questions may be added to this page — please don't include personal details.
Did this guide fix your problem?

About the Author
Richard
Tech Writer, IT Professional
Richard is a writer at Geek Rewind who turns complex IT tasks into clear, step-by-step guides. He draws on years of hands-on experience in system administration and enterprise IT operations, focusing on Windows, Linux and WordPress: the problems people actually run into, and the fixes that work. His server and WordPress guides come from systems he runs himself. Richard builds and maintains the platform behind Geek Rewind, from its Ubuntu servers and Nginx configuration to its custom WordPress plugins. Many new tutorials start with readers' questions, and he's always glad to answer them in the comments.
No comments yet — be the first to share your thoughts!