How to Install Webmin on Ubuntu 24.04

Webmin is a free web-based control panel that lets you manage your Ubuntu 24.04 server through a web browser instead of the command line. From the dashboard you can add user accounts, check server health, and update software from any computer on your network that is allowed to connect.
Once setup is done, managing files, configuring web services, and changing system settings take a few clicks. Webmin runs in the background and listens on port 10000. By default it serves its pages over HTTPS, which keeps your login encrypted in transit.
Install Webmin on Ubuntu 24.04 by first installing required packages with `sudo apt install …`, then downloading the Webmin package using `curl`, and finally installing it with `sudo dpkg -i webmin-current.deb`. Restart the Webmin service to complete the setup.
Install required packages
Before you run the Webmin installer, the system needs a few helper libraries and tools that Webmin depends on. If they are missing, the install either fails or leaves Webmin half configured. Installing them first avoids that.
You need a user with sudo rights and a terminal on the server, either directly or over SSH. The next two commands refresh the package list and then list the packages to install.
- Run the command below in your terminal to install the required packages.
- Enter your password if
sudoasks for it, and confirm with Y if apt asks whether to continue. - Wait for the prompt to return. You should see apt unpack and set up each package without error messages. Packages that are already installed are simply skipped.
Next you download the Webmin installer. On Ubuntu it comes as a .deb file, which is the standard package format for Ubuntu and Debian. This file contains everything Webmin needs, and this guide uses Webmin version 2.101. Once the file is on the server, you install it and then manage the server from a web browser.
Download and install Webmin
The installation has two parts. First you download the official setup package from the Webmin website with the curl tool. Then you install it with the package manager. Each part is a single terminal command. When both finish, Webmin is installed and running as a service.
- Open your terminal on the server.
- Run the command below to download the latest Webmin installer.
- Watch the progress output. When it ends and the prompt returns, the .deb file is saved in your current directory.
curl -L -O https://www.webmin.com/download/deb/webmin-current.deb
If the shell reports that curl is not found, install curl [sudo apt install curl] first and then repeat the download. Minimal Ubuntu installs sometimes leave it out.
- Wait until the download has finished completely.
- Run the command below from the same directory to install Webmin.
- Let the process run until it ends. You should see the package unpack and set up, and the service start automatically at the end.
The installation needs administrator rights, so use sudo or run it as root. If you get an error about missing dependencies, go back to the required packages step and make sure it finished cleanly.
sudo dpkg -i webmin-current.deb
Now restrict which machines can reach Webmin. A control panel that can change system settings should not be open to everyone. You do this in the Webmin configuration file, which you open with an editor using the command below. Use sudo, because the file is owned by root.
- Run the command above to open the configuration file in your editor.
- Add the IP addresses you want to permit on a new line in the file, following the example below.
- List only the addresses that really need access, such as your own workstation or your office network. You can add more later.
# add a new line at the end to allow IP addresses
allow=127.0.0.1 192.168.0.0/24
Save the file and exit the editor. The change does not take effect until Webmin is restarted. To undo it later, open the file again, remove the line you added, and restart Webmin.
- Run the command below to restart Webmin.
- Wait for the prompt to return. No error output means the service came back up with the new settings.
sudo systemctl restart webmin
- Open a web browser on a computer whose IP address is on the allowed list.
- Enter `http://your_server_address:10000` in the address bar, replacing the placeholder with your server's IP address or hostname.
- If the page does not load, try https instead of http. Webmin normally serves HTTPS on port 10000.
- If your browser warns about the certificate, that is expected. Webmin creates a self-signed certificate on install. Check that the address is your own server, then continue past the warning.
If the page still does not load, check two things. Your IP must be on the allowed list, and if the Ubuntu firewall (UFW) is active, it must allow TCP port 10000. A timeout usually means a firewall is blocking the port. A refused connection usually means Webmin is not running.
For example, with a domain name the address looks like this:
http://example.com:10000
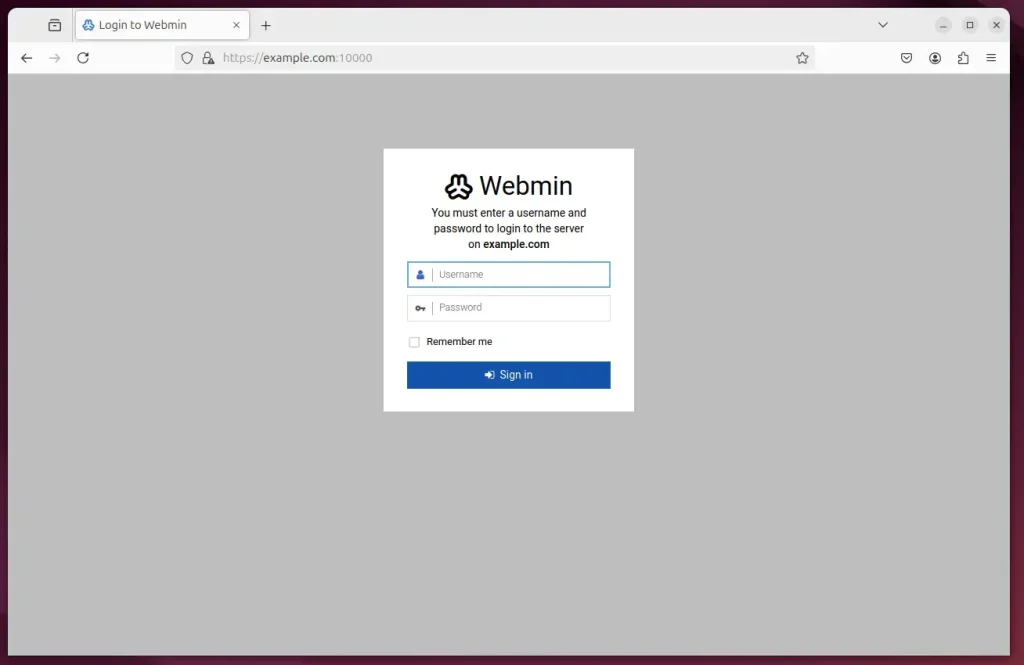
- On the Webmin login page, enter the username of an account with administrator privileges, meaning a user who can run commands with `sudo`, or the root user if you use it.
- Enter that account's password.
- Click the login button. You should land on the Webmin dashboard.
Webmin uses your normal Ubuntu account credentials. It has no separate default password.
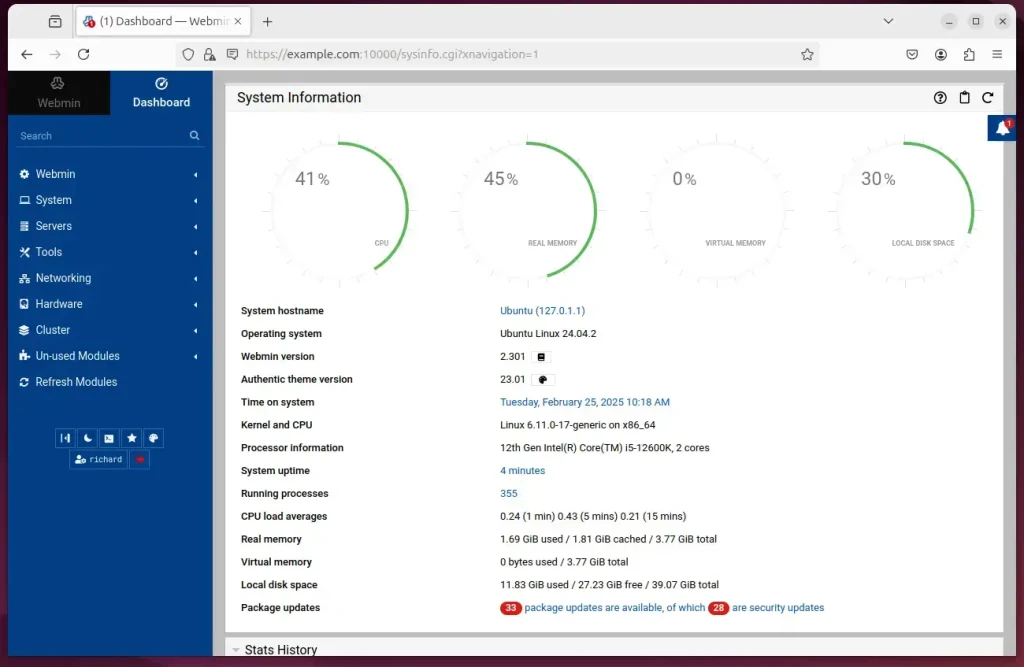
You can now manage the server from the browser. The dashboard shows an overview of system information such as the hostname, operating system, and resource use. The menu on the left groups the tools into categories like System and Servers. Use it to manage users, check for software updates, work with services, and configure server software.
The setup is finished. Webmin is installed, restricted to the addresses you allowed, and ready to use. Keep the allowed list as short as you can, and avoid exposing port 10000 to the whole internet.
Conclusion:
Webmin is now installed on Ubuntu 24.04, which makes day-to-day server management much easier. The web interface covers user accounts, the Apache web server, DNS, file sharing, and databases. It gives you one control panel for over 100 different Unix system functions.
- Web-Based Management: Webmin provides a user-friendly interface for managing server configurations without extensive command line use.
- Remote Access: Manage your server from anywhere with internet access, simplifying server administration. Limit this to trusted IP addresses through the allowed list.
- Essential Packages: Ensure necessary packages are installed before proceeding with the Webmin setup.
- Installation Steps: Follow the commands to download and install Webmin, configure access, and restart the service.
- Access and Use: Log in through the designated port (10000) to begin managing your server effectively.
Following these steps gives admins access to Webmin's tools for everyday server management, from creating users to applying software updates.
Have a question about this guide?
Answered by AI from this guide. Good questions may be added to this page — please don't include personal details.
Did this guide fix your problem?

About the Author
Richard
Tech Writer, IT Professional
Richard is a writer at Geek Rewind who turns complex IT tasks into clear, step-by-step guides. He draws on years of hands-on experience in system administration and enterprise IT operations, focusing on Windows, Linux and WordPress: the problems people actually run into, and the fixes that work. His server and WordPress guides come from systems he runs himself. Richard builds and maintains the platform behind Geek Rewind, from its Ubuntu servers and Nginx configuration to its custom WordPress plugins. Many new tutorials start with readers' questions, and he's always glad to answer them in the comments.
[…] their mail and other services on a server without requiring full access to the server itself. Webmin provides full system administration capabilities, while Usermin is designed for end users to manage […]