Create a Bootable USB in Ubuntu Linux

Startup Disk Creator is a free utility built into Ubuntu. It copies an ISO file (a disk image) onto a flash drive so you can boot your PC straight from it. The drive must be larger than the ISO itself. Older Ubuntu releases fit on a 4GB drive, but current desktop releases are over 5GB, so use an 8GB drive or larger. Check the size of the file you downloaded before you pick a drive.
Back up any important data on the drive before you start. The tool erases everything stored on it.
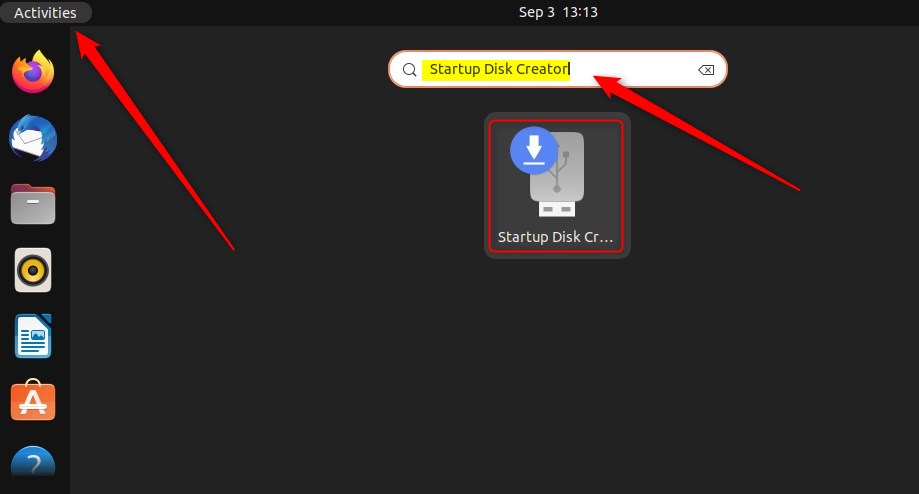
Open Startup Disk Creator from the Activities search bar . Select your Ubuntu ISO file and the target USB drive, then click “Make Startup Disk” and confirm to create the bootable drive.
How to create a startup disk in Ubuntu Linux
Making a bootable Ubuntu USB drive takes a few minutes with the built-in Startup Disk Creator. You need two things: a USB flash drive big enough for the ISO, and the downloaded Ubuntu ISO file. The process erases everything on the USB drive, so copy off anything you want to keep first. Once the drive is written, it also works as a recovery tool if an installed system stops booting.
This guide assumes the Ubuntu ISO image is already downloaded. If you have not downloaded it yet, get it from the official Ubuntu website first. Your browser normally saves it in the Downloads folder, which is where the tool looks for it.
Follow these steps to turn an Ubuntu ISO image into a startup disk. The whole job is five short actions: open the tool, check the ISO, check the drive, write the disk, and quit.
Plug the USB flash drive into your computer. Then open Startup Disk Creator from the Activities search bar :
- Click Activities in the top-left corner of the screen, or press the Super (Windows) key.
- Type Startup Disk Creator in the search bar.
- Click the Startup Disk Creator icon in the results.
The Startup Disk Creator window opens. It has a box for the source disc image at the top and a list of USB drives below it.
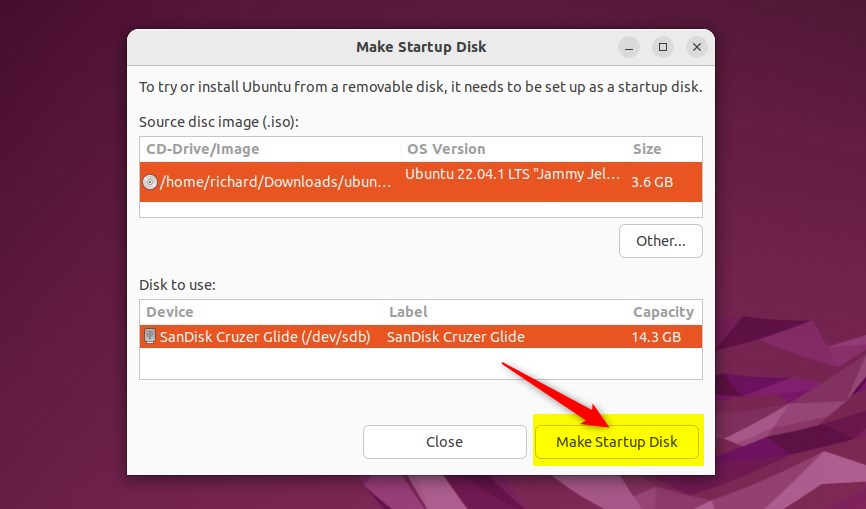
Look at the source disc image box at the top of the window. The app usually selects your ISO image automatically if it is the only ISO inside the Downloads folder. If it shows the wrong file, or none, select the correct ISO image manually:
- Click Other.
- Browse to the folder that holds the ISO and select the file.
- Click Open.
The file name and its size should now appear in the source box. Make sure it is the Ubuntu version you actually want.
Look at the drive list below the source box. If a single USB drive is connected, Startup Disk Creator selects it automatically. If several drives are connected, pick the correct target from the list.
Compare the size shown for each drive with your flash drive before you continue. Everything on the selected drive will be erased, so a wrong choice here costs you data. If the list is empty, unplug the drive, plug it in again, and give it a few seconds to appear. If it still does not show up, try another USB port.
Click Make Startup Disk. A confirmation window opens and warns that the data on the drive will be erased.
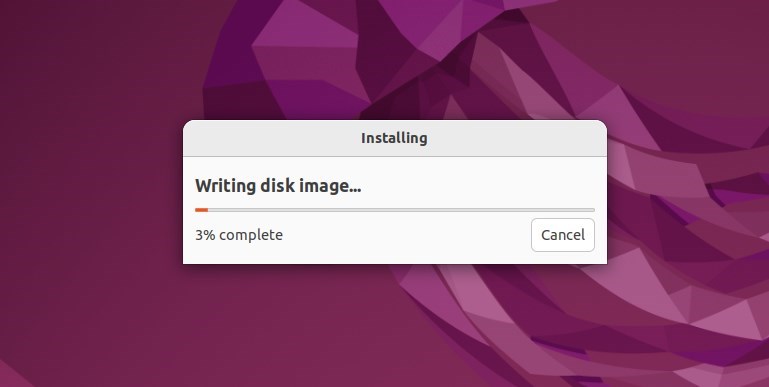
Read the warning, then click Yes to confirm. If Ubuntu asks for your password, enter it. A progress bar shows the ISO being written to the drive.
The process takes ten minutes or less. An older USB 2.0 drive or port will be slower than a USB 3 one. Do not unplug the drive or close the window while it runs, or the drive will not boot.
When the "Installation Complete" window opens, click Quit. This means the ISO has been written to the drive.
Unplug the USB flash drive and plug it into the computer you want to install Ubuntu on. Restart that computer and open its boot menu. The key depends on the manufacturer; common ones are F12, F2, Esc and Del, and the key is usually shown briefly at startup. Choose the USB drive from the list. A successful boot means Ubuntu Linux is ready for installation.
If the computer starts its normal system instead, restart and try the boot menu key again. If the USB drive is missing from the menu, check the firmware settings to make sure USB boot is enabled.
To reuse the drive for normal storage later, open the Disks app, select the drive, and format it.
Before you start, make sure the USB flash drive is larger than the ISO file and holds no data you need. The drive is erased completely during the process.
Conclusion:
- Creating a startup disk in Ubuntu Linux is essential for system recovery and installation.
- Ensure the USB flash drive has sufficient storage capacity and no valuable data before creating a startup disk.
- The Startup Disk Creator tool simplifies creating a bootable disk from an Ubuntu ISO image.
- After following the steps, users can boot their computers from the startup disk to install or repair Ubuntu Linux.
Have a question about this guide?
Answered by AI from this guide. Good questions may be added to this page — please don't include personal details.
Did this guide fix your problem?

About the Author
Richard
Tech Writer, IT Professional
Richard is a writer at Geek Rewind who turns complex IT tasks into clear, step-by-step guides. He draws on years of hands-on experience in system administration and enterprise IT operations, focusing on Windows, Linux and WordPress: the problems people actually run into, and the fixes that work. His server and WordPress guides come from systems he runs himself. Richard builds and maintains the platform behind Geek Rewind, from its Ubuntu servers and Nginx configuration to its custom WordPress plugins. Many new tutorials start with readers' questions, and he's always glad to answer them in the comments.
No comments yet — be the first to share your thoughts!