How to View User Profiles on This Computer in Windows 11

To see the user profiles on this computer, press Win+R, open System Properties, and go to the Advanced tab. Click Settings under User Profiles and Windows lists every profile stored on the PC. Profiles hold personal settings, files and app data for each person who signs in. Checking them helps you clear out disk space and track down sign-in errors.
To see the profiles on this computer, press Win+R, type sysdm.cpl and press Enter, then open the Advanced tab and click Settings under User Profiles. Windows lists every profile with its name, size, type (Local or Roaming) and last modified date. You need an administrator account to delete a profile from this list.
The steps below use the Advanced System Settings window, which shows the full list with sizes and dates. You need an administrator account to delete anything from this list, but a standard account can usually just look at it. The same steps work on Windows 11 Home and Pro.
These steps open the list of profiles on this computer:
- Press Win+R. The Run dialog box opens in the lower-left corner of the screen.

- Type
sysdm.cpland press Enter. The System Properties window opens. - Click the Advanced tab at the top of the window. You should see the Performance, User Profiles and Startup and Recovery sections.
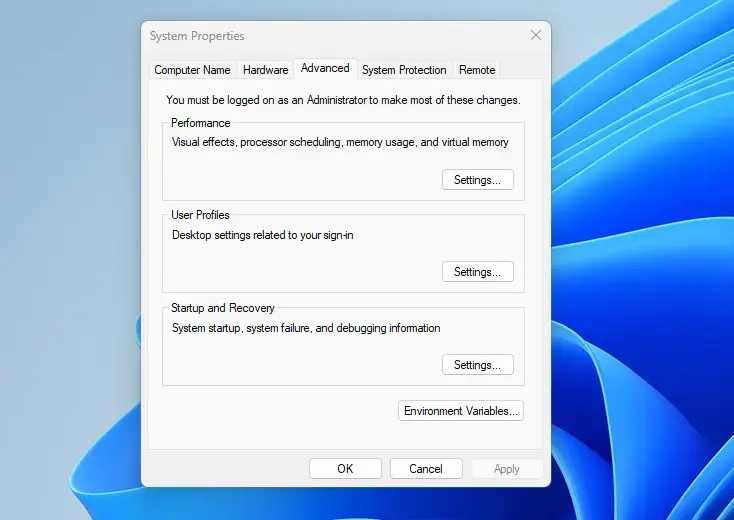
- Click Settings in the User Profiles section. A window opens with every profile stored on the computer. It shows each profile’s name, size, type (Local or Roaming) and last modified date. Large sizes point to the profiles worth cleaning up first.
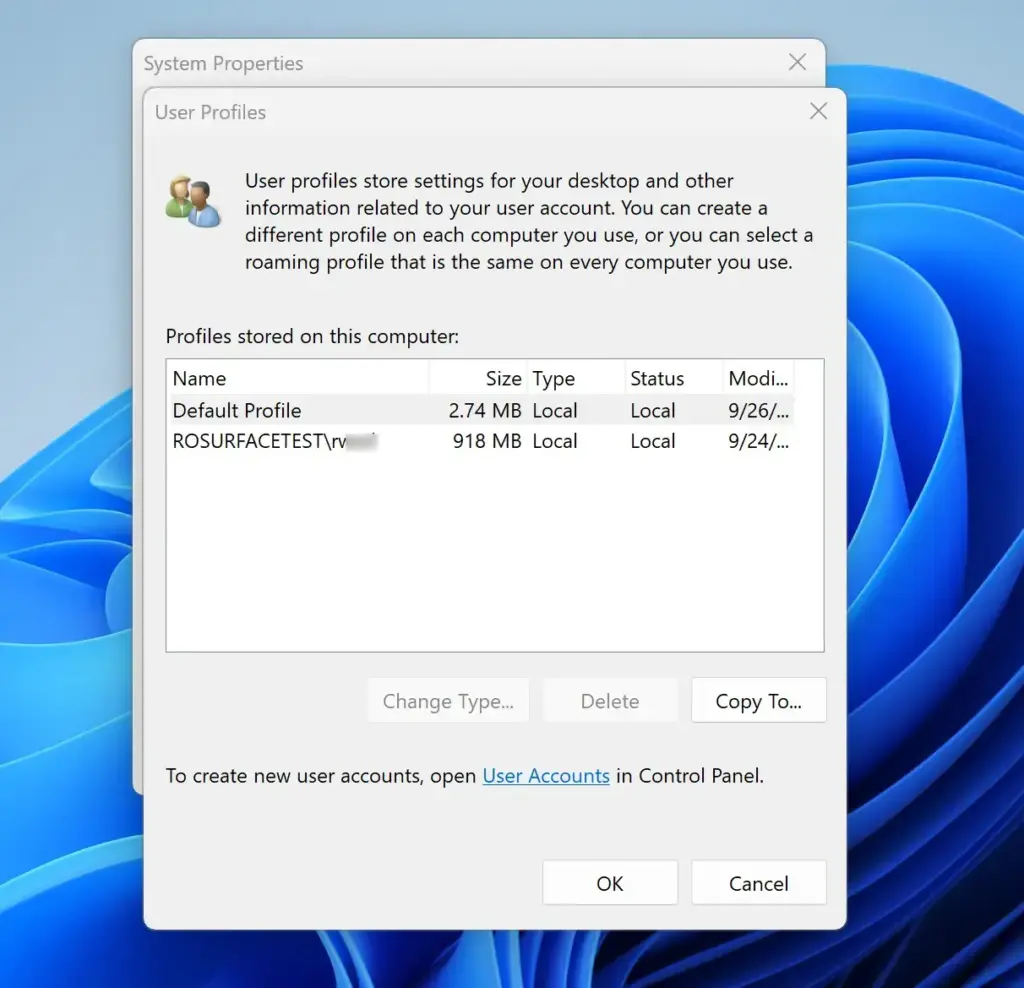
If an entry shows an account name as “Account Unknown”, the account was probably deleted while its profile folder stayed behind. These leftovers are usually safe to remove once you have checked that nothing in them is needed. Do not delete anything yet if you are unsure. Look inside the folder first, and back it up if there is any doubt.
There are two quicker ways to list profiles. In File Explorer , open 📁C:\
Deleting Unwanted User Profiles Safely
Deleting a user profile frees up disk space and removes old accounts you no longer need. You can remove a profile by opening the User Profiles window through the Run dialog, choosing the profile and clicking Delete. This removes the profile’s data, but not the account itself. To remove the account too, use Settings Accounts Other users
The files do not go to the Recycle Bin, and you cannot undo the action. Back up anything you want to keep before you start (the backup steps are later in this guide). Do not delete the profile you are signed in with, and do not delete the only administrator profile on the PC. If you do, you can lose access to the machine.
You need to be signed in as an administrator. If the Delete button is greyed out, you have probably selected the profile you are currently using, or your account is not an administrator. These steps delete a profile from the list of profiles on this computer:
- Press Windows Key + R. The Run dialog box opens.
- Type
sysdm.cpland press Enter. The System Properties window opens. - Click the Advanced tab.
- Click Settings under User Profiles. The list of profiles appears.
- Click the profile you want to remove. Check the name and size carefully, because the delete step cannot be undone.
- Click the Delete button. A confirmation prompt appears.
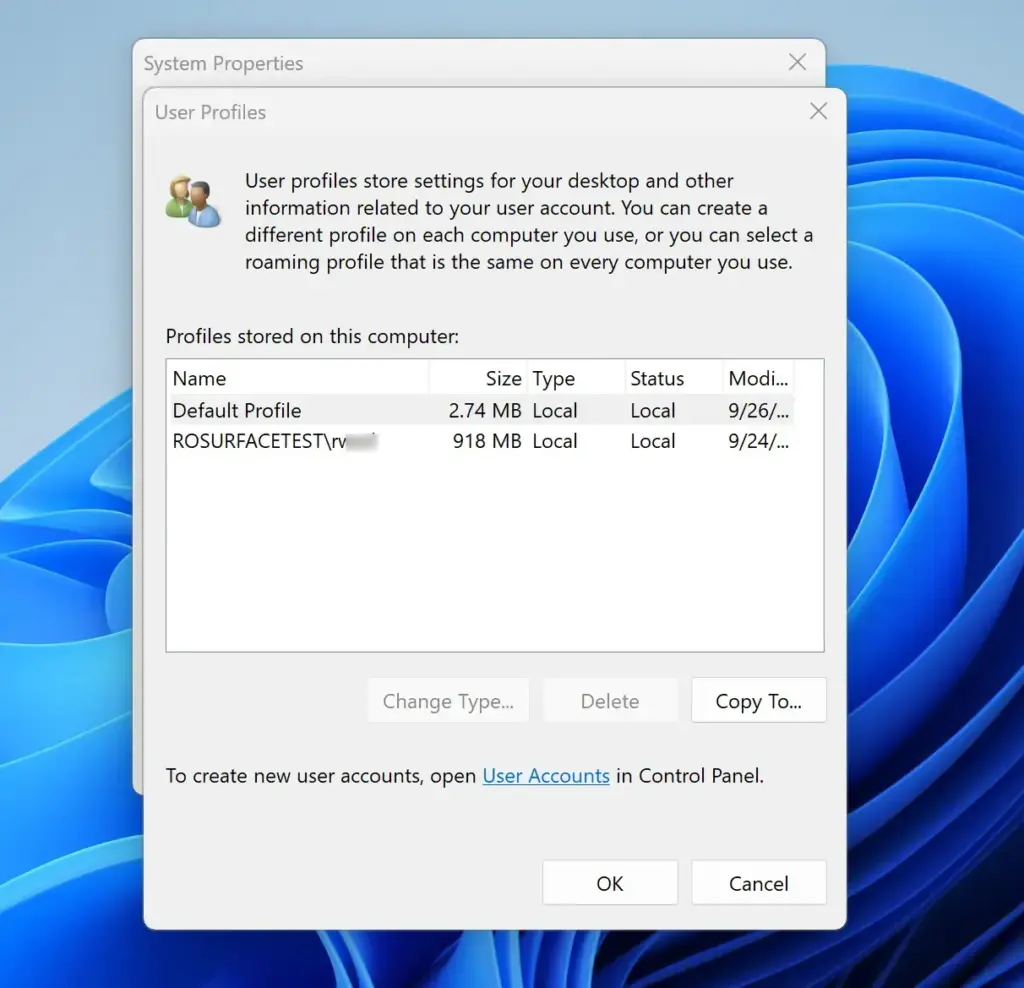
- Click Yes on the confirmation prompt. Windows permanently removes the profile and its files from the hard drive. The profile disappears from the list.
The Settings app is a simpler way to remove an account together with its data, and it works on Home and Pro. Open Settings Accounts Other users, select the account, and choose the option to remove it along with its data. Windows asks you to confirm before it deletes anything. The same warning applies: back up first.
Fixing a Corrupted Profile on This Computer
A corrupted profile is the usual cause when Windows signs you into a temporary account or shows a sign-in error. The usual fix is to create a new local account in the Settings app and copy your old personal files over to the new profile. That restores access to your desktop and documents.
You need an administrator account for these steps. If you only have the one account and it is the broken one, sign in with another administrator account first, or you will not be able to start.
- Press Windows Key + I. The Settings app opens.

- Go to Accounts and then select Other users. Depending on your Windows version, this may be called Family & other users.
- Click Add account under the "Other users" section. A Microsoft account sign-in window appears.
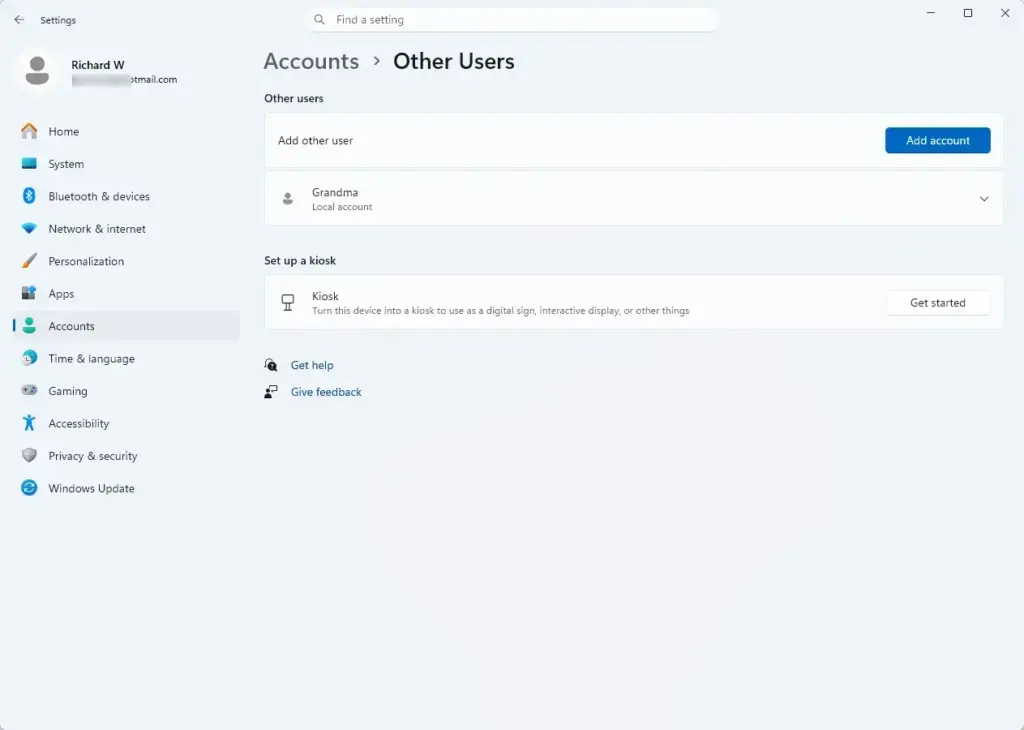
- Click I don't have this person's sign-in information. The window changes to the account creation page.
- Select Add a user without a Microsoft account. On current Windows 11 builds this option may be hidden or may require a Microsoft account. If so, create an offline account through Computer Management (Pro and higher only) or the command line.
- Enter a username and password, then finish the setup wizard. The new account now appears under Other users. It is created as a standard user, which is fine for this purpose.
- Restart your computer and sign in to the new account once. This creates its profile folders.
- Sign back in to an administrator account, then open File Explorer and go to
C:\Users\CORRUPTED-USER-NAME, where CORRUPTED-USER-NAME is your old profile. If Windows asks for permission to open the folder, click Continue. - Copy your personal files (such as Documents, Desktop and Pictures) into the new user folder at
C:\Users\NEW-USER-NAME. Copy only your own folders, not the whole profile, so you do not bring the corruption along.
Leave the old profile in place until you have checked that everything is in the new one. Once you are sure, you can delete the old profile with the steps in the previous section.
Backing Up User Profiles Before a Reset
Windows has no automatic backup button for whole accounts, so you copy the user folders from File Explorer to an external drive or a cloud storage folder. Do this before you delete any profile.
- Open File Explorer and go to
C:\Users. You see one folder for each profile. - Click the user profile folder you want to back up. You may need to click Continue if Windows asks for permission to open another user's folder.
- Select the folders that hold your data, such as Documents, Downloads, Desktop, Pictures, Music and Videos. Hold Ctrl while clicking to pick several at once.
- Press Ctrl + C to copy the folders.
- Plug in an external hard drive or USB flash drive. Check that it has enough free space for what you selected.
- Open the drive in a separate File Explorer window.
- Press Ctrl + V to paste the backup. Wait for the copy to finish before you unplug the drive.
Advanced Profile Management via Computer Management
Advanced profile management lets you change account types, rename local accounts, or disable built-in accounts such as the hidden Administrator account. You do this from the Computer Management console, in the Local Users and Groups section.
Requirement: Local Users and Groups is not available in Windows 11 Home. On Home, the Computer Management console opens, but this section is missing. Use Settings Accounts to change account types and remove accounts instead. You can also use netplwiz, or the net user commands in an elevated terminal, to list and manage local accounts. On Pro, Enterprise and Education, follow the steps below.
You need to be signed in as an administrator for these steps.
- Right-click the Start button and select Computer Management. The console opens.
- Expand System Tools in the left sidebar.
- Click Local Users and Groups and then select Users. The local accounts appear in the middle pane.
- Right-click any user account in the middle pane and select Properties. Here you can change account settings, such as forcing a password change or disabling the account. To undo a disable, open the same Properties window and clear the checkbox.
If this didn't work
If accounts keep disappearing or fail to load after the standard fixes, damaged system files may be the cause. You can repair them with the System File Checker from an elevated terminal, and then restart your PC.
- Right-click the Start button and select Terminal (Admin). Click Yes if User Account Control asks for permission. The terminal opens with administrator rights.
- Type sfc /scannow and press Enter. The scan can take several minutes, so let it reach 100%.
- Read the result. It will say either that no integrity violations were found, or that corrupt files were found and repaired, or that some files could not be repaired.
- If SFC could not repair everything, run DISM /Online /Cleanup-Image /RestoreHealth in the same window and wait for it to finish. It needs an internet connection to fetch clean files. Then run sfc /scannow again.
- Restart your PC and check whether the profile now loads normally.
If the profile still fails to load after this, create a new account and move your files over, as described in the corrupted profile section above.
Frequently asked questions
Where do I find my user profile?
Your user profile is stored in C:\Users\[YourUsername]. To view it, open File Explorer and type this path in the address bar, replacing [YourUsername] with your actual account name. This folder contains your Documents, Pictures, Desktop, Downloads, and app settings.
How do I change my computer profile?
Change your profile picture by opening Settings Accounts Your info, then click your current picture and select a new one. To change a local account name, use Control Panel User Accounts Change your account name or Computer Management; a Microsoft account name is changed at account.microsoft.com. Other profile settings like password live in the Accounts menu.
How can I view the user profiles in Windows?
Press Windows Key + R, type sysdm.cpl, and press Enter. Click the Advanced tab, then click Settings under User Profiles. This window lists all profiles on your computer, showing each one's size, type, and last modified date.
What is a profile on a computer?
A computer profile is a personalized user account that stores your settings, files, desktop shortcuts, and app preferences. Each person who signs into the computer has their own profile. Windows keeps these separate so your files and settings don't mix with other users'.
Still have a question?
Answered by AI from this guide. Good questions may be added to this page — please don't include personal details.
Did this guide fix your problem?

About the Author
Richard
Tech Writer, IT Professional
Richard is a writer at Geek Rewind who turns complex IT tasks into clear, step-by-step guides. He draws on years of hands-on experience in system administration and enterprise IT operations, focusing on Windows, Linux and WordPress: the problems people actually run into, and the fixes that work. His server and WordPress guides come from systems he runs himself. Richard builds and maintains the platform behind Geek Rewind, from its Ubuntu servers and Nginx configuration to its custom WordPress plugins. Many new tutorials start with readers' questions, and he's always glad to answer them in the comments.
No comments yet — be the first to share your thoughts!