How to Control Do Not Disturb via Phone Link on Windows 11

Phone Link lets you control your phone’s Do Not Disturb setting from your Windows 11 PC. If you searched for how to control a Windows PC from your phone, note that Phone Link works the other way round: the PC is the remote control, and the phone is what you manage. Open Phone Link on the PC and click the Do Not Disturb toggle to silence calls and alerts on your Android phone without touching it.
Phone Link is the Windows 11 app that connects your phone to your computer, so you can read notifications, send texts and change a few phone settings from the desktop. Do Not Disturb blocks sound and vibration from incoming calls and alerts, which helps when you need to focus. The Do Not Disturb toggle is an Android feature. iPhones connect to Phone Link with a shorter feature list (calls, messages and notifications), so you may not see the toggle there.
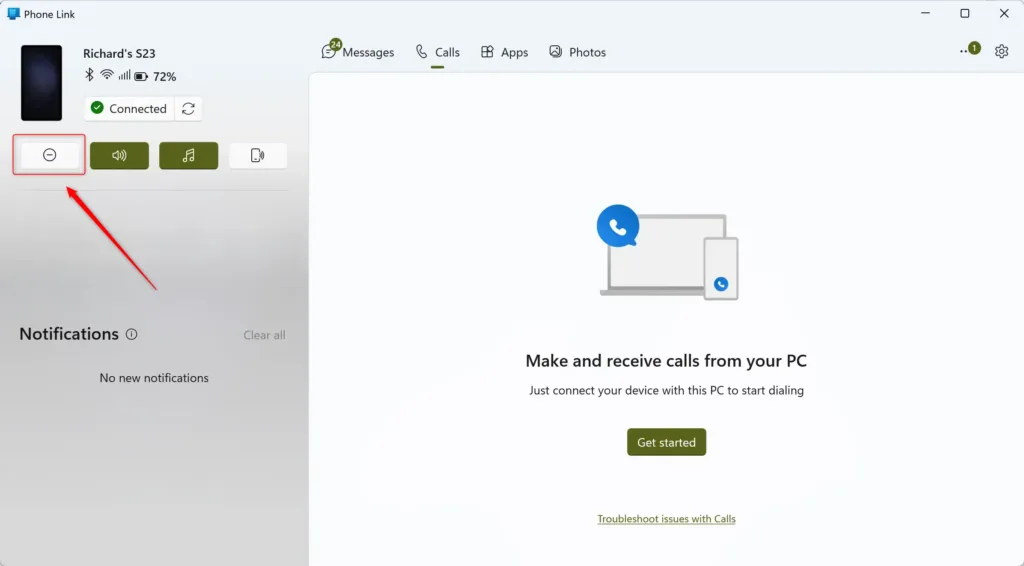
Control your phone’s Do Not Disturb mode from your Windows 11 PC using the Phone Link app. Open the Phone Link app, find the “Do not disturb” button on the left panel, and click it to toggle the mode on or off.
Option 1Control Your Phone’s Alerts with the Phone Link App
If you already use Phone Link, this is the fastest way to manage Do Not Disturb. It works like a shortcut on your PC. It needs a phone that is already paired and connected, so finish the pairing first if you haven’t.
Open the Phone Link App
Start by opening Phone Link, which is the app you use to manage your phone from your computer screen.
- Click the search box on the taskbar and type Phone Link.
- Click the app in the search results. The Phone Link window opens.
- If this is your first time, follow the on-screen steps to pair your Android phone with the PC. You will usually sign in with the same Microsoft account on both devices and approve a few permissions on the phone. Android phones use the Link to Windows app, which is preinstalled on many Samsung models.
Once pairing is done, you should see your phone’s messages, notifications and settings inside the Phone Link window.
Find the “Do Not Disturb” Button
The Do Not Disturb button on the Phone Link main screen controls your phone’s Do Not Disturb mode. Look near the top of the left-side panel. The icon may be a moon or a crossed-out circle, and it shows whether Do Not Disturb is active.
If you can't see the button, check that the phone is connected and not asleep with the app closed. Also check that you accepted the permission prompts during setup. If it is still missing, try the Windows Settings route later in this tutorial.
Turn "Do Not Disturb" On or Off
- Click the Do Not Disturb toggle button in the sidebar.
- Check the button. It changes color to show whether notifications are now blocked or allowed.
This silences calls and alerts on your phone right away. To undo it, click the same button again. If the phone doesn't react, look at its screen to confirm the mode actually changed, and check that the phone still has a connection to the PC.
Option 2Manage "Do Not Disturb" Through Windows Settings
Use Windows Settings if you prefer to manage your phone from one central place, or if you can't find the switch in the Phone Link app. This method also gives you more control over which devices you manage. The Mobile devices page is in current Windows 11 builds. If you don't see it, run Windows Update and check again.
Open Windows Settings
- Press Win + I on your keyboard to open Settings right away.
- Or click the Start button and choose the gear icon.
The Settings window should now be open.
Go to Mobile Devices
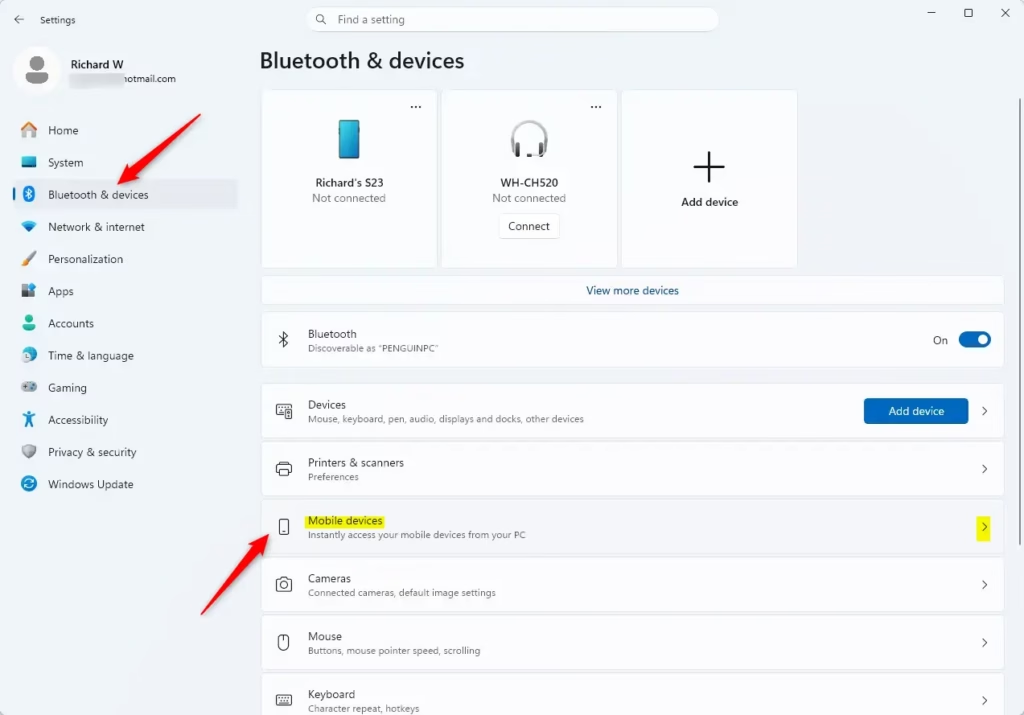
- In Settings, click Bluetooth & devices in the left pane.
- On the right, click Mobile devices.
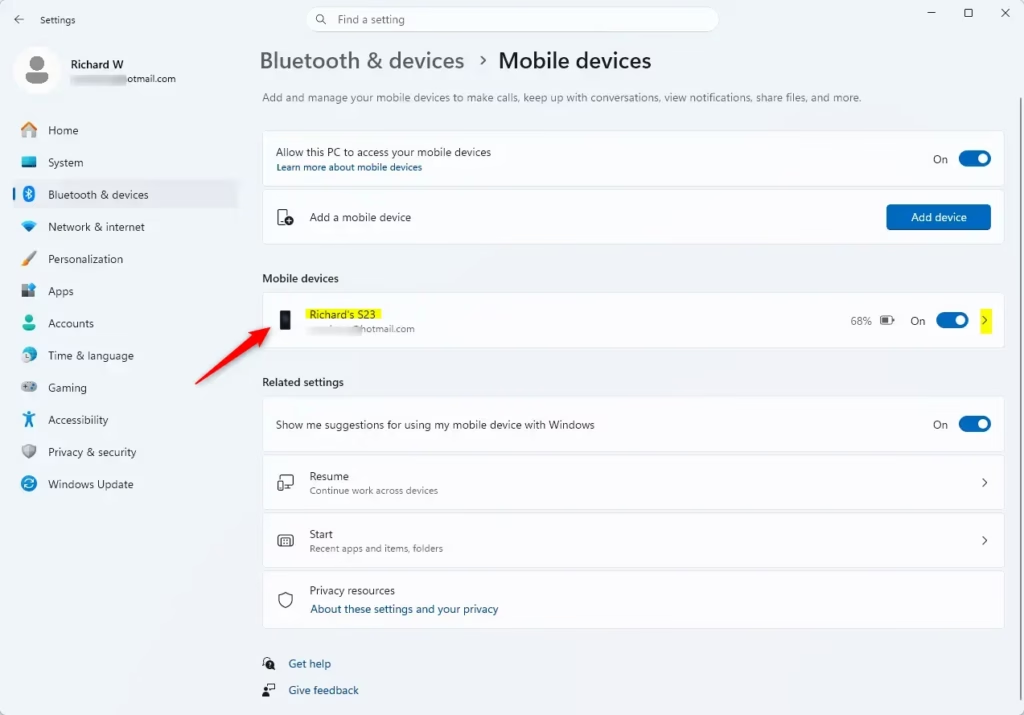
The full path is Settings Bluetooth & devices Mobile devices If the page shows a switch that lets this PC access your mobile devices, make sure it is on. Otherwise the phone won't be available here.
Select Your Linked Phone
The Mobile devices section lists the phones connected to your PC. Find your Android phone and click its name. It might appear as "My Samsung Galaxy" or something similar. If your phone isn't listed, go back to Phone Link and finish pairing, then reopen this page.
Find and Adjust "Do Not Disturb" Controls
- Click your connected device name near the top of the Phone Link window.
- Find the notification section on your device status screen.
- Click the switch to turn Do Not Disturb on or off.
The switch should change position to match the new state.
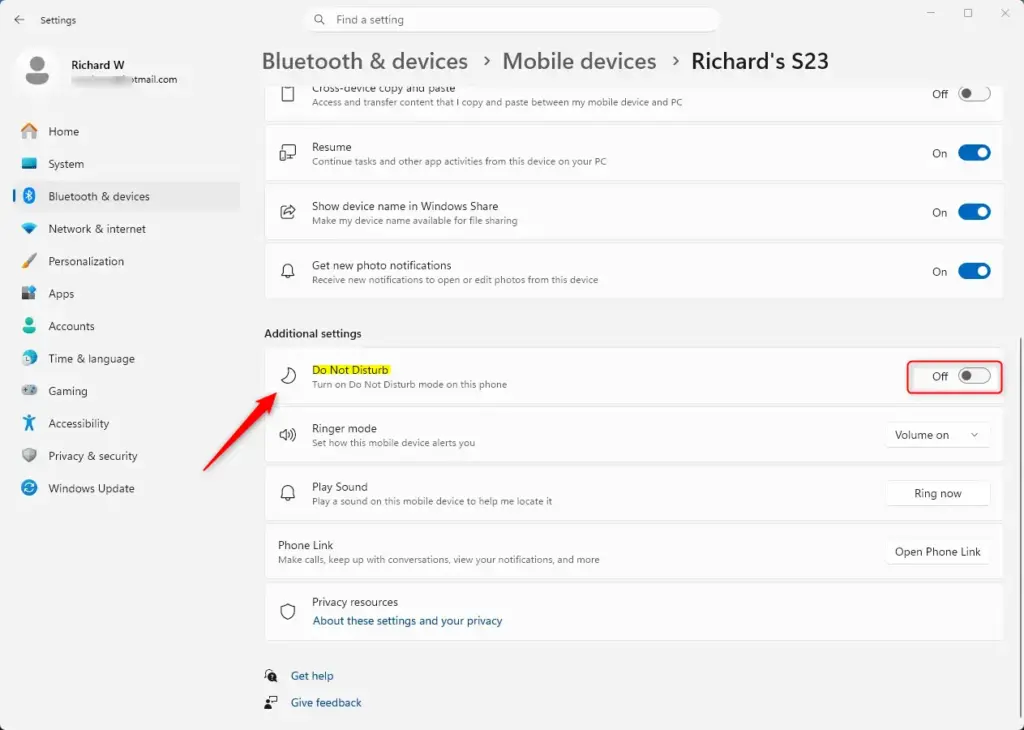
This switch controls your phone's notification status. Clicking it once turns Do Not Disturb on for your connected Android phone, and clicking it again turns it off. The change applies to the phone immediately, and you don't need to restart the PC or the phone. This works the same on Windows 11 Home and Pro.
Close Settings
After you set Do Not Disturb the way you want it, you can close the Settings window. Your changes are saved automatically. To reverse them later, return to the same switch, or use the toggle in the Phone Link sidebar.
Summary
You can manage your phone's Do Not Disturb mode from your Windows 11 PC with the Phone Link app. Use the quick toggle on the main screen, or go through Settings Bluetooth & devices Mobile devices. Either way, your phone stays silent while you need to focus, and you can turn it off again from the same place.
Have a question about this guide?
Answered by AI from this guide. Good questions may be added to this page — please don't include personal details.
Did this guide fix your problem?

About the Author
Richard
Tech Writer, IT Professional
Richard is a writer at Geek Rewind who turns complex IT tasks into clear, step-by-step guides. He draws on years of hands-on experience in system administration and enterprise IT operations, focusing on Windows, Linux and WordPress: the problems people actually run into, and the fixes that work. His server and WordPress guides come from systems he runs himself. Richard builds and maintains the platform behind Geek Rewind, from its Ubuntu servers and Nginx configuration to its custom WordPress plugins. Many new tutorials start with readers' questions, and he's always glad to answer them in the comments.
No comments yet — be the first to share your thoughts!