How to remove recently linked devices from Windows 11 Mobile Devices settings
Removing a recently linked phone from the Mobile devices settings in Windows 11 unlinks it from your PC. Text notifications, photo syncing and cross-device copy and paste then stop working for that phone. You manage these connections in the Settings ⚙️ app, so you can clear out old handsets you no longer use.
Advertisement
Unlinking does not delete anything on the phone. Your photos, files and apps stay where they are. The PC simply forgets the connection. If you change your mind, you can link the phone again later by signing in and pairing it.
⚡ Quick Answer
Open Settings ⚙️, go to Bluetooth 🔷 & devices, click Mobile devices, then Manage devices. Find the phone you want to remove and toggle it off, or click Remove if available. The device unlinks from your PC and stops syncing notifications, photos, and clipboard content.
Advertisement
Why old linked devices linger in 🪟 Windows 11
📝Good to KnowOld phones linger in Windows 11 because different features store the phone’s details in separate places.
Settings, Phone Link, Bluetooth 🔷 and your Microsoft account each keep their own record. Removing the phone from one of them does not clear the others.
That is why an old phone name can keep showing up after you thought you removed it. The separate records help prevent accidental disconnections, but they make cleanup confusing. To remove a phone completely, work through each place below. You do not need to restart the 🔄 PC at any point, though signing out and back in can help if a stale entry stays in a list.
Step-by-step: How to remove your mobile device from 🪟 Windows 11 Settings
The first place to check is the Mobile devices page in Settings. You open Settings ⚙️, go to Bluetooth 🔷 & devices, find the old phone in the list and turn it off or remove it. These steps are for current Windows 11 (23H2 and 24H2). Menu wording can vary slightly between builds.
Click the Start button on the taskbar 🖥️ and select the gear-shaped Settings icon. You can also press the Win plus I to open it instantly. The Settings ⚙️ window should open. Taskbar
In the left-hand sidebar, click Bluetooth 🔷 & devices. The page lists your connected devices and related options.
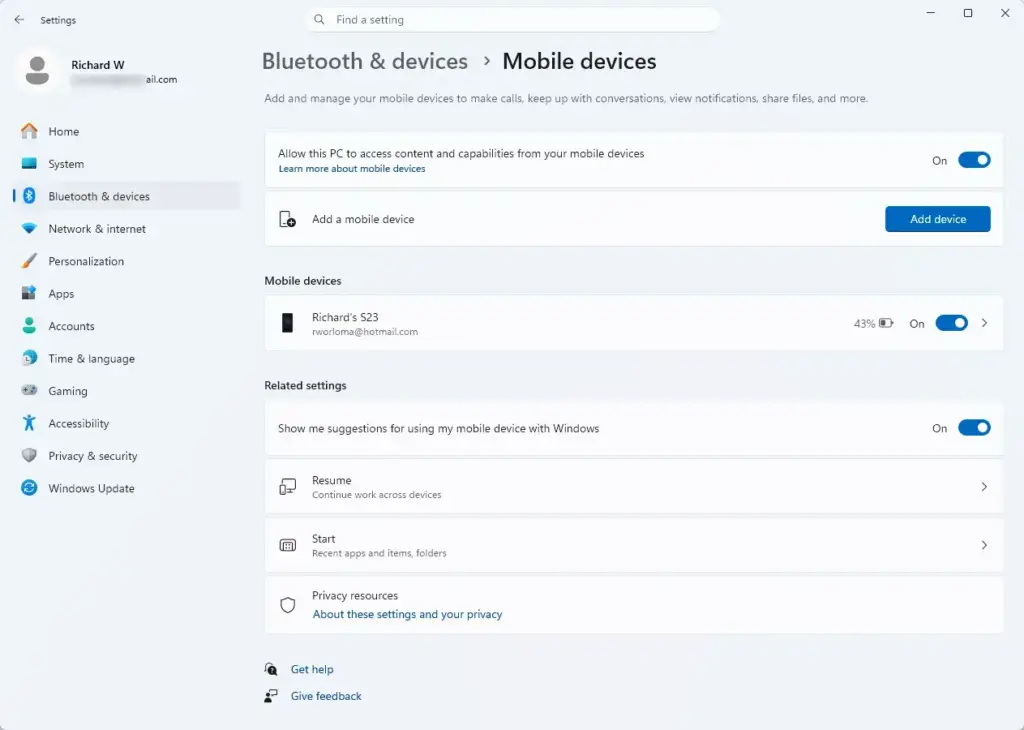
In the main window, click Mobile devices. Settings › Bluetooth & devices › Mobile devices If you do not see this entry, your Windows 11 build may not include it yet. Run Windows Update 🔃 first and check again.
Click Manage devices. You should now see a list of the smartphones and tablets that are, or have been, connected to your account.
Find the device you want to remove in the list.
Click the toggle switch next to the device name to turn it off. If a remove option is shown, click it to sever the connection entirely. Note: depending on your Windows update 🔃 version, you may need administrative privileges on your user account to make these changes. If the toggle is greyed out, sign in with an administrator account and try again.
Step-by-step: How to remove your device from the Phone Link app
Next, remove the phone in the Phone Link app. This stops the old phone from appearing in your PC settings. You open Phone Link, go to its settings, and choose to unlink or remove the phone. The wording differs a little between Phone Link versions, so look for the closest match to the names below.
Advertisement
Open the Start menu, type Phone Link into the search box, and click the app to open it.
Look in the top corner of the Phone Link window and click the Settings gear icon.
From the settings options, click My Devices or Devices. You should see the phones linked to your account.
Find the old phone you want to delete.
Click the menu icon next to the device name. It is often three dots, or it may be a Remove button.
Select the option to remove or unlink the device. Confirm when the safety message appears. The phone should disappear from the list.
Step-by-step: How to sign out of Link to Windows on your mobile device
Now sign out of Link to Windows on the phone itself. This stops the phone from trying to reconnect to your computer. You open the phone's settings, find Link to Windows, and sign out or remove the computer. These steps are written for Android. Menu names differ by manufacturer, and the app is built into many Samsung phones.
Pick up the phone and unlock the screen.
Open the phone's settings and look for Connected Devices, or search for Link to Windows. You can also swipe down from the top of the screen to open the quick settings panel and find the shortcut there.
Tap Link to Windows to open its settings page.
Tap your Microsoft account email address listed inside the app.
Select the option to sign out or remove this computer from your linked devices.
For a complete break, press and hold the Link to Windows app icon on the home screen and tap Uninstall. If the app is built into your phone, you may only see a Disable option. Signing out is enough in that case.
Step-by-step: How to unpair Bluetooth connections
⚠️WarningThen clear the Bluetooth pairing.
Unpairing removes the old phone's saved wireless link and prevents stray connection errors. You open the Bluetooth device list, find the old phone, and remove it. To use the phone with this PC again, you would have to pair it from scratch.
Open the Settings app from the Start menu or with the Windows key plus I. Settings
Click Bluetooth & devices in the left menu.
Click the Devices section to see everything currently paired with your computer over Bluetooth. If the list looks empty, make sure Bluetooth is turned on at the top of the page.
Scroll through the list until you find the old mobile device.
Click the three-dot menu button next to the device name.
Select Remove device and confirm. This deletes the Bluetooth pairing between your computer and the phone, and the entry should vanish from the list.
Cleaning up your Microsoft Account cloud devices
Last, clean up your Microsoft account. Old phones can stay tied to your online profile even after you remove them from the PC. You sign in to the Microsoft devices page in any browser, find the old phone, and remove it. This works from any computer or phone. Not every phone appears here, so if yours is not listed, you can skip this step.
Open any web browser and go to the Microsoft account management site at account.microsoft.com/devices.
Sign in with the Microsoft account you used to link the phone.
Look along the top navigation bar for the Devices tab and click it if the page does not open there already.
Find your old phone in the list of registered devices.
Click the dropdown menu or the View details link for that phone.
Select the option to remove the device and confirm the warning. The phone should no longer appear in your account's device list.
Summary
To remove an old phone fully, clear it from four places: your system settings, the Phone Link app, the Bluetooth menu and your Microsoft cloud account. Doing all of them keeps your PC tidy, stops old device names from showing up, and protects your privacy. If an old name still appears afterward, recheck each place in turn, because one of the four records is still holding it.
📬 Get new Windows tips in your inbox
One email when we publish something worth your time. No spam, unsubscribe anytime.
Have a question about this guide?
Answered by AI from this guide. Good questions may be added to this page — please don't include personal details.
Richard is a writer at Geek Rewind who turns complex IT tasks into clear, step-by-step guides. He draws on years of hands-on experience in system administration and enterprise IT operations, focusing on Windows, Linux and WordPress: the problems people actually run into, and the fixes that work.
His server and WordPress guides come from systems he runs himself. Richard builds and maintains the platform behind Geek Rewind, from its Ubuntu servers and Nginx configuration to its custom WordPress plugins.
Many new tutorials start with readers' questions, and he's always glad to answer them in the comments.
One email when we publish a guide worth your time — new Windows features, the fixes that actually
work, and a heads-up when Microsoft breaks something. Unsubscribe in one click.
📬 Get new Windows tips in your inbox
One email when we publish something worth your time. No spam, unsubscribe anytime.




No comments yet — be the first to share your thoughts!