How to Test Quick Machine Recovery in Windows 11

Quick Machine Recovery in Windows 11 lets you test whether your PC can recover from startup problems before they lock you out. The test puts the PC into a simulated recovery run, so you can find out ahead of time whether the recovery setup works.
Checking this before a real failure matters most after major system updates, when a machine is most likely to hit a boot problem. The whole test takes a few commands in Windows Terminal and one restart. You will need administrator rights on the PC.
Open Windows Terminal as Administrator, paste reagentc /SetRecoveryTestmode and press Enter, then paste reagentc /BootToRe and press Enter, then restart from Start Power Restart Your PC boots into Quick Machine Recovery test mode to verify the recovery setup works before a real failure occurs.
What is Quick Machine Recovery?
Quick Machine Recovery is an advanced troubleshooting feature for severe startup problems. When Windows can’t boot, it automatically downloads repair solutions from the internet and applies them. It works alongside the Windows Recovery Environment (WinRE), a built-in diagnostic screen that loads when Windows can’t start normally. This tool is available starting with Windows 11 build 26120.3653.
Because the fixes come from the internet, the PC needs a working network connection while it sits in recovery. On a wired or already-known Wi-Fi network this is usually straightforward. If the PC can’t get online, the feature has nothing to download.
This capability builds directly on the Startup Repair tool. It leans on the Windows Recovery Environment (WinRE), a built-in diagnostic interface, to scan for solutions and fix issues.
If the test doesn’t work on your PC, check your build number first. A build older than the one above won’t have the feature.
How to Test Quick Machine Recovery on Your PC
Save any open work first, because the last step restarts the PC.
Step 1Open Windows Terminal as Administrator ⚠️
First, open a Command Prompt tab with administrator rights:
- Click the Start button.
- Type Windows Terminal. It should appear at the top of the search results.
- Right-click it and choose Run as administrator. If a User Account Control prompt appears, click Yes.
- When it opens, click the down arrow (˅) next to the plus (+) tab and select Command Prompt. A new tab opens with a command prompt inside Windows Terminal.
Check that the tab title or prompt shows an administrator session. Without admin rights, the commands below will fail with an access error.
Step 2Enable Recovery Test Mode ⚠️
- Paste the command shown below into the terminal and press Enter. Read the output before you move on.
reagentc /SetRecoveryTestmodeIf the command reports success, continue. If it reports an error, stop and check that you are in an administrator window.
Step 3Set Your PC to Boot into Recovery Mode ⚠️
- Copy and paste the second command shown below, then press Enter. Again, read the output to confirm it completed without an error.
reagentc /BootToReStep 4Restart Your Computer
- Click Start Power Restart.
The PC will now boot into Quick Machine Recovery test mode instead of going straight to the desktop. This can take a little longer than a normal restart.
What If Your PC Doesn't Start in Recovery Mode?
If your PC fails to start in recovery mode during Quick Machine Recovery testing, you need to reset the recovery environment using Windows Terminal. You can fix this by booting normally, opening Windows Terminal with administrator rights, and running two command-line tools that turn the recovery feature off and back on again. Nothing is damaged by this; you are only refreshing the recovery setup.
- In the recovery screen, choose Continue to boot Windows normally.
- Once Windows starts, open Windows Terminal (Admin) again, as described earlier, and run these two commands. Press Enter after each one:
reagentc.exe /Disable
reagentc.exe /Enable
Run through the startup steps for Quick Machine Recovery test mode once more. That means running the two setup commands from the steps above, then restarting from Start Power Restart.
If the test still fails after a second attempt, check that the PC is on the supported build and has a working internet connection, then try again.
Spotting the recovery test screen confirms the PC is ready to handle future startup issues:
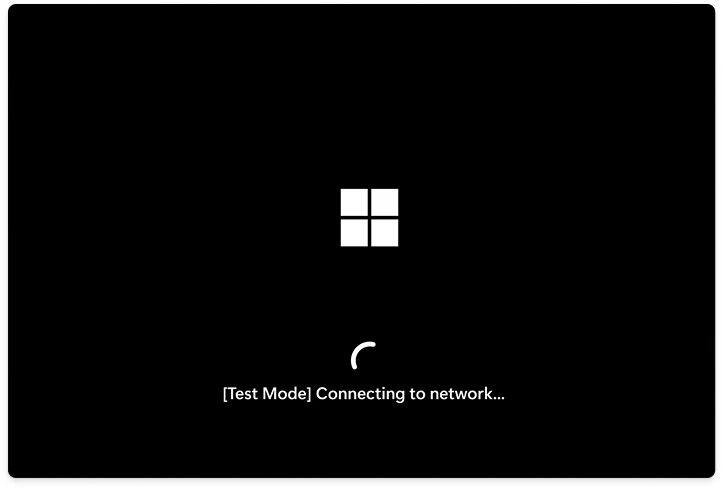
Completion of this process validates that Quick Machine Recovery functions correctly on the Windows 11 PC. If you end up in the recovery screen and don't want to stay there, choose Continue to return to Windows.
Summary
Quick Machine Recovery in Windows 11 is a built-in tool that automatically repairs serious startup failures by pulling fixes from the Windows Recovery Environment and online servers. It saves you from manual troubleshooting by handling severe boot errors on its own, provided the recovery settings are active and configured correctly on your computer.- Why Quick Machine Recovery? It fixes serious startup problems automatically using online solutions.
- What does it use? Windows Recovery Environment (WinRE) and Windows Update to find fixes.
- What do you need to do? Run simple commands in Windows Terminal as an admin to test it.
- What if it doesn't work? You can reset the recovery settings with two commands and try again.
- What does success look like? Seeing the recovery test screen means your PC is ready to recover from future startup issues.
- Why test this feature? You're making sure your PC can handle startup problems better and recover quickly.
Was this guide helpful?

About the Author
Richard
Tech Writer, IT Professional
Richard is a writer at Geek Rewind who turns complex IT tasks into clear, step-by-step guides. He draws on years of hands-on experience in system administration and enterprise IT operations, focusing on Windows, Linux and WordPress: the problems people actually run into, and the fixes that work. His server and WordPress guides come from systems he runs himself. Richard builds and maintains the platform behind Geek Rewind, from its Ubuntu servers and Nginx configuration to its custom WordPress plugins. Many new tutorials start with readers' questions, and he's always glad to answer them in the comments.


No comments yet — be the first to share your thoughts!