How to Show or Hide Gallery in Windows 11 File Explorer

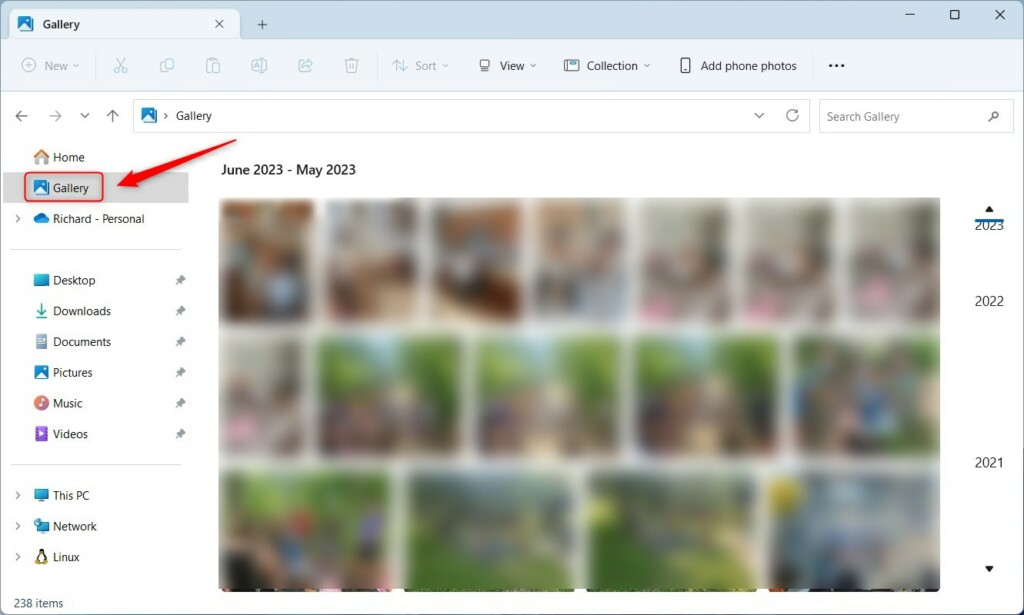
The Gallery in Windows 11 File Explorer is a photo feed that gathers pictures from several folders into one scrollable view. Microsoft first added it in Windows 11 build 23435, and it reached regular users with Windows 11 version 23H2. If your PC runs an older version, you won’t see Gallery in the sidebar, so there is nothing to hide.
Gallery only displays your photos. They stay in their original folders, and nothing is moved or copied. Hiding Gallery removes the entry from the navigation pane and does not delete any pictures. If you prefer a simpler sidebar, hiding it is a safe change you can undo at any time.
To show or hide the Gallery in Windows 11 File Explorer , edit the Registry. Navigate to 🗝️HKEY_CURRENT_USER\
Method 1Using the Registry Editor (Advanced)
The Registry Editor is the built-in tool for the database where Windows stores its configuration settings. You can show or hide Gallery by editing a specific registry key. You need an administrator account for this, and you must restart File Explorer or sign out and back in before the new setting takes effect. The tool works the same on Windows 11 Home and Pro.
A wrong edit in the registry can cause problems, so make a backup first. In Registry Editor, choose File Export, pick a location, and save the file. If something goes wrong, double-click that file to restore the settings .
- Open the Windows Registry by typing regedit in the search bar and pressing Enter. The Registry Editor window should open. If a User Account Control prompt appears, click Yes.
- Navigate to this path:
HKEY_CURRENT_USER\Software\Classes\CLSID\{e88865ea-0e1c-4e20-9aa6-edcd0212c87c} - Check the left pane for the
{e88865ea-0e1c-4e20-9aa6-edcd0212c87c}folder. If it is missing, right-click theCLSIDfolder, select New, and create the subkey with that name. The new key should appear under its parent in the left pane.
If the search bar doesn’t find Registry Editor, you can open it from the Run dialog instead. The steps below also cover creating the key and the value in one pass.
- Press
Win + Rto open the Run dialog. - Type
regeditand press Enter to open the Windows Registry. Click Yes if User Account Control (UAC) prompts you. - Navigate to the following registry path:
HKEY_LOCAL_MACHINE\SOFTWARE\Microsoft\Windows\CurrentVersion\Shell Extensions - Right-click the
Shell Extensionskey in the left pane. - Select
New, then clickKey. A new key appears in the left pane with its name highlighted for editing. - Name the new key:
Blocked - Right-click the newly created
Blockedkey. - Select
New, then clickString Value. A new value appears in the right pane. - Name the new item ShowGallery.
- Double-click the new string value you created. An edit window opens.
- In the Value data field, enter
{e17d4fc0-5564-11d1-bb52-00805fc11070}to hide the Gallery, or leave the field blank to show it. - Click OK. The value now shows your entry in the right pane.
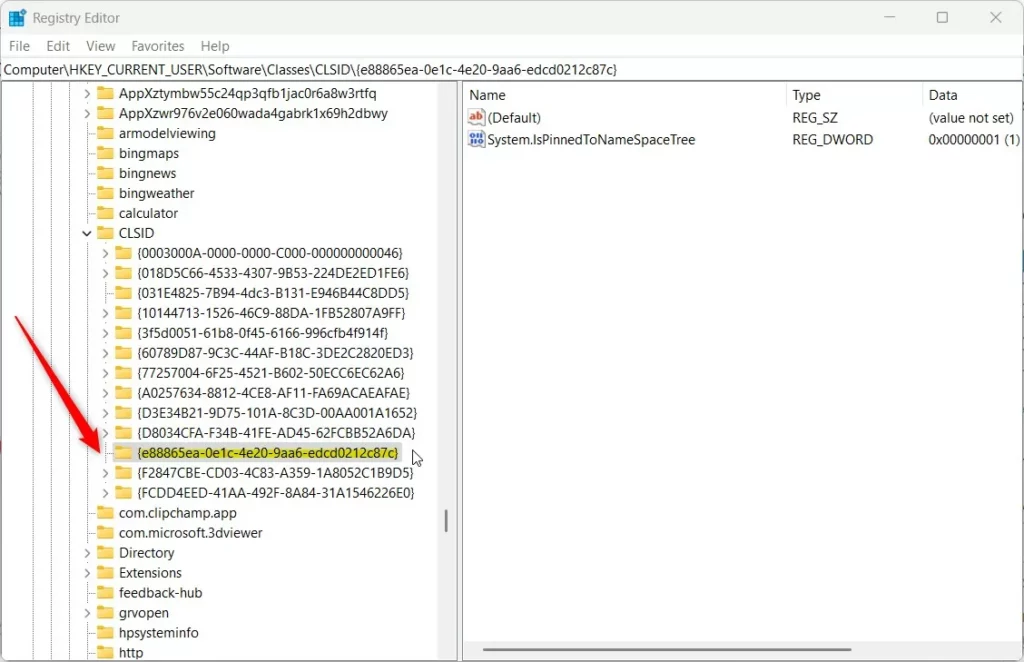
Some setups use a DWORD value instead of a string. The steps below continue from the previous ones and set a number to switch Gallery on or off.
- Right-click an empty space on the right side of the window.
- Select New, then choose DWORD (32-bit) Value.
- Name the new item:
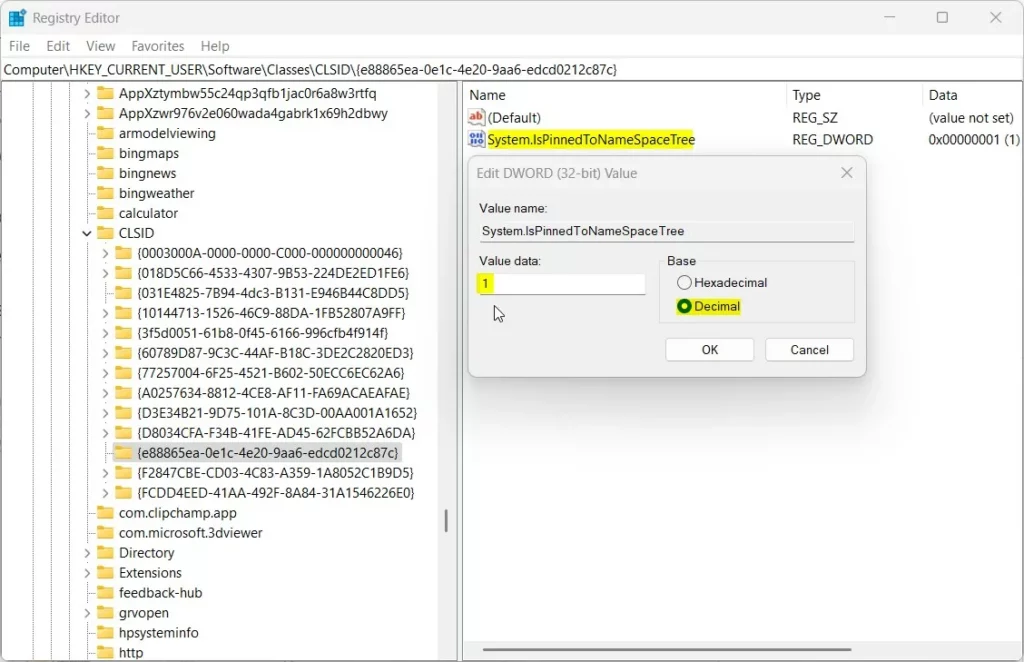
System.IsPinnedToNameSpaceTree - Double-click your new
System.IsPinnedToNameSpaceTreeitem. - Set the Base to Decimal.
- Change the Value data to 1 to show the Gallery or 0 to hide it.
You may also see a second location for the same setting. If so, use these steps there:
- Navigate to the following registry path:
HKEY_CURRENT_USER\SOFTWARE\Microsoft\Windows\CurrentVersion\Explorer\Advanced - Right-click an empty space in the right pane.
- Select
New, then clickDWORD (32-bit) Value. - Name the new value:
GallerySizing - Double-click the newly created
GallerySizingvalue. - Under Base, select Decimal.
- Set the Value data to 0 to hide the Gallery or 1 to show it.
- Click OK.
To undo any of these changes, return to the same value and switch it back, or delete the value you created. Then restart File Explorer or sign out and back in.
Close Registry Editor to save your changes. Restart your computer to be sure the update applies. For a quicker option, press Ctrl+Shift+Esc to open Task Manager, find Windows Explorer in the list, right-click it, and select Restart. The taskbar will flicker briefly. When it returns, open a new File Explorer window and check whether Gallery appears in the left pane.
Troubleshooting and Permissions
If the Registry method doesn't work, the cause is usually a permissions problem or a lack of administrator rights. Check that you are signed in with an administrator account, and that you opened Registry Editor and accepted the UAC prompt. Also confirm that the key and value names match exactly, and that the value type is correct (string or DWORD, as in the steps above). If the setting still doesn't change, restart the PC rather than only File Explorer, and make sure you are on Windows 11 version 23H2 or later.
Summary
Choosing to show or hide Gallery in Windows 11 helps keep File Explorer tidy and organized. The change is small and easy to reverse, so you can switch it back whenever you like.
Have a question about this guide?
Answered by AI from this guide. Good questions may be added to this page — please don't include personal details.
Did this guide fix your problem?

About the Author
Richard
Tech Writer, IT Professional
Richard is a writer at Geek Rewind who turns complex IT tasks into clear, step-by-step guides. He draws on years of hands-on experience in system administration and enterprise IT operations, focusing on Windows, Linux and WordPress: the problems people actually run into, and the fixes that work. His server and WordPress guides come from systems he runs himself. Richard builds and maintains the platform behind Geek Rewind, from its Ubuntu servers and Nginx configuration to its custom WordPress plugins. Many new tutorials start with readers' questions, and he's always glad to answer them in the comments.
[…] and Redo commands, enable or disable File Explorer folder options, show or hide the details pane, show or hide the Gallery, and […]
I’m confused because although blurred, the gallery is still visible after the registry modification.
The registry modification provided is also ineffective for regular users like myself because Wins 11 registry key(s) DEFAULT TO A HEXADECIMAL BASE therefore the provided registry modification won’t work.
[…] article explains how to add or remove folders in the File Explorer Gallary collection on Windows […]
[…] open File Explorer and open your Google Drive folder. You can find it in the File Explorer navigator pane, Quick access, or in “This […]