How to Set Up Custom Speech Recognition Profiles in Windows 11 Time and Language Speech Settings

Custom speech recognition profiles in Windows 11 help your computer learn your voice, accent, and vocabulary, so dictation produces fewer typing errors. Standard speech engines often struggle with distinct vocal pitches and specialized jargon, and dictation accuracy drops when they do.
You build this profile from several places: the Time & language settings, the older Speech Recognition tools in Control Panel , and a few privacy switches. This guide covers each in the order you would normally set them up. The Control Panel tools are still in Windows 11 but are legacy features, so some screens look older than the rest of the system.
Open Settings , go to Time & language, select Speech, and choose your language from the dropdown menu. Then click Get started under Microphone to run the setup test. Your profile learns your voice as you use dictation.
Navigating to Time & Language Speech Settings
The speech settings page is where you manage your spoken language, your microphone, and related voice options. Every later step in this guide starts from here or from a nearby page, so it is worth knowing how to get to it quickly.
- Press Win+I on your keyboard to open Settings.

Windows 11 Start menu with Settings gear icon highlighted. - Click Time & language in the left-hand sidebar.

Settings › Time & language - Click Speech. You should now see the speech configuration screen, where you manage spoken input, microphone selection, and voice options.
The exact layout of this page varies a little between Windows 11 versions. If a section is in a slightly different place on your PC, look for it by name rather than by position.
Managing Speech Languages and Regional Packs
The speech engine needs to know which language and regional variant you speak. Picking the right one matters most if you have an accent or a regional dialect. A US English model, for example, will misread many words spoken in other English variants.
- Open Settings, go to Time & language, and select Speech.
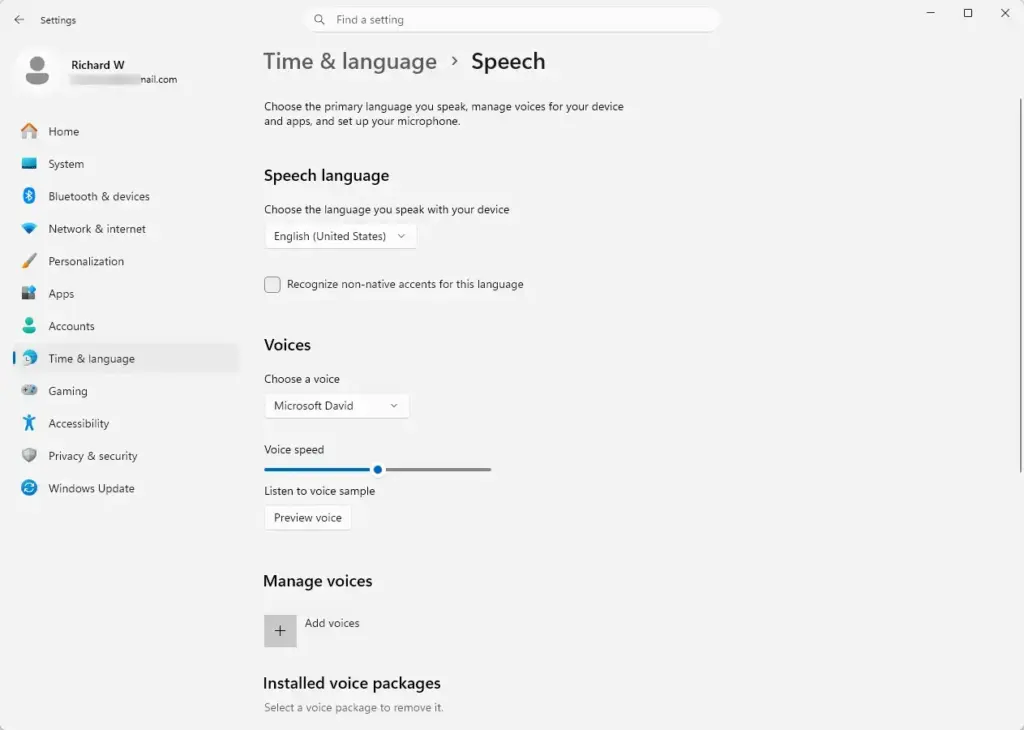
Settings › Time & language › Speech - Find the Choose the language you speak with your device drop-down menu.
- Open the menu and select your native language or regional dialect. The setting takes effect straight away, so there is no Save button.
- If your language or dialect is not in the list, you need to install its language pack. Go back to Time & language and select Language & region.
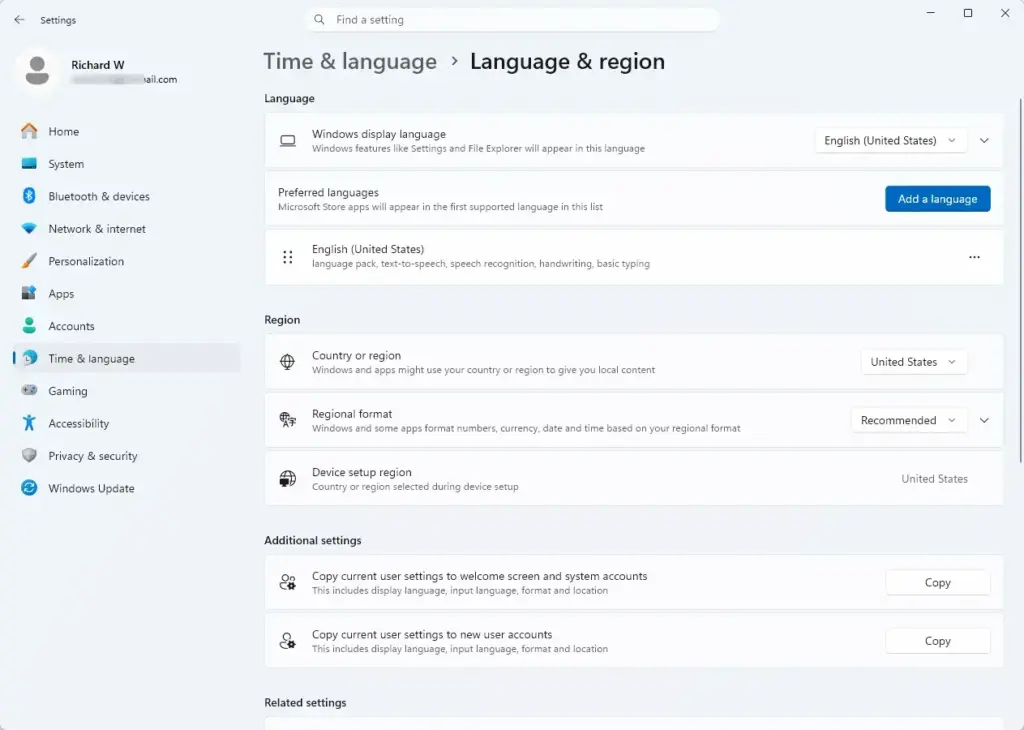
Settings › Time & language › Language & region - Click Add a language and search for the language you want.
- Select the language and click Next.
- On the features screen, check the box for Speech recognition, then click Install. The download needs an internet connection and can take a few minutes.
- When the install finishes, return to Speech and pick the new language from the drop-down menu.
If Speech recognition is not offered for a language, that language has no speech support in Windows. In that case, choose the closest supported regional variant. To undo the change, switch the drop-down back to your previous language. You can also remove the added language from Language & region.
Setting Up and Testing Your Microphone
Run the microphone setup before you train your profile so the training samples are clean.
- Open Settings, go to Time & language, and select Speech.
Settings › Time & language › Speech - Find the Microphone section near the top of the page.
- Click the Get started button under the microphone setup option. A short test window opens.
- Follow the on-screen prompts and read the sentence aloud at a normal volume. Watch the audio meter: it should move clearly when you speak, but it should not hit the maximum and stay there. Clipping and distortion lower recognition accuracy.
- If Windows picked the wrong device, set the right one as your default input. Open the Windows Sound settings (under System in Settings) and choose your headset or standalone microphone as the input device. You can also do this from the sound options in Control Panel.
- Repeat the test after changing the device to confirm the meter responds.
If Get started is greyed out or the meter stays flat, check that the microphone is plugged in and not muted. Also check that microphone access is allowed in Privacy & security. A USB headset or external microphone usually gives better results than a laptop's built-in one.
Training Your PC to Better Recognize Your Voice
This is the part that actually adapts the speech engine to you. The legacy training wizard in Control Panel records you reading sample sentences and adjusts the recognition profile to your pitch, pace, and pronunciation. Do it in a quiet room, with the same microphone you will use for dictation.
- Press the Windows key, type Control Panel in the search bar, and press Enter.
- Click Ease of Access, then select Speech Recognition.
- Click Train your computer to better understand you. The voice training wizard opens.
- Read each sentence aloud in your normal speaking voice and at your normal pace. Do not slow down or over-enunciate, or the profile will be tuned to a voice you do not actually use.
- Continue until the wizard says training is complete. The recognizer uses the new data from then on.
If Speech Recognition has never been set up on the PC, Windows may first start a short setup wizard for the microphone. Complete it and then run the training again. You can run the training session more than once, and each round tends to improve accuracy, especially if you use technical terms.
Configuring Advanced Speech Options
The advanced options control how the legacy speech tools behave day to day. They also let you manage the recognition profile Windows keeps for you. Review these settings once so nothing runs, or collects data, that you do not want.
- Open Control Panel from the Windows search menu.
- Click Ease of Access and select Speech Recognition.
- Click Advanced speech options in the left-hand menu. The Speech Recognition Properties window opens.
- Check Review documents and mail to improve speech recognition if you want the system to look at your writing so it can predict words better in context. Leave it unchecked if you would rather it did not scan your documents.
- Clear the startup option if you do not want voice tools to launch automatically every time Windows boots.
- Click Apply, then OK, to save the changes.
The exact wording of these options can differ a little depending on your Windows build. If you change your mind, return to the same window and reverse the checkboxes.
Configuring Privacy Settings for Speech and Voice Activation
Cloud-based speech recognition and voice typing only work if Windows is allowed to send your speech to Microsoft for processing. These switches are in Privacy & security. If they are off, voice typing may fail or give poor results, even with a well-trained profile.
- Press Windows key + I to open Settings.
- Click Privacy & security in the left-hand sidebar.
- Under Windows permissions, select Speech.
- Turn the switch for Online speech recognition to On.
- Go back to Privacy & security and select Voice activation.
- Make sure apps are allowed to use voice activation. If you want this to work when the PC is locked, also allow it for the locked state.
If that is a concern, leave the switch off and use the legacy Speech Recognition tools, which do their recognition on your PC. To undo this change, return to the page and turn the switch off.
Personalizing Inking and Typing Dictionary
Windows can keep a personal dictionary of names, jargon, and other words you use often. Turning on personalization lets that dictionary feed the speech-to-text engine, so unusual terms are less likely to be turned into the wrong word.
- Open Settings and go to Privacy & security.
- Scroll down to Windows permissions and click Inking & typing personalization.
- Turn the switch for Personalization dictionary to On. Windows can then learn from how you type and speak and add custom words to your personal dictionary. Speech-to-text then transcribes your unique vocabulary more accurately.
On some Windows 11 builds this switch is labelled slightly differently, for example as a custom inking and typing dictionary. On some newer builds the page may be missing or reduced. If so, you will not be able to follow this step exactly on that PC. To stop Windows learning from you, return to the page and turn the switch off.
What to do next
Test your setup in a real application. Open a modern app such as Notepad or Word, click into the text area, and press Windows key + H to start voice typing. Dictate a few sentences that include the names and technical terms you use most. Then check how many words come out wrong. You can also try the voice-driven navigation tools on your system to confirm the microphone and permissions work.
If you see delays or missing words while you speak, check your internet connection first. Cloud-based speech processing needs network access, and a slow or dropped connection causes exactly those symptoms. If the connection is fine, go back and re-run the microphone test, then repeat the voice training in a quieter room.
Was this guide helpful?

About the Author
Richard
Tech Writer, IT Professional
Richard is a writer at Geek Rewind who turns complex IT tasks into clear, step-by-step guides. He draws on years of hands-on experience in system administration and enterprise IT operations, focusing on Windows, Linux and WordPress: the problems people actually run into, and the fixes that work. His server and WordPress guides come from systems he runs himself. Richard builds and maintains the platform behind Geek Rewind, from its Ubuntu servers and Nginx configuration to its custom WordPress plugins. Many new tutorials start with readers' questions, and he's always glad to answer them in the comments.

No comments yet — be the first to share your thoughts!