How to Hide the Virus & Threat Protection Section in Windows 11 Security app


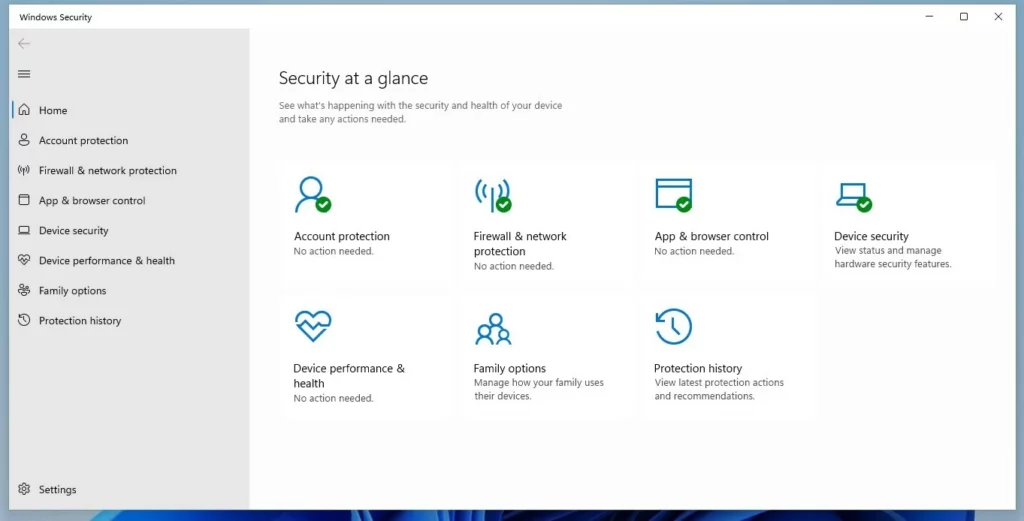
Hiding the Virus & Threat Protection section in the Windows 11 Security app removes that specific tile from your dashboard without turning off your actual antivirus protection. This tweak works on Windows 11 version 23H2 and newer to help simplify the security screen when you use alternative security software or set up a PC for someone else.
You can hide the Virus & Threat Protection section by using the Local Group Policy Editor, the Windows Registry, or PowerShell. These methods involve enabling a specific policy or setting a registry value to lock the user interface for that section.
Why Hide or Disable Security Settings?
Hiding the Virus & Threat Protection section in the Windows Security app (the central dashboard for your PC safety tools) prevents other users from changing important safety settings on your computer. People often use this feature when running a third-party antivirus program or when sharing a PC with family members or coworkers.
Safety and Security Risks
Hiding the interface of Windows Defender (the built-in Windows security software) doesn’t stop its background service entirely. Real-time protection keeps the PC safe from malware, ransomware, and viruses, so third-party software must be active before touching built-in settings.
Method 1Using Local Group Policy Editor
The Local Group Policy Editor (a tool for managing system settings and configurations) lets you hide virus protection in Windows 11 by turning on a single system rule. This method works well on Windows Pro and Enterprise editions to lock down the security dashboard and prevent unauthorized changes.
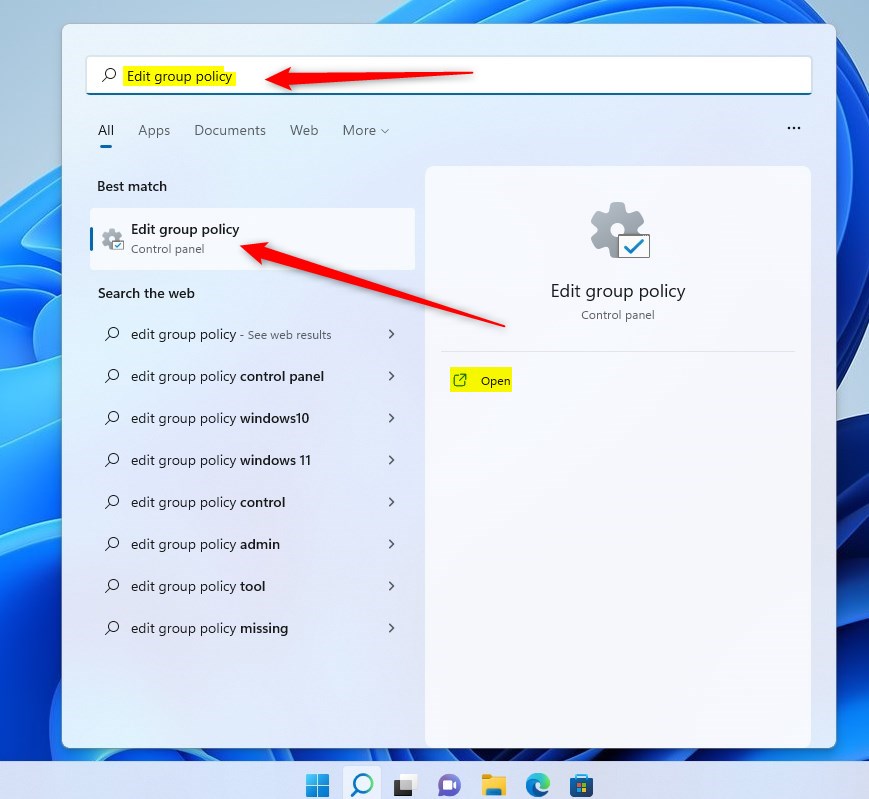
- Press
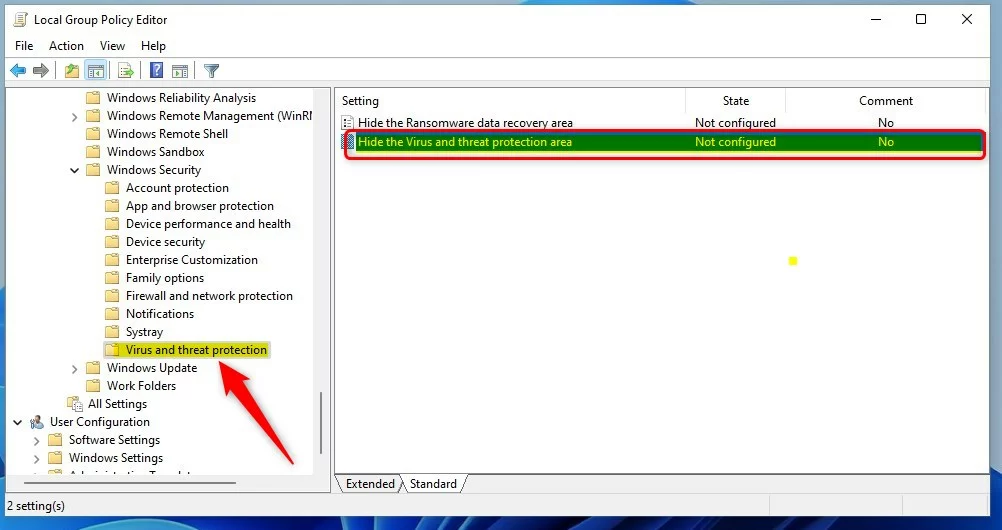
Win + Rto open the Run dialog box. Typegpedit.mscand press Enter. - Navigate to: Computer Configuration\Administrative Templates\Windows Components\Windows Security\Virus and threat protection
3. Double-click 'Hide the Virus and threat protection area'.
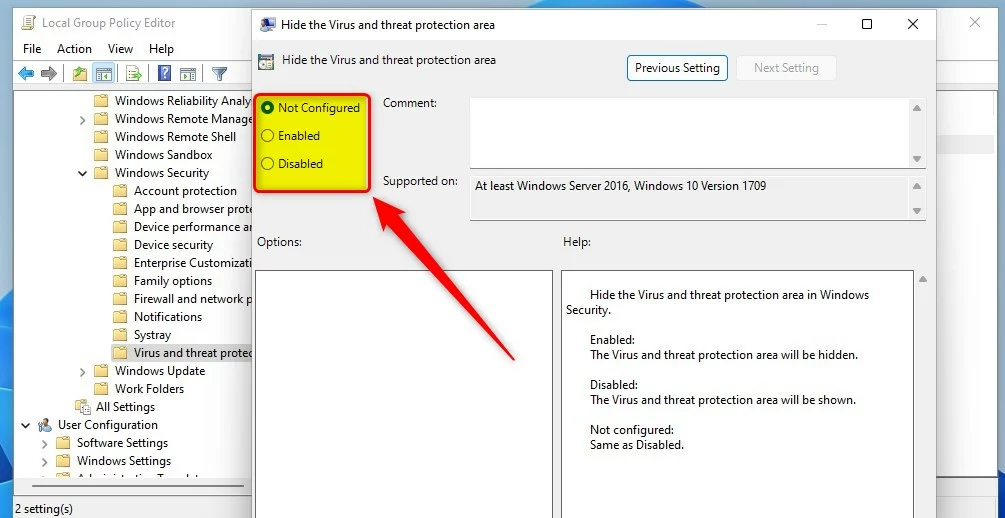
4. Select Enabled to hide the section, or Disabled to show it.
Method 2Using the Windows Registry
The Windows Registry (a hierarchical database storing low-level operating system settings) lets you hide virus protection in Windows 11 by creating a specific DWORD value. This approach provides a reliable alternative for users on Windows Home editions where the group policy editor is not available.
1. Press the Windows key and R together to open the Run dialog box. Type regedit (the Registry Editor) and press Enter.
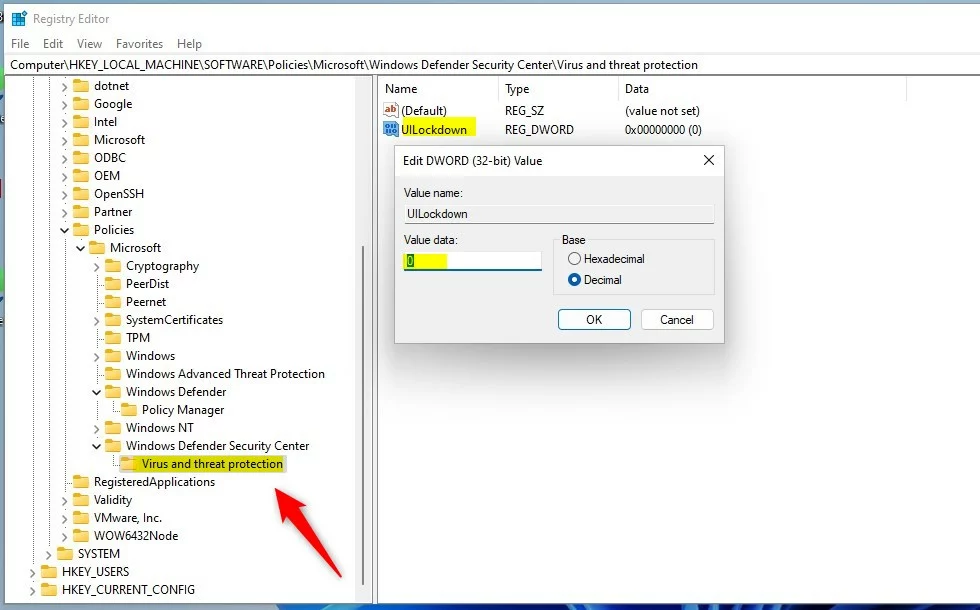
2. Navigate to: HKEY_LOCAL_MACHINE\SOFTWARE\Policies\Microsoft\Windows Defender Security Center\Virus and threat protection
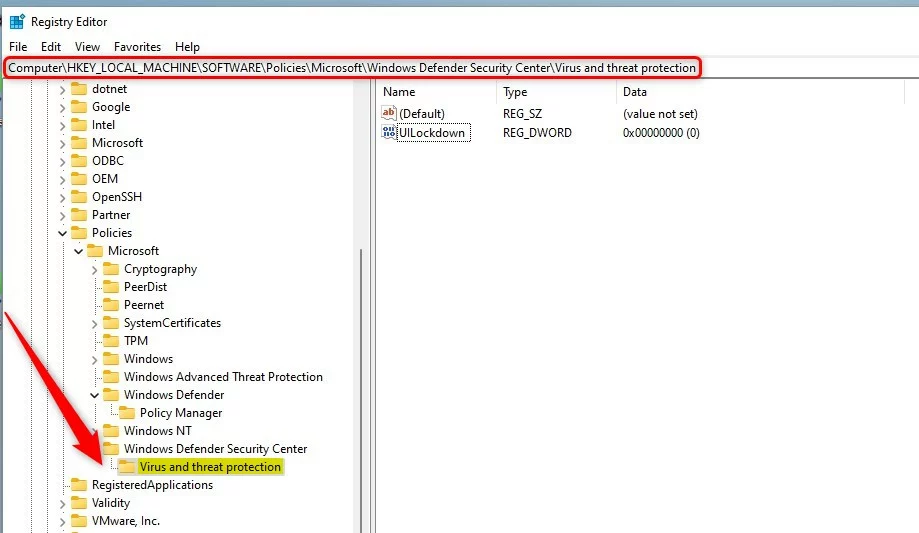
3. Right-click an empty space in the right pane, select New DWORD (32-bit) Value, and name it UILockdown.
4. Set the value to 1 to hide the section, or to 0 to show it.
Restart the computer to apply the changes.
Method 3PowerShell Method
PowerShell (a command-line shell for system administration) lets you hide virus protection in Windows 11 by running a single command with administrator rights. This approach offers the fastest way to lock down the security dashboard without manually clicking through registry keys or group policy menus.
- Right-click the Start button and select Terminal (Admin) to open a command-line interface with elevated rights.
- To hide the area, run this command:
Set-ItemProperty -Path "HKLM:\SOFTWARE\Policies\Microsoft\Windows Defender Security Center\Virus and threat protection" -Name "UILockdown" -Value 1
3. To show it again, change the value to 0.
Summary
Hiding the Virus & Threat Protection section in Windows 11 works through either the Group Policy Editor or the Windows Registry, offering flexible ways to manage the security app's appearance.
Why does Windows Defender keep turning itself back on?
Windows Defender protects the system by default. If another antivirus is absent, Windows automatically re-enables real-time protection to secure the PC against threats. Windows does this automatically to keep the hardware safe, and users cannot permanently disable it without changing specific policies.
Is it safe to disable Windows Defender permanently?
Disabling Windows Defender remains unsafe unless a high-quality third-party antivirus is installed. Without active protection, computers sit exposed to malicious software, data theft, and system corruption. Keeping security software active maintains a safe computing environment.
How do I exclude specific files from Windows Defender scans?
Users can add exclusions instead of disabling protection entirely. Go to Windows Security Virus & threat protection Manage settings Exclusions. Click Add or remove exclusions and select the files, folders, or processes the antivirus should ignore during regular system scans.
Was this guide helpful?

About the Author
Richard
Tech Writer, IT Professional
Richard, a writer for Geek Rewind, is a tech enthusiast who loves breaking down complex IT topics into simple, easy-to-understand ideas. With years of hands-on experience in system administration and enterprise IT operations, he’s developed a knack for offering practical tips and solutions. Richard aims to make technology more accessible and actionable. He's deeply committed to the Geek Rewind community, always ready to answer questions and engage in discussions.


[…] app has many sections that allow you to quickly see the status of your virus and threat protection, firewall and network security, Account protection, App and Browser Control, Device Security, and […]
[…] app has many sections that allow you to quickly see the status of your virus and threat protection, firewall and network security, Account protection, App and Browser Control, and […]
[…] App has many sections that allow you to quickly see the status of your virus and threat protection, firewall and network security, Account protection, and […]
[…] app has many sections that allow you to quickly see the status of your virus and threat protection, Firewall and network security, device security controls, and […]
[…] app has many sections that allow you to quickly see the status of your virus and threat protection, firewall and network security, device security controls, and […]