How to Export Passwords from Google Chrome


Exporting passwords from Google Chrome saves your stored logins into a CSV (Comma-Separated Values) file. You can use it as a backup or import it into another password manager such as Bitwarden or 1Password. The whole process takes less than 2 minutes and happens inside the browser settings.
Chrome keeps the export option in its password settings and makes you prove who you are before it writes anything to disk. Once you confirm, Chrome writes every saved website address, username and password into a plain text file. You can open that file in any spreadsheet app or text editor.
Because the file is not encrypted, anyone who gets a copy can read every password in it. Plan to delete it as soon as you finish with it. The steps below are for Chrome on Windows 11. Chrome updates often, so a label or layout may differ slightly on an older or newer version.
Access Chrome settings, navigate to Autofill then Passwords, click the three dots menu, and select “Export passwords.” You will need to confirm with your system password to save the passwords as a CSV file.
How to Export Passwords from Google Chrome
Step 1Open Chrome Settings
Make sure you are signed into your Google account in Chrome before you go any further. Your profile picture or icon sits in the top right corner of the toolbar. If you see a “Sign in” prompt instead, sign in first so Chrome shows the passwords tied to your account.
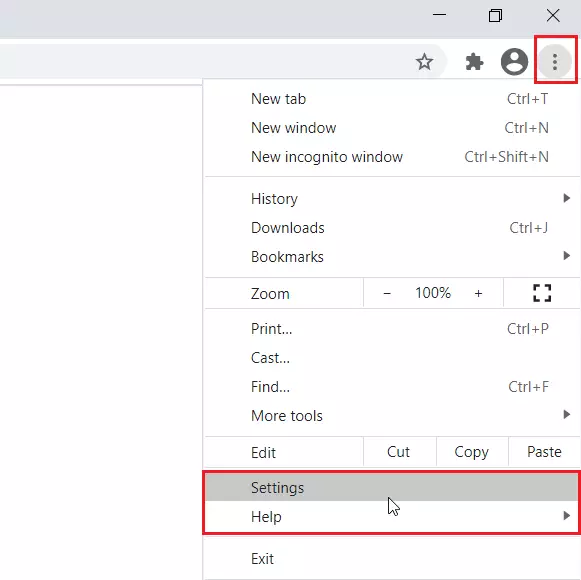
- Look at the top right corner of the Chrome window and click the three dots (the menu button).
- Click Settings.
The Settings page opens in a new tab, with a list of categories down the left side.
Step 2Go to Passwords
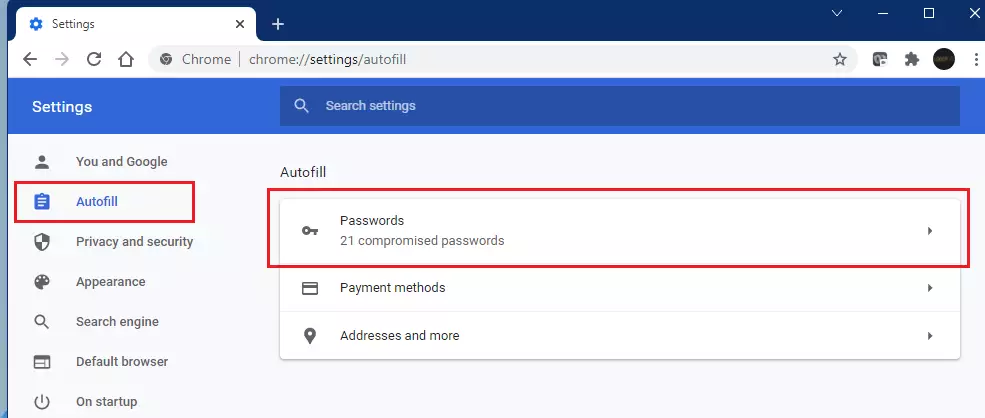
- Click Autofill in the left sidebar. On some Chrome versions this category is named Autofill and passwords.
- Click the Passwords tile.
The Passwords page opens. It lists every website, username and masked password that Chrome has saved, and it is where you manage your saved logins.
Step 3Click Export Passwords
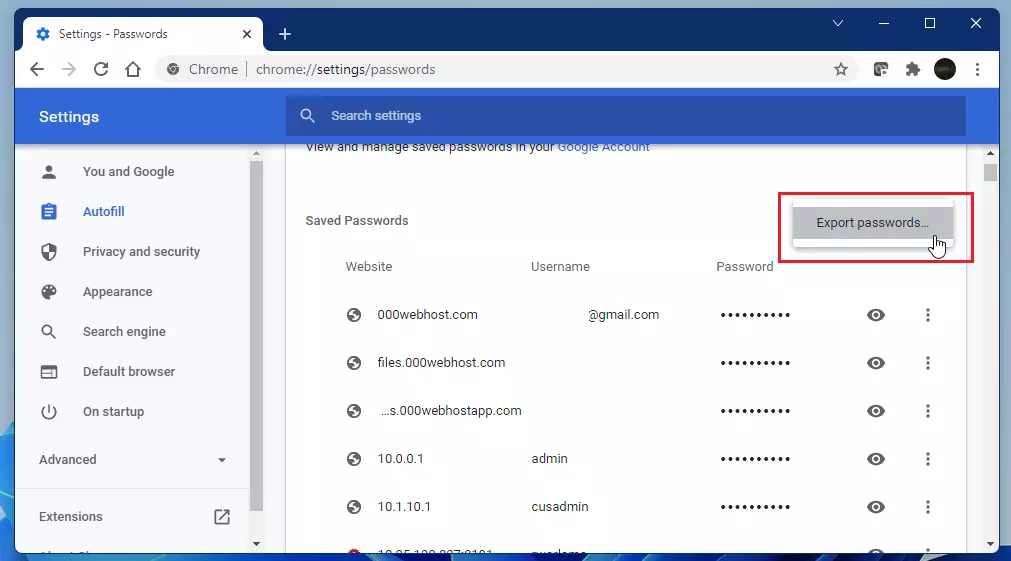
- On the Passwords page, find the three vertical dots in the top right of the saved passwords area and click them.
- Select Export passwords from the menu that drops down.
If you cannot find the three dots on your version of Chrome, look for a Settings entry in the left sidebar of the Password Manager page. The export option is listed there instead.
Step 4Confirm Export ⚠️ Admin Privileges Required
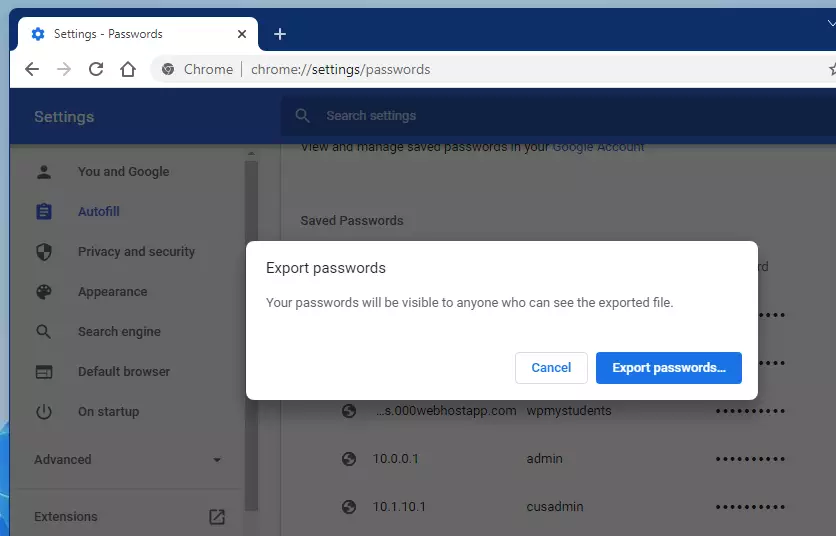
A confirmation window appears on screen. It warns you that anyone who opens the file can see your passwords.
- Read the warning.
- Click the Export passwords button to continue. If you change your mind, close the window and nothing is exported.
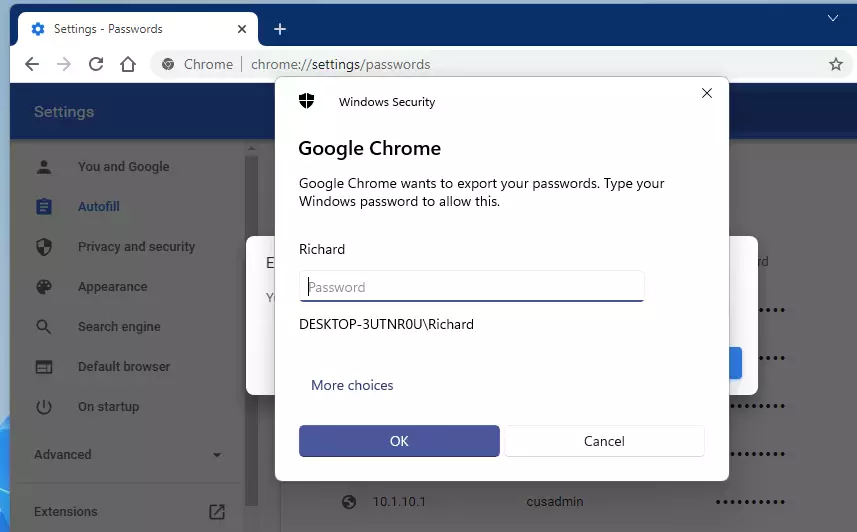
Step 5Enter Your Windows Password ⚠️ Admin Privileges Required
Chrome asks for your Windows sign-in as a security measure. This confirms that you, and not someone who borrowed an unlocked browser, are exporting the saved logins.
- Type your Windows password in the prompt that appears. If your PC uses a PIN or Windows Hello, Chrome may ask for that instead.
- Click Next.
If the prompt does not appear, check the taskbar. It sometimes opens behind the Chrome window. If you enter the wrong password, Chrome does not export anything. Try again.
Step 6Save Your Password File
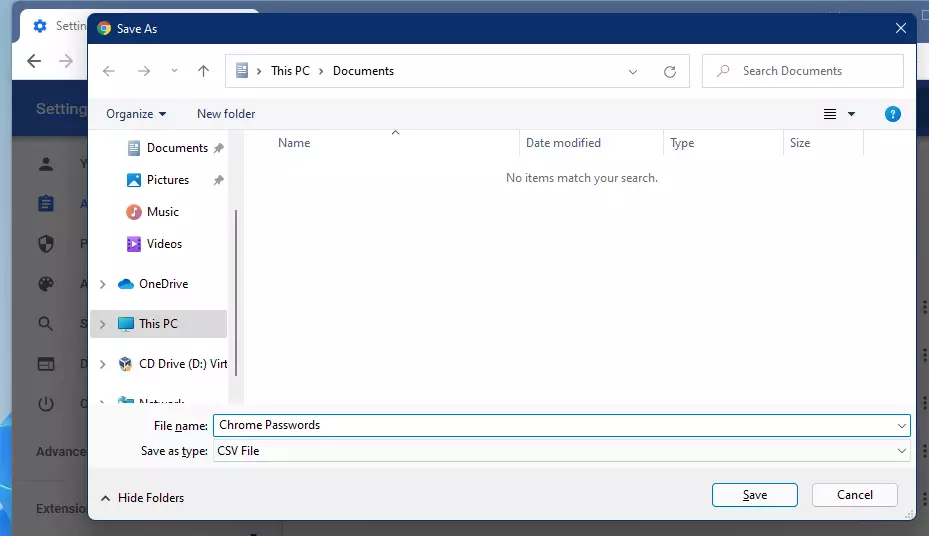
After you enter the password, a save dialog opens.
- Browse to the folder where you want to store the file. Pick a secure location on the computer, such as a folder only your account can open. Avoid shared or synced folders, because a cloud copy of the file is harder to delete.
- Check the file name. Chrome usually suggests a name ending in .csv. Keep that ending.
- Click Save.
The dialog closes and the file is written to the folder you chose.
Backing up browser credentials takes less than a minute once the dialog closes. Open the folder you chose and confirm the CSV file is there. Then import it into your new password manager, or move it to the place where you keep backups. When you are done, delete the file and empty the Recycle Bin, since it holds your passwords in plain text. Exporting does not remove anything from Chrome, so your saved passwords stay where they were.
Summary
To export passwords Chrome saves to your account, open the Chrome settings menu, go to the password manager page, and select the export option to save your login details as a comma-separated values file. This file contains all your saved usernames and passwords in plain text, so delete it once you finish moving your data to a secure new location.
- Exporting passwords from Chrome is simple and quick, and it takes under 2 minutes.
- Your passwords save to a CSV file that other password managers can read.
- You need to be signed into your Google account in Chrome.
- Chrome asks for your Windows password (or PIN) for security reasons.
- Keep your exported password file in a safe place since it contains sensitive information, and delete it when you no longer need it.
- You can now use this file to move your passwords to another password manager or keep it as a backup.
Have a question about this guide?
Answered by AI from this guide. Good questions may be added to this page — please don't include personal details.
Did this guide fix your problem?

About the Author
Richard
Tech Writer, IT Professional
Richard is a writer at Geek Rewind who turns complex IT tasks into clear, step-by-step guides. He draws on years of hands-on experience in system administration and enterprise IT operations, focusing on Windows, Linux and WordPress: the problems people actually run into, and the fixes that work. His server and WordPress guides come from systems he runs himself. Richard builds and maintains the platform behind Geek Rewind, from its Ubuntu servers and Nginx configuration to its custom WordPress plugins. Many new tutorials start with readers' questions, and he's always glad to answer them in the comments.
No comments yet — be the first to share your thoughts!