How to Enable Point-in-Time Restore in Windows 11

- 17 steps
- Needs administrator rights
- Includes a restart or sign-out
Point-in-Time Restore (the older, better-known name is System Restore) rolls your Windows 11 PC back to an earlier working state. Use it after a broken update, a bad driver or a setting change that made things worse. It undoes recent changes to system files, installed apps and registry settings. It does not touch your personal photos or documents.
You need at least 2GB of free space on your C: drive to store the recovery files. Once the feature is on, Windows 11 creates restore points automatically in the background, so you don’t have to remember to make them.
Enable Point-in-Time Restore in Windows 11 by opening Settings, navigating to System Recovery, and toggling the “Point-in-time restore” option on. This feature allows you to revert your system to a previous state using automatically created restore points.
What is Point-in-Time Restore?
Point-in-Time Restore is a recovery feature that lets you roll your computer back to an earlier working state after a bad system update or a bad setting change. It uses saved restore points, which work like snapshots of your system, to fix software problems. It does not delete your personal documents, photos or recent files.
It fixes software problems only. If the cause is failing hardware, or a file you deleted yourself, a restore point won’t help. Keep regular file backups as well.
Restore points are stored on your computer using the Volume Shadow Copy Service (VSS). This service keeps copies of system state data, so Windows can put things back the way they were when something goes wrong. Because the points live on the same drive as Windows, they can’t help you if that drive fails.
Why You Need This Feature
The quickest way is the Settings app. Press Win+I to open Settings, go to System Recovery, and turn on the Point-in-time restore toggle. To disable the feature, follow the same steps and turn the switch off.
This option is new and is rolling out in stages. If you don’t see it on the Recovery page, your Windows 11 build probably doesn’t have it yet. Run Windows Update and check again, or use the Registry method later in this tutorial.
How Restore Points Work
Restore points are snapshots of your system that Windows captures automatically. They are saved using the Volume Shadow Copy Service (VSS), which keeps them on your storage drive in a form Windows can restore from later.
How to Turn On or Off Point-in-Time Restore Using Settings
You can turn Point-in-Time Restore on or off in the main Settings app, from the system recovery page. The switch controls whether your computer saves system snapshots and manages the disk space those backups use. The steps are the same on Windows 11 Home and Pro.
- Open the Settings app using either of these methods:
- Click the Start menu and choose Settings, or
- Press Win+I on your keyboard. The Settings window opens either way.
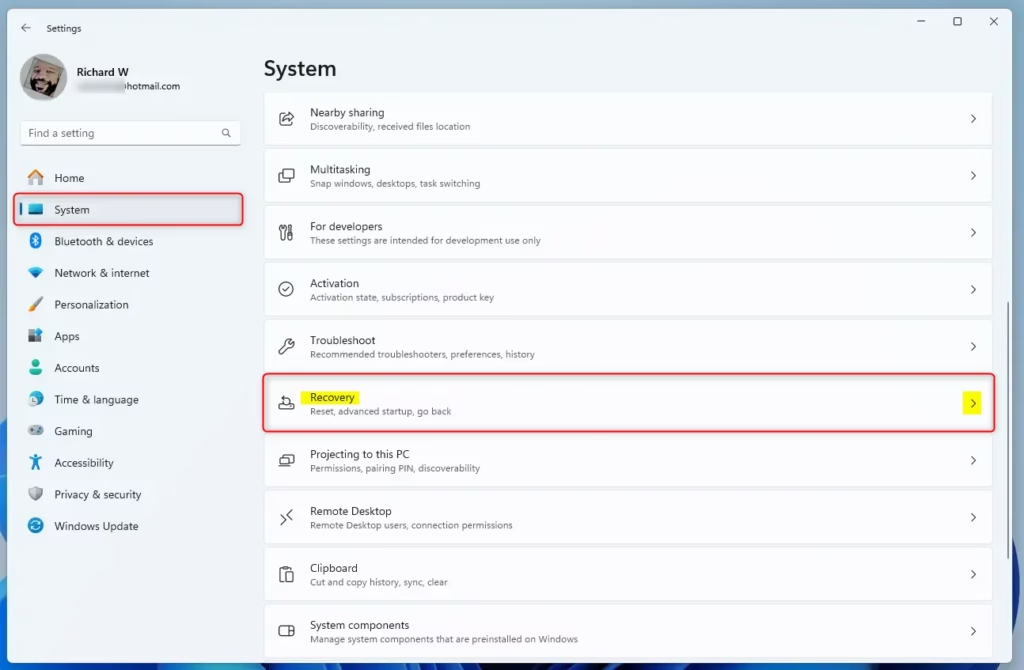
- In Settings, click System in the left pane. The system options appear on the right.
- On the right, scroll down and click Recovery. The recovery options for your PC are listed.
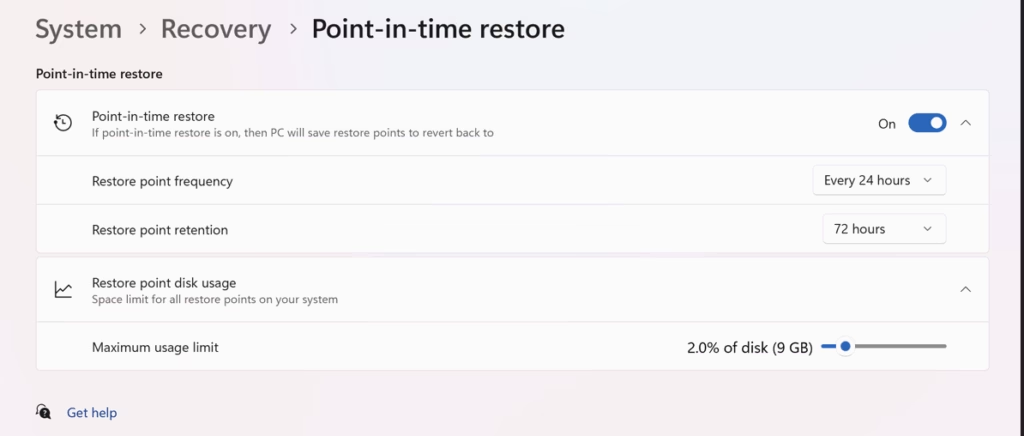
- Find the Point-in-time restore option and switch the toggle to On to enable it, or Off to disable it. The toggle should show its new state straight away. If the option is missing or greyed out, your build may not include it yet, or your account may not have administrator rights.
- Close the Settings app when you are done. To undo the change later, come back to the same page and flip the toggle again.
How to Enable or Disable Point-in-Time Restore Using Registry Editor
You can also enable or disable Point-in-Time Restore by editing specific values in the Registry Editor. This method changes the system protection setting directly in the Windows registry. It helps when the Settings page is locked down, missing or greyed out.
Changes made here can break Windows if you get them wrong. Before you start, back up the registry. In Registry Editor, choose File Export, pick All as the export range, and save the file somewhere safe.
⚠️ Admin Privileges Required
You must be signed in with an administrator account to change these values. If you are not, Registry Editor will refuse to save the change.
Follow these steps:
- Open the Registry Editor:
- Press Win+R, type
regedit, and press Enter. If Windows asks for permission, click Yes. The Registry Editor window opens.
- Press Win+R, type
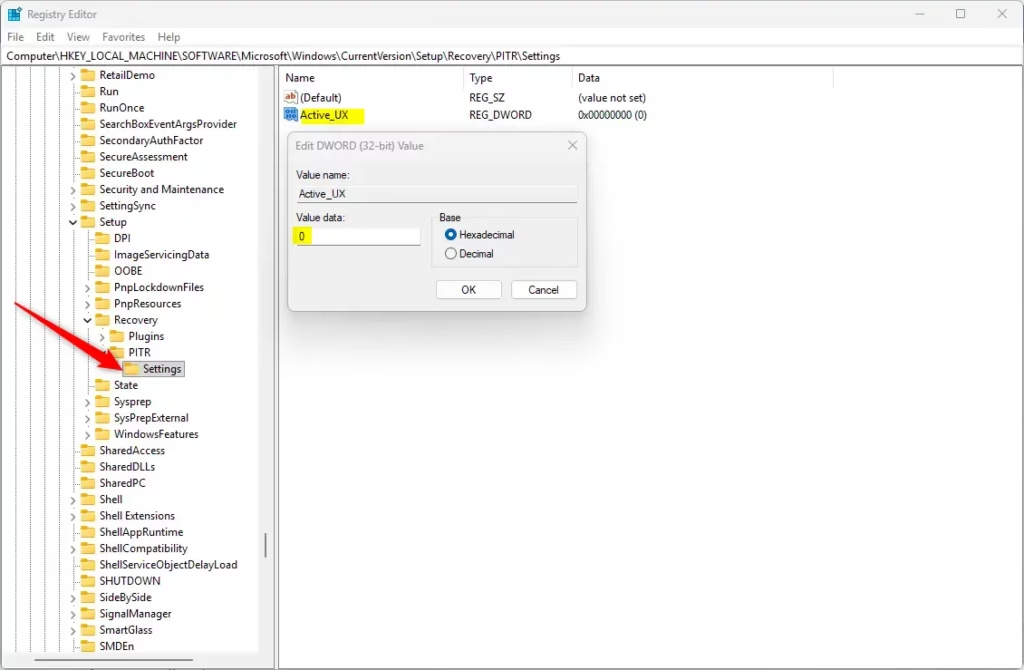
- Navigate to this folder path, using the tree in the left pane:
Computer\HKEY_LOCAL_MACHINE\SOFTWARE\Microsoft\Windows\CurrentVersion\Setup\Recovery\PITRSettings - Right-click Settings in the left pane and select New DWORD (32-bit) Value. A new entry appears in the right pane with its name ready to edit.
- Name this new value
Active_UXand press Enter. Check the spelling, because a wrong name will have no effect. - Double-click
Active_UXand set its Value data to one of these:1to enable Point-in-Time Restore0to disable it
- Click OK and close the Registry Editor. The new value should show in the right pane with the data you entered.
- Restart your computer to apply the changes. To undo them later, change the value data back, or import the registry backup you made earlier, and restart again.
Summary
- Quick FixEasily restore your PC to a recent working state if something goes wrong, such as after a bad update or driver.
- Automatic BackupsWindows creates restore points every 24 hours without you needing to do anything.
- Simple ControlTurn the feature on or off from Settings or the Registry. Settings is easier, and the Registry is the fallback.
- Temporary StorageRestore points last for 3 days, giving you plenty of time to fix issues. If a problem shows up later than that, you will need a regular backup.
- Smart Space UseWindows deletes old restore points when space is low, so your PC keeps running smoothly. Keep at least 2GB free on C: so there is room to create them.
- Be CarefulAlways back up before changing Registry settings.
Point-in-Time Restore in Windows 11 gives you a reliable way to fix system problems by rolling your PC back to a recent working condition. It relies on automatic background backups called restore points to protect your system files, and it uses only a small amount of temporary storage space on your hard drive. Turn it on before you need it, because a restore point can't be made after the damage is done.
More info from Microsoft: Point-in-time restore official guide
Have a question about this guide?
Answered by AI from this guide. Good questions may be added to this page — please don't include personal details.
Did this guide fix your problem?

About the Author
Richard
Tech Writer, IT Professional
Richard is a writer at Geek Rewind who turns complex IT tasks into clear, step-by-step guides. He draws on years of hands-on experience in system administration and enterprise IT operations, focusing on Windows, Linux and WordPress: the problems people actually run into, and the fixes that work. His server and WordPress guides come from systems he runs himself. Richard builds and maintains the platform behind Geek Rewind, from its Ubuntu servers and Nginx configuration to its custom WordPress plugins. Many new tutorials start with readers' questions, and he's always glad to answer them in the comments.
No comments yet — be the first to share your thoughts!