How to Change the Magnifier Zoom Level in Windows 11

Magnifier is a built-in Windows 11 tool that enlarges all or part of your screen so small text and fine details are easier to see. You can adjust the zoom level in exact steps, from 100% up to 1600%, depending on how much help your eyes need.
You can change the zoom level at any time with keyboard shortcuts, the mouse wheel, the Magnifier toolbar or the Settings app. Advanced users can also set it in the Registry. This guide covers all five methods, so you can pick the one that suits you. Magnifier is included in both Windows 11 Home and Pro, so every method here works on either edition, though the Registry method needs admin rights.
Use keyboard shortcuts, the Magnifier toolbar, or Windows Settings to adjust zoom. Press Windows key + Plus to zoom in and Windows key + Minus to zoom out. Alternatively, use the + and – buttons on the Magnifier toolbar or the zoom sliders in Accessibility Settings.
What is Magnifier?
Windows Magnifier is a screen-enlarging tool. It remembers the last zoom level you used and starts at that setting the next time you turn it on, so you only need to set your preferred level once. Microsoft provides further details on using Magnifier to improve screen visibility.
Why Use Magnifier?
Magnifier makes text and images easier to see. That helps if you have low vision, if you are working on a high-resolution display where everything looks small, or if you just need a closer look at one part of the screen. Because the zoom level is adjustable, you can use a gentle 150% for everyday reading or go much higher for fine detail.
Option 1Change Zoom Level Using Keyboard Shortcuts
- Turn on Magnifier by pressing the Windows key + Plus (+) on your keyboard. The screen zooms in right away, and a small Magnifier toolbar appears.
- To zoom in (make things bigger), press Windows key + Plus (+) again. Each press raises the zoom by one step, up to a maximum of 1600%.
- To zoom out (make things smaller), press Windows key + Minus (-). Each press lowers the zoom by one step, down to 100%. To turn Magnifier off completely, press Win+Esc.
Option 2Change Zoom Level Using Mouse Scroll Wheel
- Turn on Magnifier (Windows key + Plus (+)). The mouse wheel method only works while Magnifier is running.
- Hold down the Ctrl and Alt keys on your keyboard. Keep them held for the next step.
- While holding these keys, scroll your mouse wheel up to zoom in or scroll down to zoom out. The screen changes as you scroll, so you can stop exactly where the text looks right. Release Ctrl and Alt when you’re done.
Option 3Change Zoom Level Using the Magnifier Toolbar
- Turn on Magnifier (Windows key + Plus (+)).
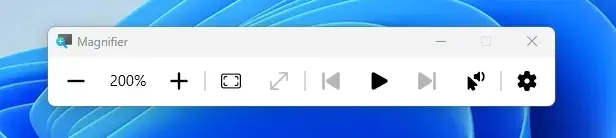
- Look for the Magnifier toolbar that appears on your screen. If you only see a small magnifying glass icon, the toolbar is minimized. Click the icon to expand it again.
- Click the + button to zoom in or the – button to zoom out. Each click changes the zoom by one step, and the screen updates straight away.
Option 4Change Zoom Level in Windows Settings
- Press Win+I to open Settings .
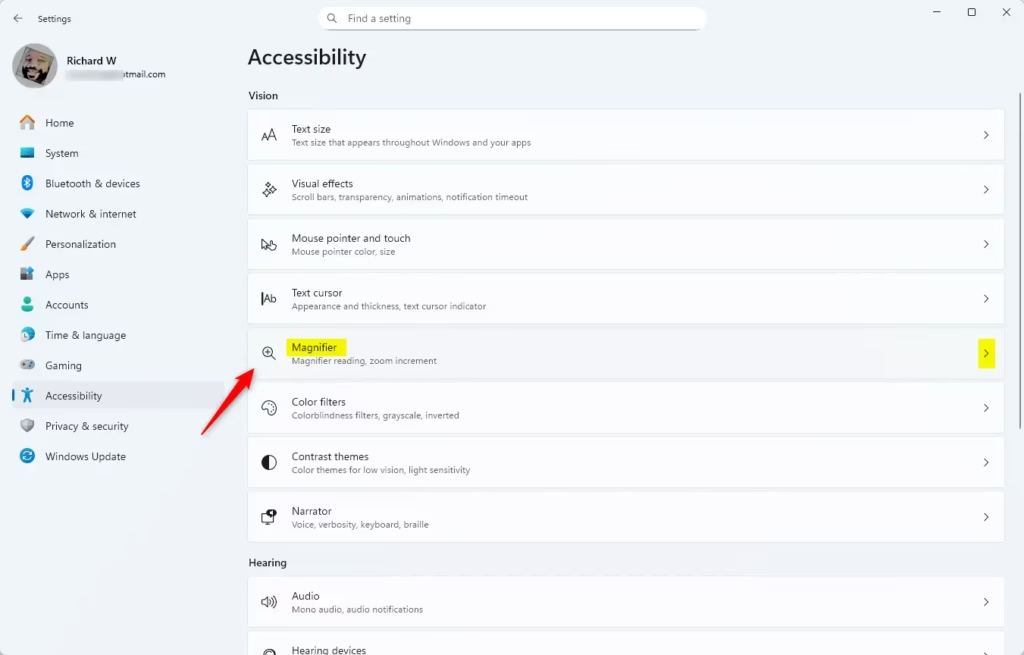
- Click Accessibility on the left menu.
- Click Magnifier on the right. The Magnifier page opens with its on/off switch and zoom options.
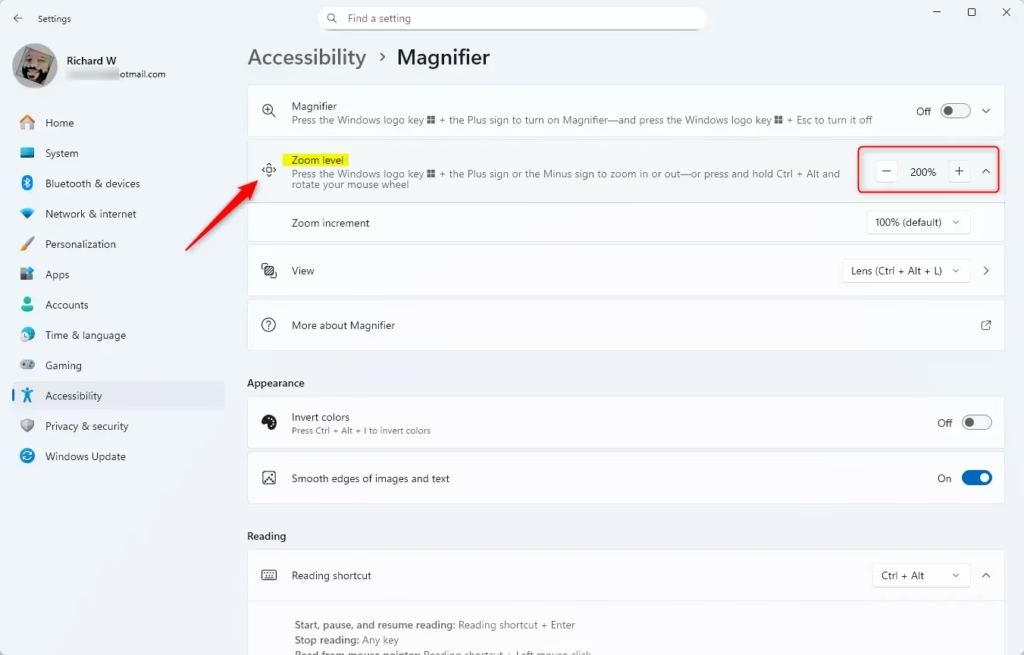
- Under Zoom level, click the – or + buttons to change the zoom. If you don’t see the zoom controls, turn on the Magnifier switch at the top of the page first.
- You can close Settings when you’re done. The new zoom level is saved and Magnifier will use it the next time it starts.
Option 5Change Zoom Level Using Registry Editor (Advanced)
You can change the Windows 11 Magnifier zoom level in Registry Editor by opening the tool with the Windows key + R shortcut, typing 'regedit', and editing the default magnification value. This advanced method lets you set an exact zoom percentage that the normal settings menu may not offer. You need administrator privileges to make these changes to your system settings. A wrong edit in the Registry can cause problems, so change only the value described here. Before you start, consider backing up the Registry: in Registry Editor, click File Export, choose a location and save the file.
⚠️ Admin privileges required
- Press Windows key + R, type
regedit, and press Enter to open Registry Editor. If a User Account Control prompt appears, click Yes. If you aren't signed in as an administrator, you will be asked for admin credentials. - Navigate to this folder:
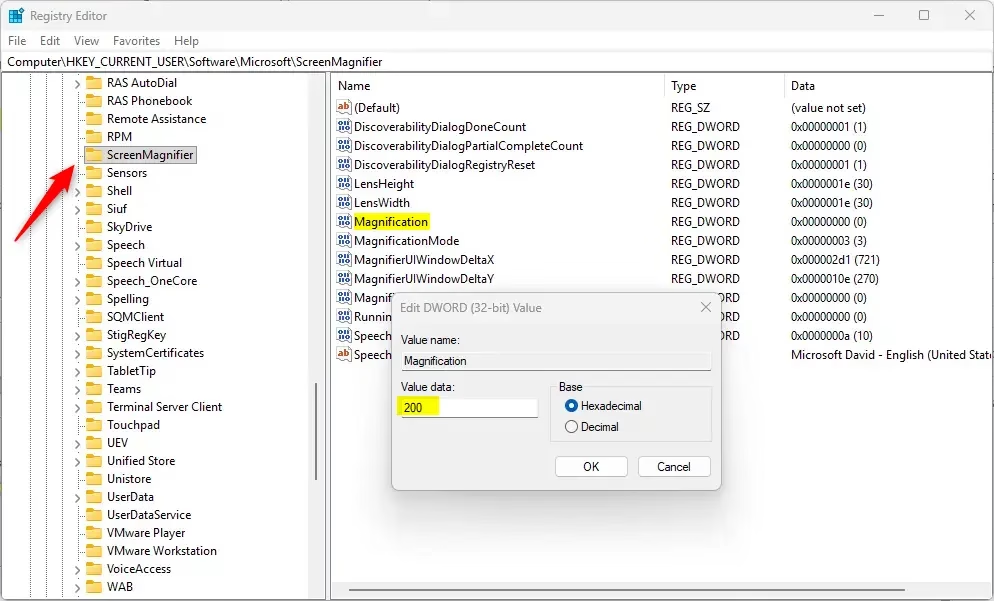
Computer\HKEY_CURRENT_USER\Software\Microsoft\ScreenMagnifier. You can expand the folders in the left pane one by one until you reach it. - In the right pane, double-click Magnification. An edit window opens for that value.
- Select Decimal for the number format. This makes sure the number you type is read as a normal percentage rather than a hexadecimal value.
- Type a number between 100 (100%) and 1600 (1600%) in the Value data box to set your zoom level. For example, 200 gives you 200%.
- Click OK and close Registry Editor. If the new level doesn't show up, turn Magnifier off (Windows key + Esc) and on again. If it still hasn't changed, sign out of Windows and back in. To undo the change, repeat these steps and enter your old value, or import the backup you exported.
Summary
You can adjust the Windows 11 Magnifier zoom level with keyboard shortcuts, the mouse scroll wheel, the toolbar buttons or the Accessibility settings. The fastest way to change your zoom is to press the Windows key and the Plus or Minus keys together. You can also hold down the Ctrl and Alt keys while scrolling your mouse wheel to zoom in and out smoothly. Here is a quick summary of each method.
- Keyboard shortcuts: Use Windows key + Plus or Minus to zoom in and out. Press Windows key + Esc to turn Magnifier off.
- Mouse scroll: Hold Ctrl + Alt and scroll your mouse wheel. Magnifier must already be running.
- Magnifier toolbar: Click the + or – buttons on the toolbar. If only a magnifying glass icon shows, click it to bring the toolbar back.
- Settings: Go to Settings Accessibility Magnifier and find the zoom level controls.
- Registry Editor: Change the zoom level directly in the Registry (advanced users only, admin rights required).
Try whichever method works best for you. Each one gives you control over how much your screen magnifies. For everyday use, the keyboard shortcuts are usually quickest. Because Magnifier remembers your last zoom level, you only need to set it once.
Have a question about this guide?
Answered by AI from this guide. Good questions may be added to this page — please don't include personal details.
Did this guide fix your problem?

About the Author
Richard
Tech Writer, IT Professional
Richard is a writer at Geek Rewind who turns complex IT tasks into clear, step-by-step guides. He draws on years of hands-on experience in system administration and enterprise IT operations, focusing on Windows, Linux and WordPress: the problems people actually run into, and the fixes that work. His server and WordPress guides come from systems he runs himself. Richard builds and maintains the platform behind Geek Rewind, from its Ubuntu servers and Nginx configuration to its custom WordPress plugins. Many new tutorials start with readers' questions, and he's always glad to answer them in the comments.
No comments yet — be the first to share your thoughts!