How to Change the Magnifier Lens Size in Windows 11

The Magnifier lens size in Windows 11 controls the width and height of the zoomed-in box on your screen. Magnifier is a built-in accessibility tool that enlarges text and images so you can read small print without straining your eyes.
Press the Win and the Plus key at the same time to open Magnifier quickly. You can then change the lens dimensions in the Settings app. A larger lens shows more of your desktop at once. A smaller lens keeps the zoom tight around your mouse pointer. This guide covers two ways to set the size: Settings, which suits most people, and the Registry Editor, which is for when you want to enter the values by hand.
Open Settings Accessibility Magnifier, click View, then drag the Width and Height sliders under Change lens size left to shrink the lens or right to enlarge it. The lens updates in real time as you move the sliders. Windows saves changes automatically.
What is Magnifier?
Magnifier is a built-in Windows tool that zooms in on your screen to make text and pictures clearer. It is included in both Windows 11 Home and Pro, so everything below applies to either edition. The lens is one of Magnifier’s three views, and the size settings in this guide only affect that view.
Learn more about it here: Turn On or Off Magnifier in Windows 11
How to Change the Lens Size Using Settings
The Settings app is the easiest way to change the lens size, and you don’t need to touch any system files. You open the Accessibility page, find Magnifier, and drag the built-in width and height sliders. It works the same on Home and Pro, and you don’t need to restart. To undo a change, drag the sliders back to where they were. The default for each is 30%.
- Press Win+I to open Settings . The Settings window appears with the category list down the left side.
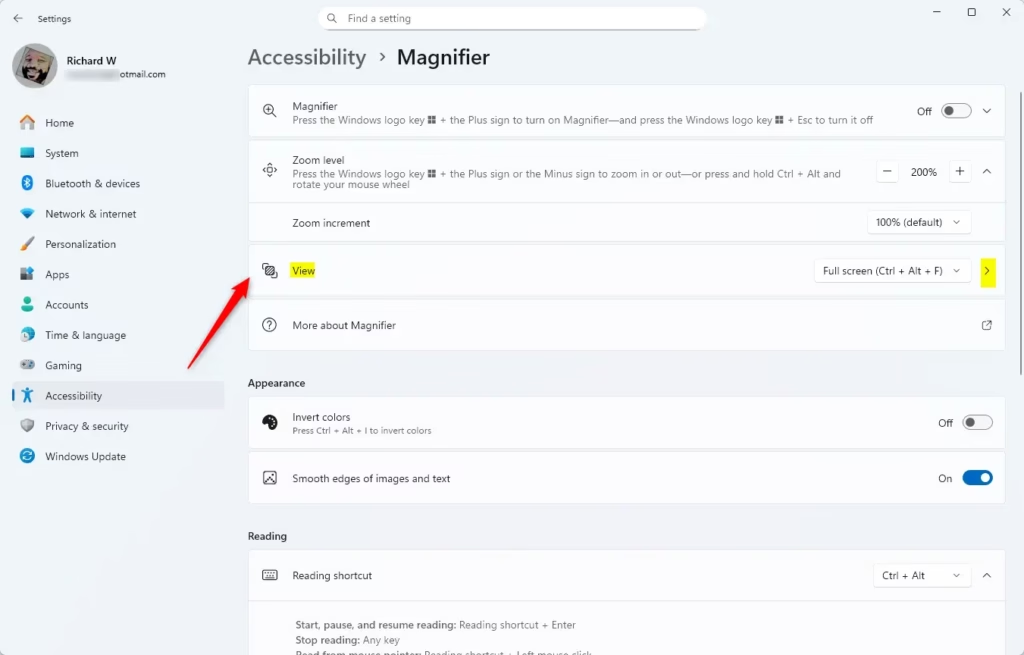
- On the left, click Accessibility. Then, on the right, click Magnifier. The Magnifier page opens with its on/off toggle and the zoom options.
- Click on the View section. If it is collapsed, it expands and shows the options for how Magnifier looks and behaves.
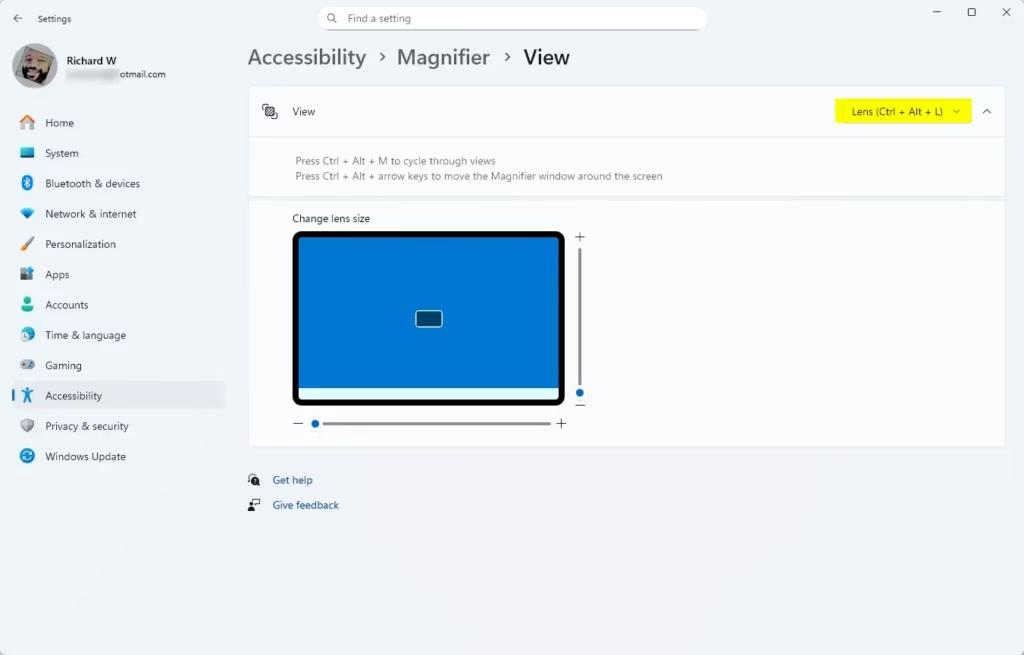
- Find Change lens size. You’ll see two sliders:
- Width (bottom slider)
- Height (right slider)
- Drag the sliders left or right to make the lens smaller or bigger. A percentage number shows as you move each slider (the default is 30%). The lens size changes in real time, so you can see the effect right away. If the lens isn’t on screen, press Windows key + Plus to start Magnifier, then press Ctrl+Alt+L to switch to Lens view. Leave the Settings window open beside it and adjust until the size looks right.
- When you’re happy with the size, close the Settings window. Windows saves the change automatically, so there is no Save or Apply button to click.
If the sliders seem to do nothing, check which view you are using. Full screen and Docked views ignore the lens size. To switch views, see: Change Magnifier View in Windows 11.
How to Change Lens Size Using the Registry Editor (Advanced)
The Registry Editor lets you set the lens height and width values by hand, so you control them exactly. This method needs administrator access and careful navigation to the Magnifier key. A wrong edit in the registry can cause problems, so use Settings above unless you have a reason to do this. Before you start, consider exporting the key (File Export in Registry Editor) so you can restore it later. The registry method works on Home and Pro.
- ⚠️ Admin Privileges Required: Press Windows key + R, type
regedit, and press Enter to open Registry Editor. If a User Account Control prompt appears, click Yes. A standard account will be asked for an administrator password. - In Registry Editor, go to:
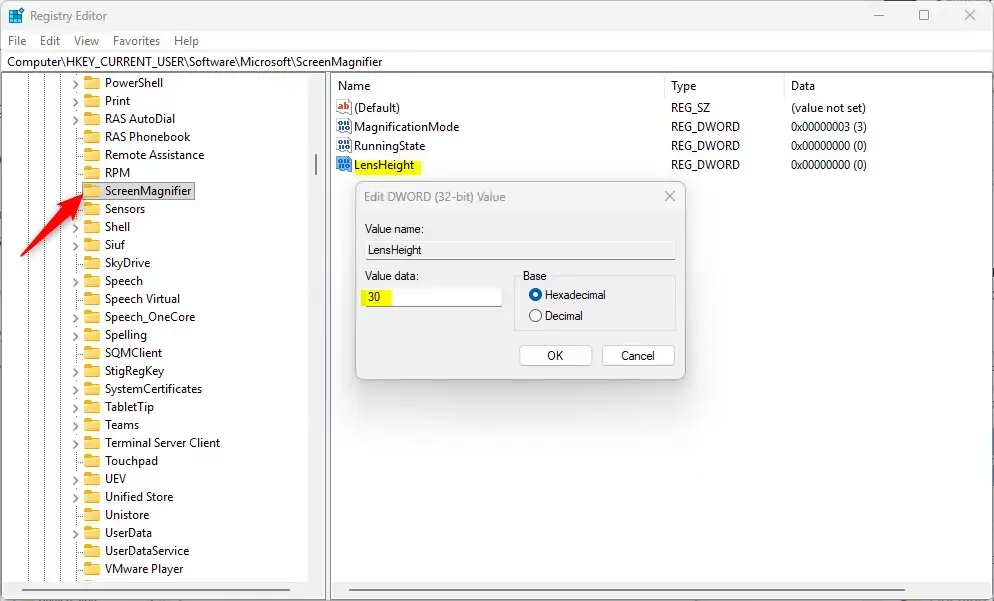
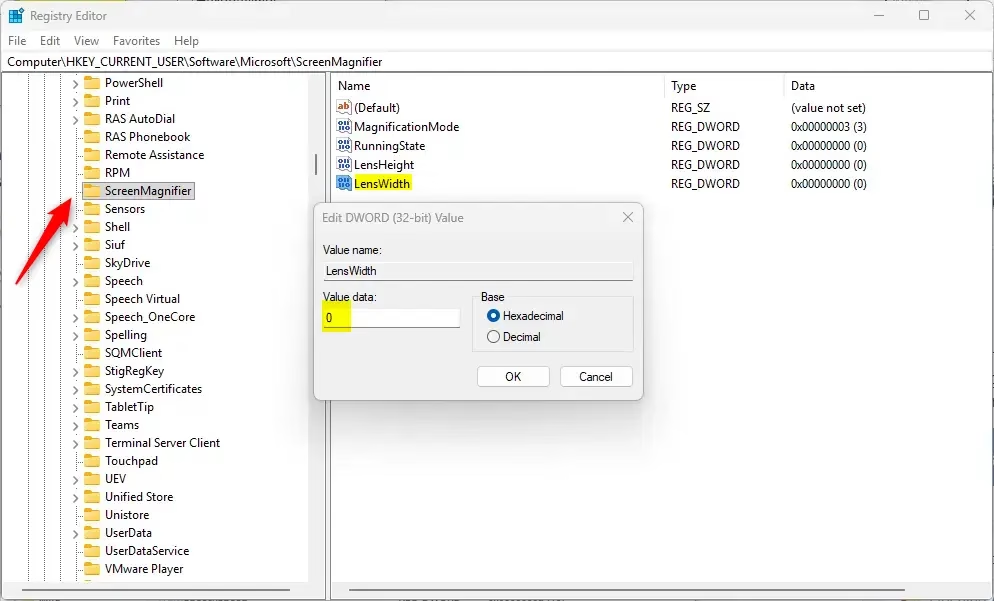
Computer\HKEY_CURRENT_USER\Software\Microsoft\ScreenMagnifierYou can paste the path into the address bar at the top of the window, or expand the folders in the left pane one by one. When you select the last key, its values appear in the right pane. - To change the lens height:
- Double-click LensHeight in the right pane. An edit window opens. If you can't find the value, use the Settings method instead.
- Under Base, select Decimal. Do this before you type, so your number isn't read as hexadecimal.
- Enter a number from 10 to 100 (in steps of 10) to set the height percentage you want.
- Click OK. The new number now shows next to LensHeight in the right pane.
- To change the lens width:
- Double-click LensWidth in the right pane.
- Under Base, select Decimal.
- Enter a number from 10 to 100 (in steps of 10) to set the width percentage you want.
- Click OK.
- Close the Registry Editor when done. Then close Magnifier (if it is running) and open it again with Windows key + Plus to see the new lens size. If it still looks the same, sign out and back in. To undo the change, edit the same values and enter your old numbers (the default is 30), or import the file you exported earlier.
For example, a wide, short lens suits reading lines of text, and a taller one suits looking at images or forms.
More Help and Info
Microsoft's own documentation covers more of the accessibility features in Windows 11, and it is worth a look if you use Magnifier often. Check out this Microsoft page: Use Magnifier to make things on the screen easier to see - Microsoft Support

Summary
Changing the Magnifier lens dimensions adapts the viewing area to how you work. Use the Settings sliders for a quick change you can see as you make it. Use the registry values only when you want to enter exact numbers. Either way, you can go back to the 30% default at any time.
Did this guide fix your problem?

About the Author
Richard
Tech Writer, IT Professional
Richard is a writer at Geek Rewind who turns complex IT tasks into clear, step-by-step guides. He draws on years of hands-on experience in system administration and enterprise IT operations, focusing on Windows, Linux and WordPress: the problems people actually run into, and the fixes that work. His server and WordPress guides come from systems he runs himself. Richard builds and maintains the platform behind Geek Rewind, from its Ubuntu servers and Nginx configuration to its custom WordPress plugins. Many new tutorials start with readers' questions, and he's always glad to answer them in the comments.
No comments yet — be the first to share your thoughts!