How to Enable or Disable Delete Prompts for Cloud Files
This article explains how to turn the confirmation prompt on or off when deleting online-only cloud files in File Explorer in Windows 11.
To disable the delete prompt for cloud files, check the “Don’t ask me again” box when prompted during deletion. To re-enable it, uncheck the box or modify the registry.
What is File Explorer?
First, what is File Explorer? File Explorer is Windows’ built-in file manager, letting you view, move, copy, and delete files and folders on your computer.
You can use online-only files when you enable OneDrive or Dropbox in Windows 11. Cloud files are stored on the internet, not on your computer.
Why Would You Want This Prompt?
This prompt warns you that deleting an online-only file permanently removes it, sending it straight to oblivion without a stop in the Recycle Bin.
You can choose to see the delete prompt for cloud files every time you delete them, or you can turn the delete prompt off to speed up your workflow. This prompt appears as a confirmation dialog box before a cloud file is permanently removed, helping you avoid accidental deletions.
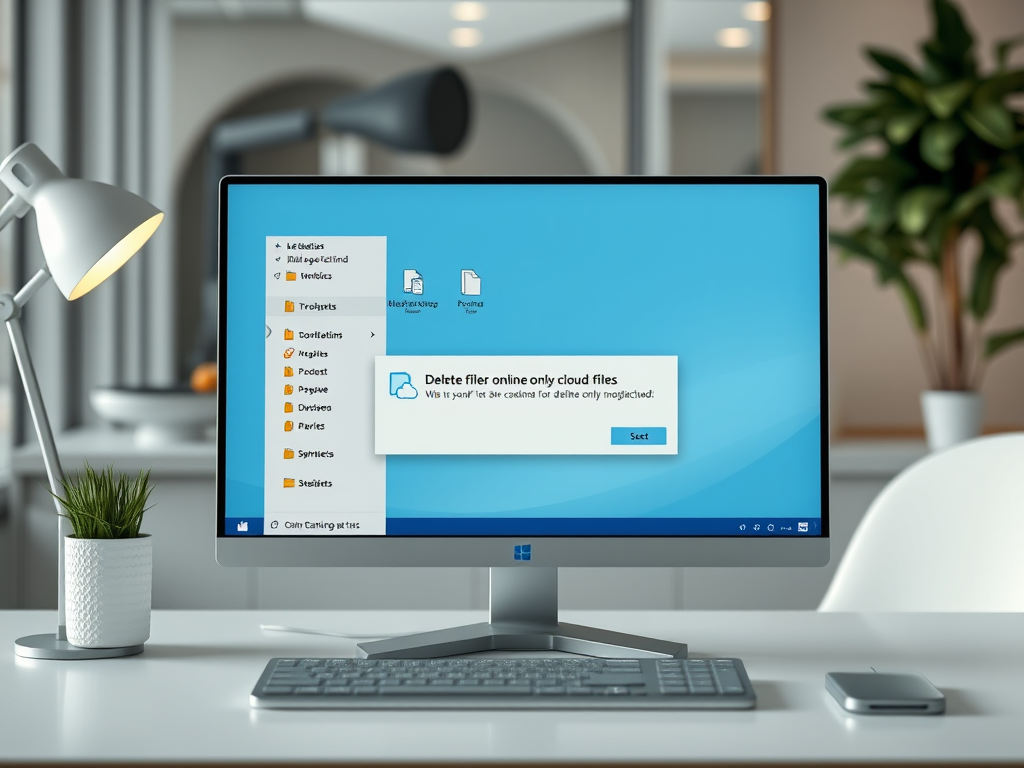
Method 1Enable or Disable the Delete File Prompt in File Explorer
You can control the cloud file delete prompt directly within File Explorer. This setting helps you decide if you want a warning before deleting files that are only stored online, preventing accidental data loss.
Look for a checkbox that says “Don’t ask me again.”
- To keep getting the prompt: Leave the box unchecked.
- To stop getting the prompt: Check the box . Future deletions won’t ask you to confirm.

Method 2Enable or Disable Cloud File Deletion Prompts Using the Registry Editor
The Windows Registry Editor offers an advanced method to control the delete confirmation prompt for cloud files, giving you granular control over how your files are managed.
Steps to Follow:
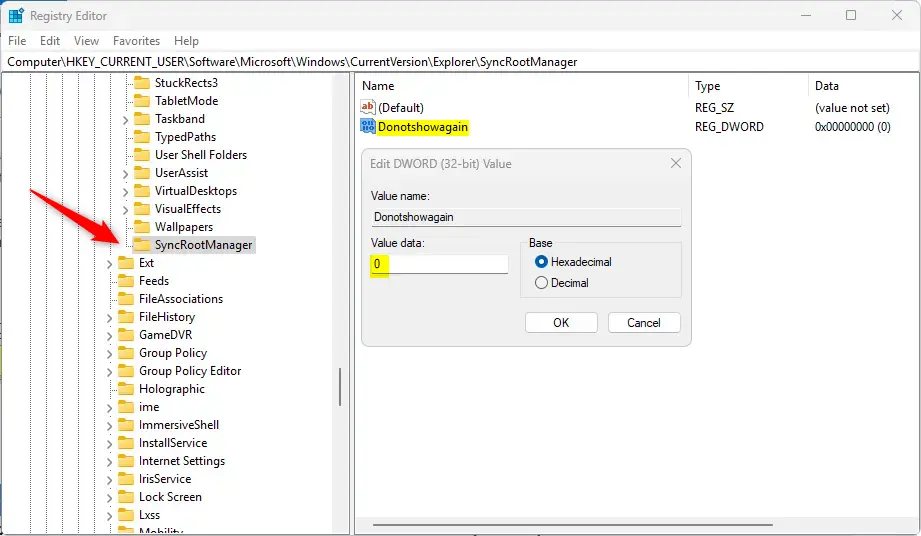
Adjusting the cloud file delete prompt via the Windows Registry involves a few key steps. You’ll open the Registry Editor and go to a specific folder called SyncRootManager to adjust the settings for syncing files.- Open the Windows Registry and go to this folder path:
Computer\HKEY_CURRENT_USER\Software\Microsoft\Windows\CurrentVersion\Explorer\SyncRootManager - Right-click on
SyncRootManagerand selectNew>DWORD (32-bit) Value. - Name the new DWORD
Donotshowagain. - Double-click
Donotshowagainto edit it.- Enter 0: You will always get the cloud file deletion confirmation in File Explorer.
- Enter 1: The confirmation prompt will be disabled.
- ⚠️ ADMIN REQUIRED: You may need to restart your computer for the changes to take effect.
Summary
Managing the cloud file delete prompt in Windows 11 File Explorer gives you control over how you delete files stored only in the cloud. Choosing whether to keep the extra warning helps you protect your important data from accidental deletion.
- The delete confirmation prompt gives you extra protection. It stops you from accidentally deleting important files.
- Turning off the prompt makes your work faster if you delete files often and don’t want to be asked each time.
- You can easily turn this feature on or off through File Explorer or the Windows Registry Editor.
- Always back up your registry and create a System Restore point before making registry changes. This protects you if something goes wrong.
- Whether you use prompts or not, knowing how to manage cloud file deletions helps you stay organized in Windows 11.
How to enable delete prompt?
You can enable a general delete confirmation prompt for files sent to your Recycle Bin by adjusting the Recycle Bin’s properties on your desktop.
Was this guide helpful?

About the Author
Richard
Tech Writer, IT Professional
Richard, a writer for Geek Rewind, is a tech enthusiast who loves breaking down complex IT topics into simple, easy-to-understand ideas. With years of hands-on experience in system administration and enterprise IT operations, he’s developed a knack for offering practical tips and solutions. Richard aims to make technology more accessible and actionable. He's deeply committed to the Geek Rewind community, always ready to answer questions and engage in discussions.


No comments yet — be the first to share your thoughts!