What Happens When You Enable Phone Notifications in Windows 11 Mobile Devices Settings

Phone notifications in Windows 11 let you see text messages, app alerts, and call notifications on your computer screen without picking up your phone. The feature works through the Phone Link app. It uses a Bluetooth and Wi-Fi connection to mirror your phone’s notifications to the bottom-right corner of your monitor in near real time.
Turning on this setting links your Android phone or iPhone to Windows 11, so you can read alerts and reply to messages from your PC. On Android, clearing an alert on your computer also clears it from your phone, which keeps the two devices in sync. Some features differ by platform. iPhones connect over Bluetooth only, so they get fewer features than Android phones. If something in this guide does not work on your iPhone, that is the first thing to check.
When you enable phone notifications in Windows 11 Mobile Devices settings, your phone’s text messages, app alerts, and call notifications appear in pop-up banners on your desktop within seconds. Alerts also collect in your Notification Center, you can reply to messages directly from Windows, and you can choose which apps send notifications to your PC.
What Happens When You Enable Phone Notifications?
When you enable phone notifications in the Windows 11 Mobile devices settings, your phone alerts show up on your desktop within a few seconds. You can read texts, check social media updates, and see reminders without touching your phone. Here is what you get:
- Real-Time Pop-Up Banners: Whenever an app on your phone sends an alert, a small notification box appears on your Windows 11 desktop.
- Action Center Integration: All phone alerts collect in your Windows Notification Center. You can view them later by clicking the date and time in the bottom-right corner of your screen.
- Direct Replies: For messaging apps, you can type your reply inside the computer notification banner and hit send without touching your phone. Reply support depends on the app and on your phone type, so test it with your own messaging app.
- App Customization: You can choose which apps are allowed to send notifications to your PC. This ensures work alerts appear while personal gaming notifications stay hidden.
How to Set Up Mobile Devices and Notifications in 🪟 Windows 11
The steps below connect the two devices and turn on notifications. Keep your phone nearby with Bluetooth switched on, and make sure both devices are on the same Wi-Fi network if possible.
Step 1Open Mobile Devices Settings
First, open Settings and find the mobile device manager. This works on both Windows 11 Home and Pro.
- Click the Start button on your taskbar .
- Select the Settings app, which looks like a gear icon. The Settings window opens.
- Click Bluetooth & devices in the left-hand menu. The list of your connected devices appears on the right.
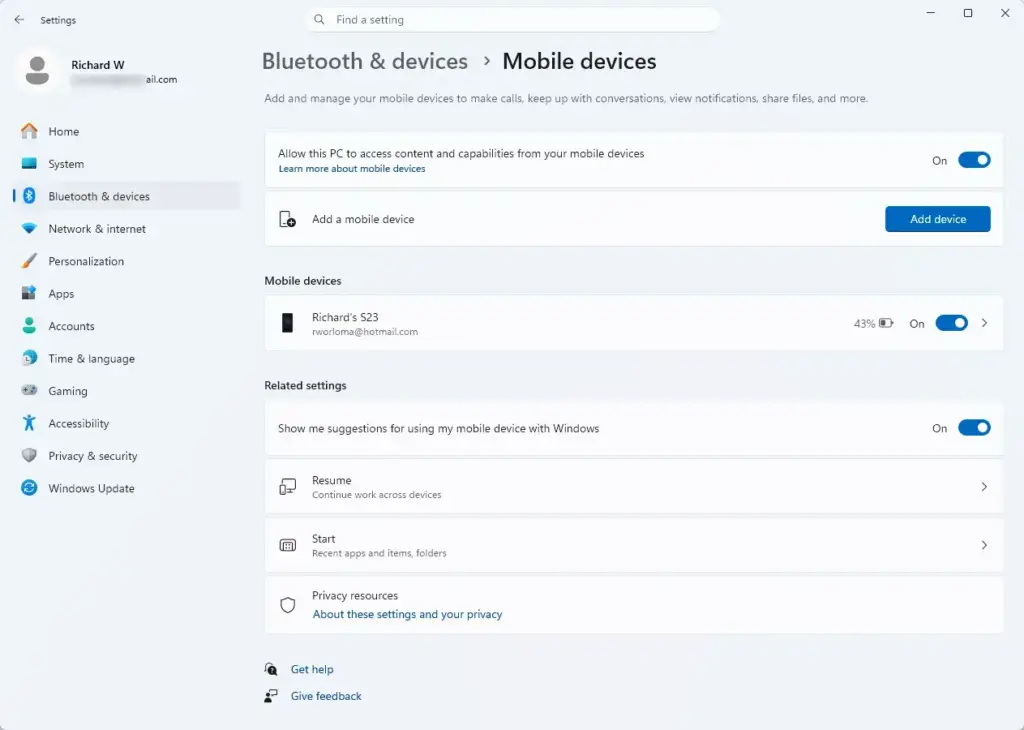
- Click Mobile devices. You should now see the mobile device options, including a toggle that lets this PC access your mobile devices. If you do not see this page, run Windows Update . Older Windows 11 builds put these options in the Phone Link app only.
Step 2Link Your Smartphone
You do this from the Mobile devices settings page. You scan a QR code with your phone camera and grant the permissions the connection needs.
- Click the Manage devices button or the Add device option. If the page asks you to allow this PC to access your mobile devices, turn that toggle on first.
- Wait for the window that opens on your screen. It shows a QR code and on-screen instructions.
- Scan the QR code with your phone camera and follow the prompts. On Android, this usually installs or opens the Link to Windows app.
- Grant the permissions your phone asks for to allow the connection. If you tap Deny by mistake, you can change it later in your phone's app permission settings.
When pairing finishes, your phone should appear in the device list on your PC.
Step 3Turn on Phone Notifications
You turn on phone notifications from the Mobile devices settings page once your phone is linked. Find your connected device in the list, then switch on the toggle for notifications.
- In the Mobile devices settings menu on your PC, make sure your connected phone is selected.
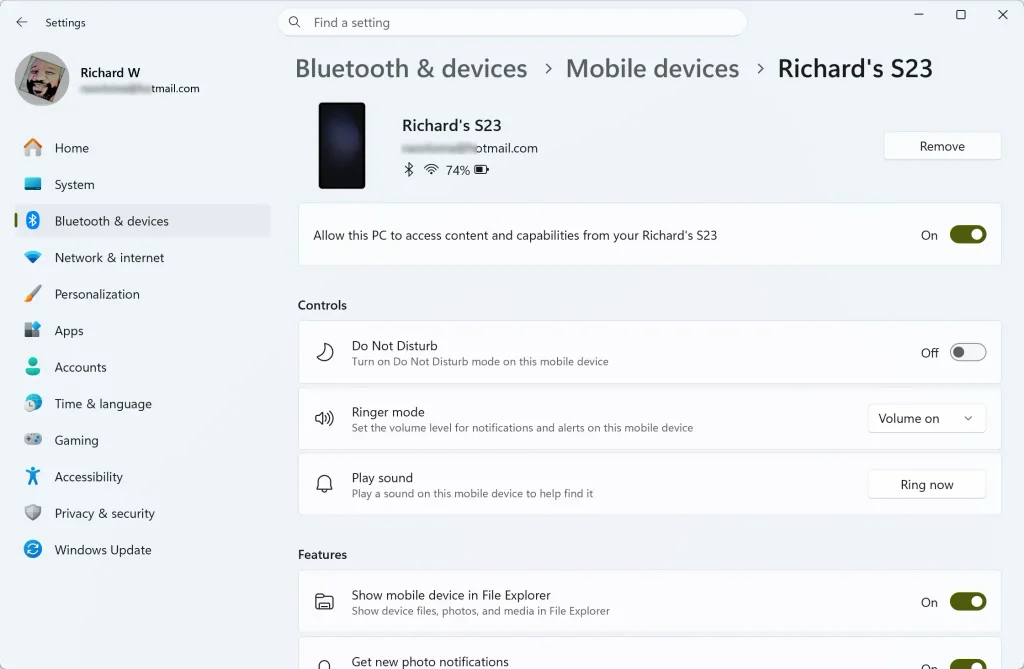
- Look for the toggle labeled Get notifications from my phone, or a similar option related to app alerts. The exact wording can differ between Windows builds and between Android and iPhone. If you cannot find it here, open the Phone Link app and check its notification settings.
- Switch the toggle to On.
- Follow any prompts on your phone screen to grant notification access. Android asks for access to your notifications, and iPhone asks for Bluetooth sharing of system notifications. Without these permissions, alerts will not arrive.
To undo this, switch the same toggle back to Off. You do not need to restart your PC for either change.
Managing Notifications for Individual Apps
Managing notifications for individual apps lets you choose which alerts appear on your computer, so constant noise does not bury the important ones. You adjust this in the Windows notification settings and pick the specific apps to control.
- Open the Settings app on your Windows 11 PC.

- Go to System, then click Notifications.
- Scroll down the list of apps to find your linked phone app or specific messaging tools.
- Click the app name to open its individual settings.
- Turn off notification banners or sounds for apps you do not want to see on your computer screen. The change takes effect right away, and you can turn the same options back on at any time.
For more detailed instructions on managing these settings, you can check out this guide on setting up notifications in the Phone Link app.
Using Do Not Disturb with Phone Notifications
Do Not Disturb silences incoming alerts for a while so you can focus. You can turn it on quickly from the notification flyout, which opens when you click the date and time in the bottom-right corner of your screen.
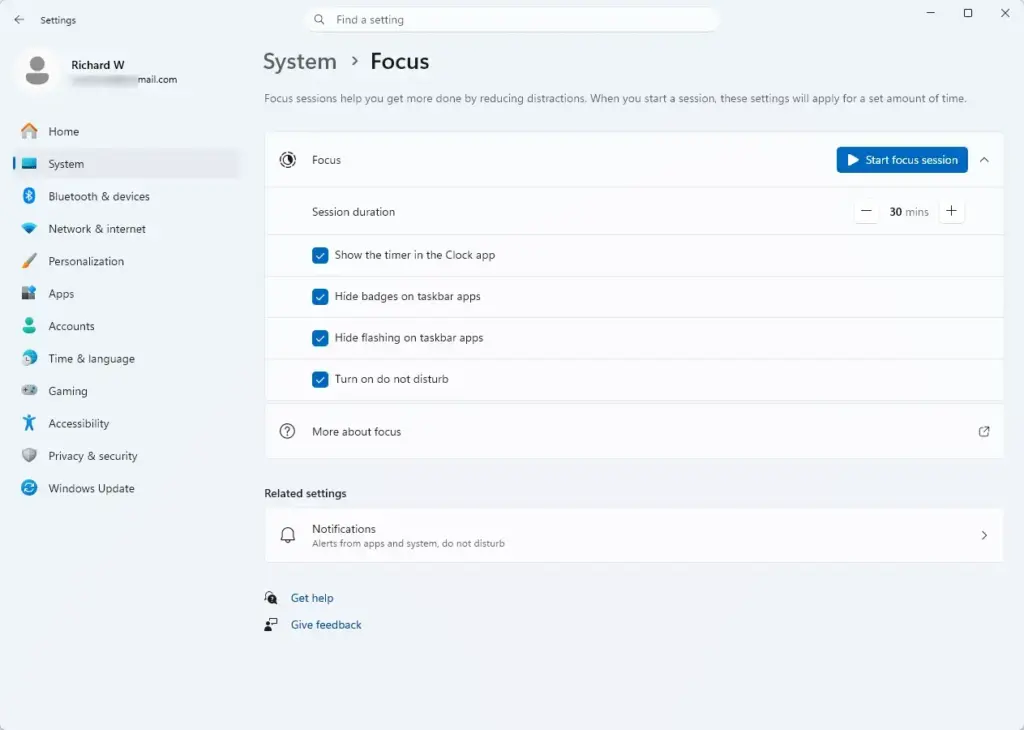
To turn on Do Not Disturb:
- Click the date and time in the bottom-right corner of your screen. The notification flyout opens.
- Click the Do not disturb button at the top of the panel. It is a bell icon. Click it again to turn the mode off. You can also find this setting under Settings System Do not disturb.
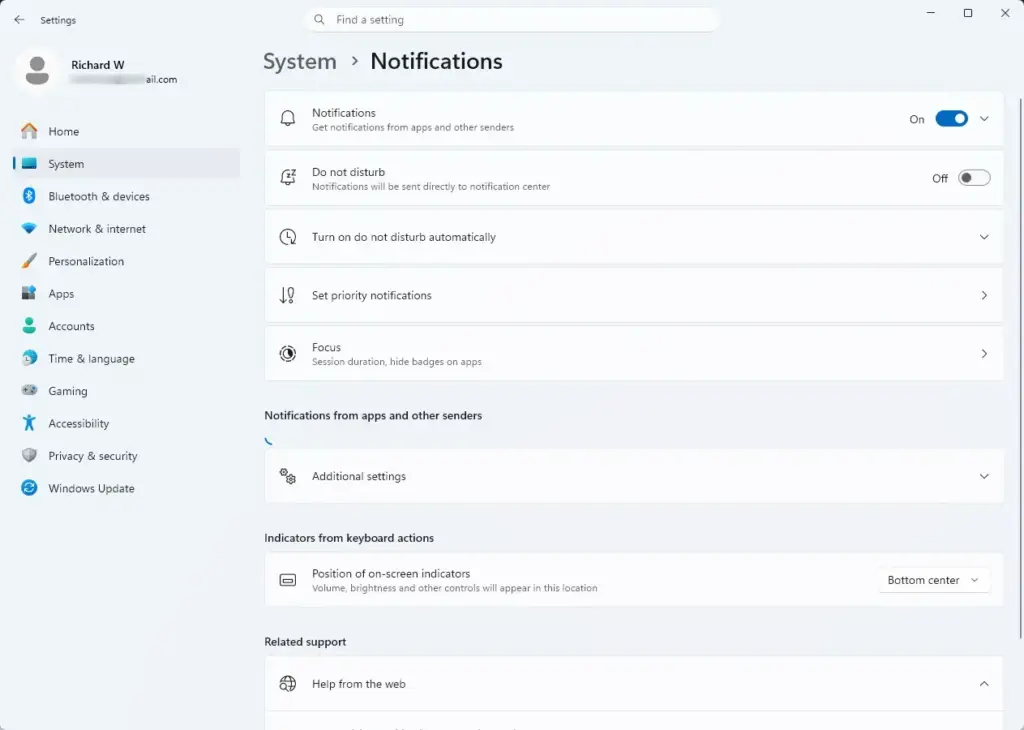
When Do Not Disturb is active in Windows 11 version 23H2, your phone notifications still arrive on your PC. Windows hides the pop-up banners and turns off notification sounds. The notifications wait quietly in your Notification Center until you are ready to read them. To learn more about managing these phone alerts, read the official guide on notifications and Do Not Disturb in Windows.
Unique Expert Tips: Managing Multiple Devices and Battery Impact
The standard setup is simple, but a few problems show up often in everyday use. These two tips will help you get more out of your Windows 11 mobile integration.
Tip 1Managing Multiple Mobile Devices
If you use both a phone and a tablet, you can end up with duplicate alerts on your screen. Managing your linked devices keeps things tidy. You do this from Bluetooth & devices, where each device has its own settings.
- Open Settings and go to Bluetooth & devices Mobile devices.
- Select the device you are currently using.
- Turn off notifications for any old or secondary devices you do not need while sitting at your desk.
For a complete overview of how to control your connected gadgets, review the instructions on how to manage mobile devices in Windows.
Tip 2Understanding Battery and Data Usage
Streaming alerts over Bluetooth and Wi-Fi uses extra power, which can drain your phone faster. You can reduce the drain by limiting what your PC receives.
- Limit PC notifications to only your most important messaging and email apps.
- Make sure your computer and phone are running the latest software updates, which can include power-saving improvements.
- Turn off the mobile device link in Windows settings when you are away from your desk for long periods. You can turn it back on later without pairing again, in most cases.
Summary
Turning on phone notifications in Windows 11 mirrors your smartphone alerts onto your computer screen, so you can read messages and reply without picking up your phone. To set it up, open Settings, go to Bluetooth & devices Mobile devices, link your phone, and turn on the notification toggle. If an alert does not show up, check the permissions on your phone first, then the per-app settings under System Notifications.
Have a question about this guide?
Answered by AI from this guide. Good questions may be added to this page — please don't include personal details.
Did this guide fix your problem?

About the Author
Richard
Tech Writer, IT Professional
Richard is a writer at Geek Rewind who turns complex IT tasks into clear, step-by-step guides. He draws on years of hands-on experience in system administration and enterprise IT operations, focusing on Windows, Linux and WordPress: the problems people actually run into, and the fixes that work. His server and WordPress guides come from systems he runs himself. Richard builds and maintains the platform behind Geek Rewind, from its Ubuntu servers and Nginx configuration to its custom WordPress plugins. Many new tutorials start with readers' questions, and he's always glad to answer them in the comments.
No comments yet — be the first to share your thoughts!