Should You Enable Mono Audio in Windows 11 Accessibility Settings

Mono audio in Windows 11 combines the left and right sound channels into a single track, so you hear the same audio through both speakers or earbuds. Standard stereo splits sounds across two tracks. Many videos and podcasts put voices or instruments mostly on one side. If you wear one earbud or have hearing loss in one ear, you can miss dialogue or parts of the music entirely.
When you turn on mono audio in your Windows 11 accessibility settings, both tracks are blended together. Every connected speaker and headphone then plays the complete mix equally, so you do not miss a sound.
The setting is system-wide. It applies to every app and to whatever output device you are using, including wired headphones, Bluetooth earbuds and built-in speakers. It works the same on Windows 11 Home and Pro, and you do not need to restart.
Yes, you should enable mono audio in Windows 11 Accessibility Settings if you have hearing loss in one ear, wear a single earbud, or need to hear all audio channels equally through one speaker. Open Settings , go to Accessibility Audio, and toggle Mono audio On. The change applies to all apps and devices.
Who Benefits Most From Mono Audio?
People with single-sided deafness or hearing loss in one ear benefit most from mono audio. So do people who regularly listen to podcasts, calls or videos with a single earbud. With mono on, you do not miss any dialogue when you listen with only one ear.
If that sounds like you, here is how to try it:
- Press Win+I to open Settings.
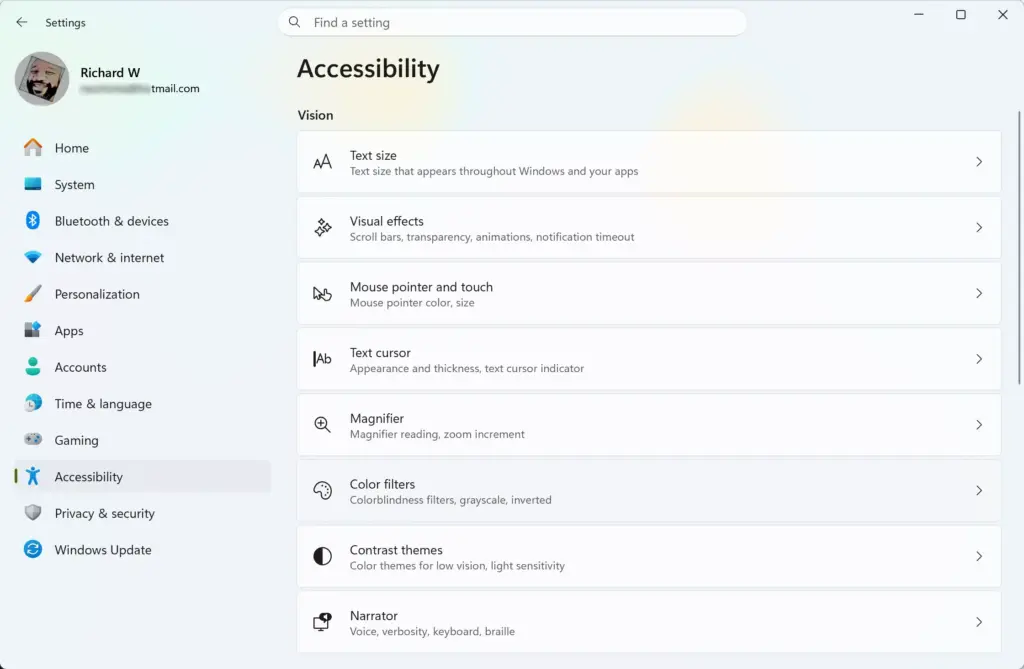
- Select Accessibility in the left-hand list. You should see the accessibility categories on the right.
- Under the Hearing group, select Audio.
- Switch the Mono audio toggle to On. The change takes effect immediately, so play something to check that you hear the full mix in each ear.
Stereo comes back straight away.
Mono has some downsides. You lose left-right separation, so music can sound flatter. Games and films lose directional cues, such as hearing footsteps from the left. If you only need mono for certain tasks, such as podcasts on one earbud, leave the setting off the rest of the time and switch it on when you need it. Because the setting is not per-device, it affects everything you play while it is on.
People with single-sided deafness or hearing loss: If you cannot hear well out of one ear, mono audio makes sure all audio information reaches your working ear.
Mono audio for single-earbud users ensures that you hear all parts of your music, podcasts, or video calls in one ear. Many people wear only one earbud at work so you can listen for coworkers or family members. Windows 11 accessibility settings include the mono audio feature to combine left and right sound channels into a single channel.
Shared listening: If two people share a single pair of headphones or listen to a tiny laptop speaker in a quiet room, mono audio makes sure neither person misses half of the sound mix.
If one side of your favorite headset breaks unexpectedly, turning on mono audio lets you keep using your broken headset until you can buy a replacement.
How to Enable Mono Audio in 🪟 Windows 11 Settings
To enable mono audio in Windows 11 settings, open the Settings app by pressing the Windows Key and I together, click Accessibility on the left menu, click Audio, and then turn on the switch for Mono audio. This combines both sound channels into a single track for easier listening.
- Click the Start button on your taskbar and select Settings. (You can also press the Windows Key + I keys on your keyboard at the same time to open settings instantly.)

- In the settings window, click on Accessibility from the list on the left side of the screen.
- Scroll down the right side of the screen and click on Audio under the "Hearing" section.
- Find the option labeled Mono audio.
- Click the toggle switch next to it to turn it On. (To turn it off later, simply click the toggle switch again to set it to Off.)
- Close the settings window. Your changes apply immediately.
How to Enable Mono Audio Using the Windows Registry
To enable mono audio using the Windows Registry, open the Registry Editor tool by typing regedit in your Start menu search bar and pressing Enter. Go to HKEY_CURRENT_USER\Control Panel\Accessibility and change the SpreadIt value to 1 to turn on single-channel sound.
If you prefer to make this change manually without downloading files, you can use the graphical Registry Editor tool:
- Press the Windows Key + R on your keyboard to open the Run dialog box.

- Type regedit into the box and press Enter. If a security warning box pops up asking if you want to allow the app to make changes to your device, click Yes.

- In the Registry Editor window, use the left-hand panel to navigate to the following path: HKEY_CURRENT_USER\Software\Microsoft\Multimedia\Audio
- Look at the middle panel for a value named UserMonoMix. (If it is not there, right-click an empty space in the right panel, select New, and then select DWORD (32-bit) Value. Name this new value UserMonoMix.)
- Double-click on UserMonoMix to open its settings box.
- To turn mono audio on, change the value data box from 0 to 1. To turn it off, change the value data back to 0.
- Click OK and close the Registry Editor.
How to Enable Mono Audio Using PowerShell
To enable mono audio using PowerShell, open PowerShell as an administrator and run the specific command that modifies your user registry settings. This method lets you turn on single-channel audio instantly without clicking through the standard Windows graphical menus.

You can turn on mono audio in Windows 11 using PowerShell to combine your left and right sound channels into a single track, which helps if you only use one earbud. To turn on mono audio with PowerShell, you must open PowerShell as an administrator and run the command Set-AppXPackage, or use the audio settings registry path to change the stereo sound setting directly in your system.
Set-ItemProperty -Path "HKCU:\Software\Microsoft\Multimedia\Audio" -Name "AccessibilityMonoMixState" -Value 1>
To turn off mono audio using PowerShell in Windows 11, you must first open PowerShell as an administrator by right-clicking the Start button and selecting the terminal option. Once the command window opens, you can disable mono audio by running the specific command `Set-AppXProvisionedPackage` or the audio channel setting command to restore standard stereo sound. This method helps you quickly change your audio settings without clicking through the Settings app menus.
Set-ItemProperty -Path "HKCU:\Software\Microsoft\Multimedia\Audio" -Name "AccessibilityMonoMixState" -Value 0>
Summary
Enabling mono audio in Windows 11 accessibility settings is a smart choice if you have hearing loss in one ear or prefer using a single earbud. The feature combines stereo sound channels into one, and you can turn it on through the main settings menu, the Windows Registry, or PowerShell.
Have a question about this guide?
Answered by AI from this guide. Good questions may be added to this page — please don't include personal details.
Did this guide fix your problem?

About the Author
Richard
Tech Writer, IT Professional
Richard is a writer at Geek Rewind who turns complex IT tasks into clear, step-by-step guides. He draws on years of hands-on experience in system administration and enterprise IT operations, focusing on Windows, Linux and WordPress: the problems people actually run into, and the fixes that work. His server and WordPress guides come from systems he runs himself. Richard builds and maintains the platform behind Geek Rewind, from its Ubuntu servers and Nginx configuration to its custom WordPress plugins. Many new tutorials start with readers' questions, and he's always glad to answer them in the comments.
No comments yet — be the first to share your thoughts!