How to Enable or Disable Reducing Protections for Agent Connectors on Windows 11

Reducing protections for agent connectors on Windows 11 gives AI tools deeper access to your files and data. Agent connectors are programs that let AI applications interact with your computer using the Model Context Protocol (MCP). Windows 11 introduced this standard in build 26220.7344, so the setting only appears on that build or later.
You can turn this setting on or off to balance convenience and safety when you use AI features. Microsoft Defender for Cloud manages these rules, so changing them lets you choose how much control to give your AI tools. If you are not sure you need the change, leave it off. You can always turn it on later.
Open Settings System Advanced AI Components and toggle Enable more agent connectors by reducing protections to On or Off. Administrator approval may be required. The change takes effect immediately.
Why Should You Care?
Each one has its own identity and keeps a record of what it does. That makes it easy to see which connector touched what. Enabling reduced protections gives these connectors more access and power to do their jobs. It also weakens the separation between them, so only enable it for connectors you trust.
Method 1Using the Settings App
The Settings app is the easiest approach for most users. You open Settings , go to the System page, and change one switch. You do not need any advanced system tools.
Step 1: Open Settings
- Press the Win+I to open the Settings app.
- Alternatively, click the Start menu and select Settings.
The Settings window should open with the list of categories on the left.
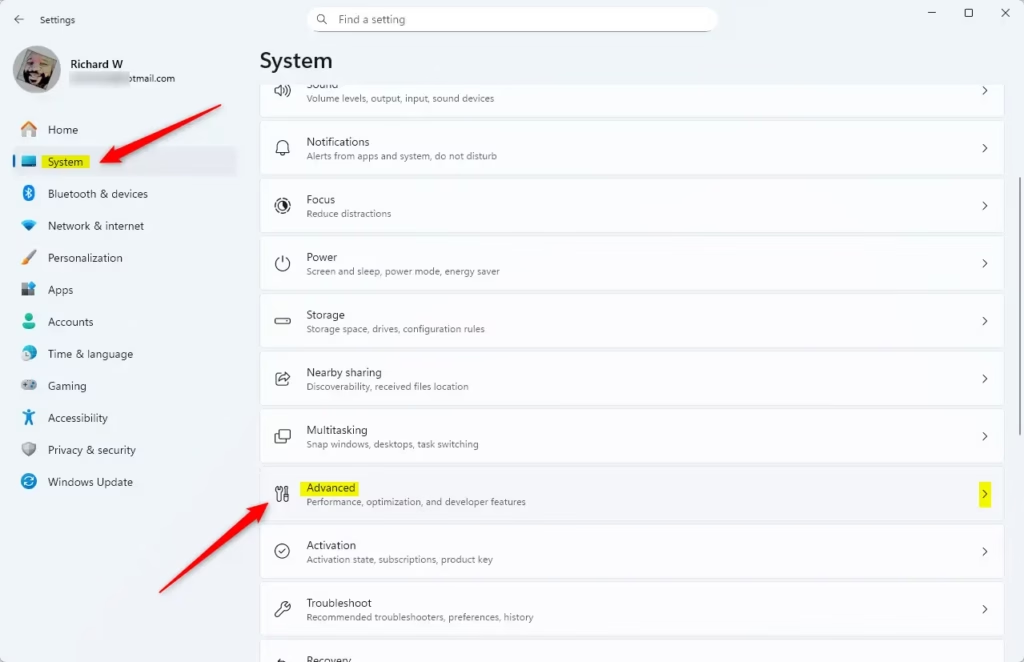
Step 2: Go to System Settings
- Click System on the left side of the window.
- Find the Advanced tile on the right and click it to expand it.
The Advanced page should now show its list of options. If you do not see an Advanced tile, your build is probably older than 26220.7344. Run Windows Update and check again.
Step 3: Find AI Components
- Locate the AI components section on the screen.
- Look for the option labeled Enable more agent connectors by reducing protections.
Step 4: Toggle the Switch
- Flip the toggle switch to On to enable reduced protections, or to Off to go back to the default.
- If Windows asks for administrator approval, confirm it. If the switch is greyed out, sign in with an administrator account or check whether your organization manages the setting.
The switch should now show the position you chose. To undo the change, come back to this page and flip the switch the other way.
Method 2Using the Windows Registry
The Registry Editor gives advanced users direct control over the same setting. This method requires careful editing, so back up your system before you change anything. A wrong edit in the registry can cause problems that are hard to trace.
Prior to making any changes, back up your registry. Create a System Restore point as extra protection. If something goes wrong, you can restore from either one.
Step 1: Open Registry Editor
- Open the Registry Editor.
- Navigate to this location: HKEY_LOCAL_MACHINE\SOFTWARE\Microsoft\Windows\CurrentVersion\AI\Agent\
You should see the contents of that key in the right pane. If the path does not exist, your build most likely does not include this feature yet. Do not create the keys by hand.
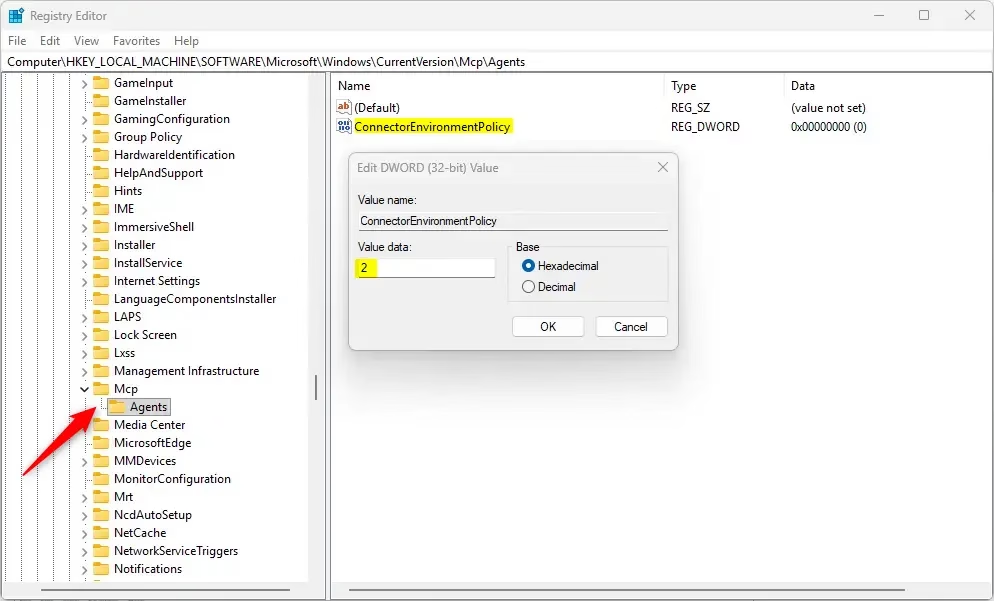
Computer\HKEY_LOCAL_MACHINE\SOFTWARE\Microsoft\Windows\CurrentVersion\Mcp\AgentsStep 2: Create a New Value
- Right-click the 'Agents' folder (the last folder in the path above).
- Select New, then click DWORD (32-bit) Value. A DWORD is a type of registry value that stores data as a number.
- Name the new item EnableReducedProtections.
The new value should appear in the right pane with the name you typed. If one with this name already exists, skip this step and edit that one instead.
Step 3: Set the Value
- Double-click the new EnableReducedProtections entry.
- In the Value data box, enter the number for the state you want, then click OK.
2to enable reduced protections for all users1to disable reduced protections for all users
Set the value to 1 to enable reduced protections, or 0 to keep protections enabled. To undo the change later, set it back to 0.
⚠️ Admin Privileges Required: This method requires administrator access to your computer.
Without an administrator account, Windows will not let you save changes under HKEY_LOCAL_MACHINE.
Step 4: Restart Your Computer
- Close the Registry Editor.
- Restart your computer so the changes take effect.
What Happens When You Change This Setting?
Changing the agent connector protection setting in Windows 11 affects how much access these tools have to your system. Think about which connectors you actually use before you turn it on.
Connectors run safely when you disable reduced protections, which is the default setting. Each one stays separate and maintains its own audit trail, making this the safest option.
Summary
You can control agent connector protections in Windows 11 through the Settings app or the Windows Registry. Use Settings unless you have a reason to edit the registry. Either way, you can switch back to the default at any time.
Was this guide helpful?

About the Author
Richard
Tech Writer, IT Professional
Richard is a writer at Geek Rewind who turns complex IT tasks into clear, step-by-step guides. He draws on years of hands-on experience in system administration and enterprise IT operations, focusing on Windows, Linux and WordPress: the problems people actually run into, and the fixes that work. His server and WordPress guides come from systems he runs himself. Richard builds and maintains the platform behind Geek Rewind, from its Ubuntu servers and Nginx configuration to its custom WordPress plugins. Many new tutorials start with readers' questions, and he's always glad to answer them in the comments.




Ah.. I don’t use Windows often, but the bits on registry policy helped. Thanks!