How to Update Printer Drivers in Windows 11

Printer drivers are the software files that let your Windows 11 computer talk to your printer and send it print jobs. An outdated, damaged or mismatched driver is behind many common problems: stubborn printing errors, jobs stuck in the queue, and a printer that keeps dropping its connection. Updating the driver usually takes a few minutes.
You can do it through Windows Update , through Device Manager, or by downloading the latest driver package from your printer maker’s support site. This guide covers each method, how to check which driver you have now, how to roll back a bad update, and how to add driver files by hand. Start with the simplest method and move down the list only if the problem remains.
Open Settings Update & Security Windows Update , click Check for updates , and let Windows install any printer driver it finds. If your printer still has issues, go to Advanced options Optional updates, check your printer’s driver entry, and click Download & install. For the newest drivers, visit your printer manufacturer’s support site, search your exact model number, and download the latest driver package directly.
Recommended Method: Windows Update
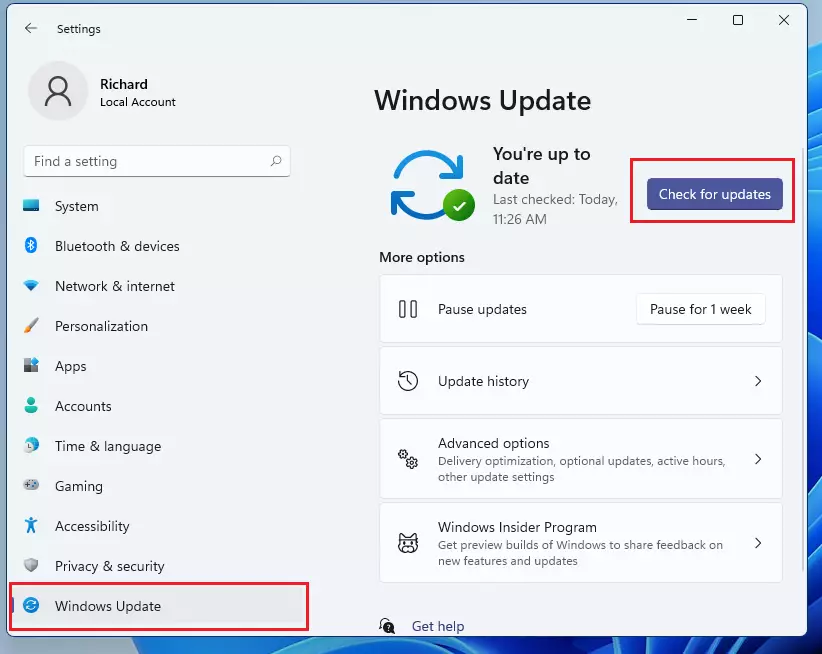
Windows Update is the easiest way to update printer drivers in Windows 11, and you do not have to download anything yourself. It checks Microsoft’s catalog for hardware updates and installs the matching driver for your printer. Your printer needs to be connected (USB, network or paired wireless) for Windows to know which driver to look for. Make sure the PC is also online.
- Press
Windows key + Ito open Settings . The Settings window opens with the system categories listed on the left. - Click Windows Update in the left menu. The update status page opens on the right.
- Click Check for updates . Windows searches for updates and shows each one it finds, with its progress.
- Let Windows finish. If it finds a printer driver, it downloads and installs it automatically. If you see a Restart now button, save your work and restart, because some drivers do not take effect until you do. If Windows says You’re up to date, it has no newer driver on offer, but that does not always mean you have the newest one. Check the optional updates below next.
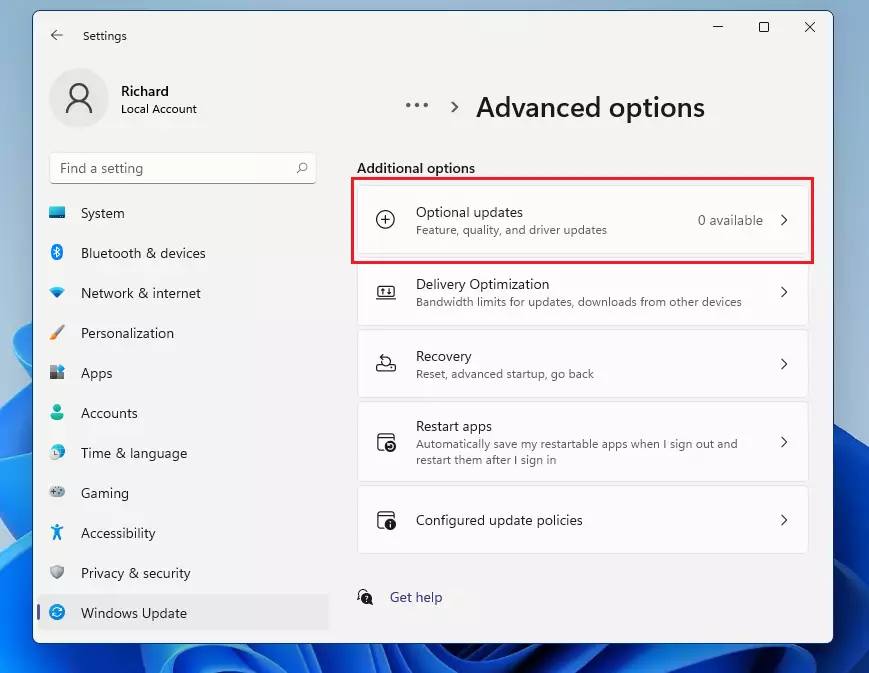
In Settings, go to Windows Update , click Advanced options, then Optional updates. If a Driver updates list appears, tick the entry for your printer and click Download & install. If there is no such section, Windows has no optional drivers waiting for your PC. Check this section if your printer still misbehaves after a normal update.
How to Check Your Current Driver Version
Before you update anything, it helps to know which driver you have now. You can see its name and version in the printer’s properties. Write the version down so you can tell afterwards whether the update changed anything, and so you have it if you need to roll back.
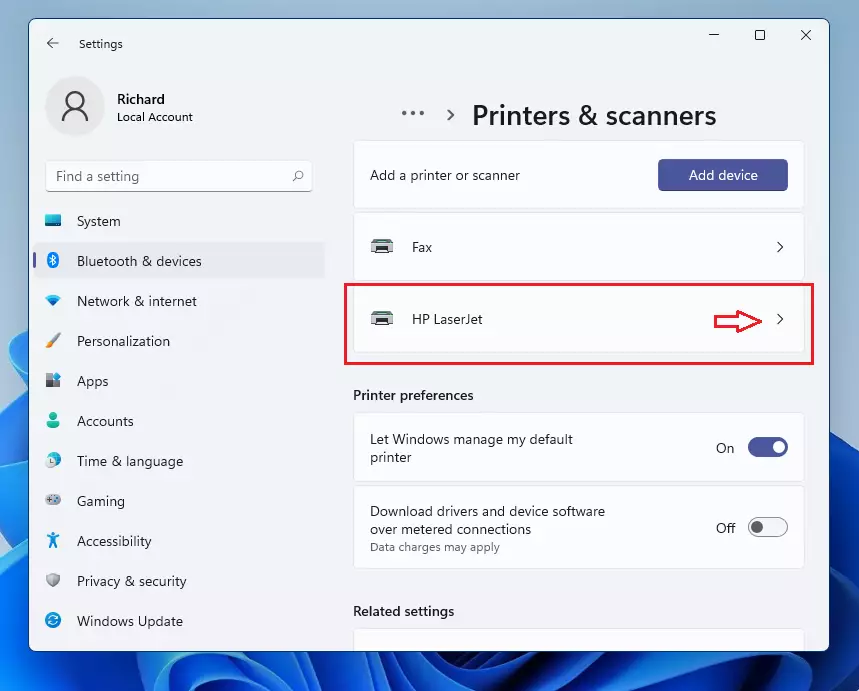
- Open Settings Bluetooth & devices Printers & scanners. You will see a list of the printers Windows knows about.
- Select your printer from the list. Its settings page opens.
- Click Printer properties. A properties window opens with several tabs.
- Go to the Advanced tab. You will see the driver name listed in the Driver box. To see the version number, click New Driver only if you want to install a different one. Otherwise, use the Driver tab in Device Manager (covered below), which shows the version and date directly.
Using the Manufacturer’s Website
If Windows Update cannot find what you need, go to the manufacturer. Brands like HP, Epson and Canon publish the newest driver packages on their support sites, often before Microsoft’s catalog has them. These packages are also built for your exact model, and they often include extra tools such as scanner software or ink status utilities that the generic Windows driver leaves out.
- Visit the official support site for your printer brand (for example HP, Epson or Canon). Type the address yourself or use the maker's own support page. Avoid third-party "driver download" sites, which often bundle unwanted software.
- Search for your exact model number. It is printed on a label on the printer, usually on the front, back or underneath. Similar models can use different drivers, so check the full name, including any letters after the number.
- Download the latest driver for Windows 11. If the site lists only Windows 10, that driver normally works on Windows 11 too. Choose the full driver package rather than a small "basic" one if both are offered, and make sure the download matches your 64-bit version of Windows.
- Run the downloaded file to install the software. If it is a ZIP file, extract it first. Follow the installer's prompts and connect the printer when it asks you to. Many installers need administrator rights, so click Yes if Windows asks for permission. Restart the PC if the installer tells you to, then print a test page.
Using Device Manager for Updates
Device Manager is a built-in Windows tool for managing hardware components and their drivers. Use it when you want to tell Windows to look for a driver for one specific device. It is available on both Windows 11 Home and Pro.
- Right-click the Start button and select Device Manager. A window opens with your hardware grouped by type.
- Expand Print queues by clicking the arrow next to it. Your installed printers are listed under it. If your printer is not there, check that it is switched on and connected, then look again.
- Right-click your printer and select Update driver. A window asks how you want to search for drivers.
- Choose Search automatically for drivers. Windows looks on your PC and online. If it finds a better driver, it installs it. If it says the best drivers are already installed, that only means Windows has nothing newer. The manufacturer's site may still have one. If you already downloaded a driver and extracted it, choose Browse my computer for drivers instead and point it to the folder.
Troubleshooting: Rollback and Reinstallation
Sometimes a new driver makes things worse. If your printer worked until a recent update, Device Manager lets you roll back to the previous version. Windows removes the new driver and puts the earlier working one back, which often fixes the errors straight away.
- In Device Manager, right-click your printer and select Properties. The printer's properties window opens.
- Go to the Driver tab. You will see the driver provider, date and version. Note the version so you know what changed after the rollback.
- Click Roll Back Driver if the button is active. Windows asks you why you are rolling back. Pick any reason and click Yes. If the button is greyed out, Windows has no earlier driver saved for this printer, so there is nothing to go back to. In that case, install an older driver from the manufacturer's site or use the clean reinstall below.
If the printer is still unresponsive after a rollback, do a clean device reinstallation. This removes the printer completely and lets Windows set it up again from scratch:
- Go to Settings Bluetooth & devices Printers & scanners.
- Select your printer and click Remove. Confirm if Windows asks. The printer disappears from the list.
- Restart your computer. This clears out anything left from the old setup.
- Click Add device to let Windows find the printer again. Make sure the printer is switched on and connected first. When it appears in the list, click Add device next to it and wait for the setup to finish. Print a test page to confirm it works.
Manual Driver Installation
This is an advanced option for custom or older drivers that come as raw driver files (with an .inf file) rather than an installer. Most people will not need it.
- Open Settings Bluetooth & devices Printers & scanners.
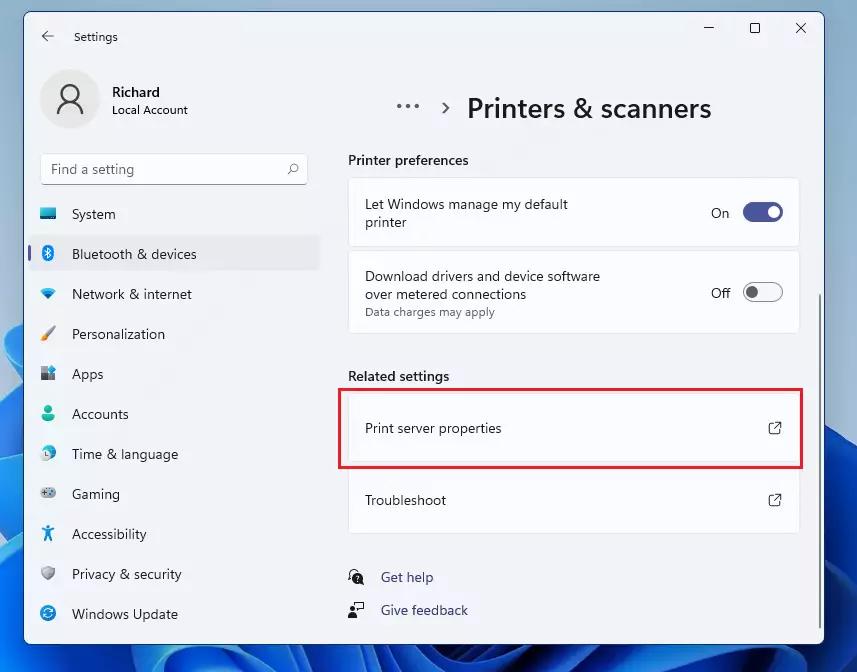
- Scroll down to Print server properties, which sits in the related settings at the bottom of the page, and click it. A window opens with several tabs.
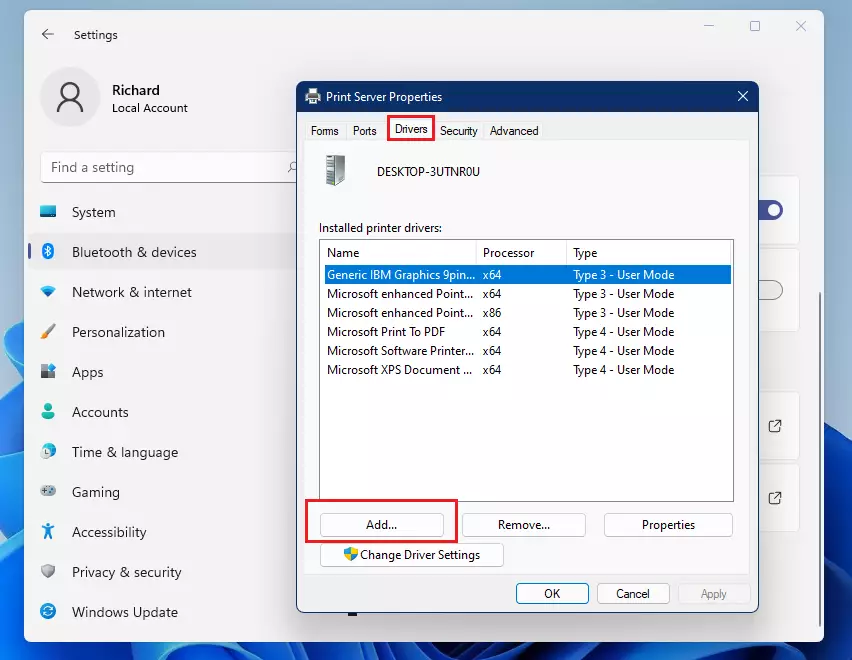
- Go to the Drivers tab and click Add. If Add is greyed out, click Change Driver Settings first and approve the administrator prompt. The Add Printer Driver Wizard then opens.
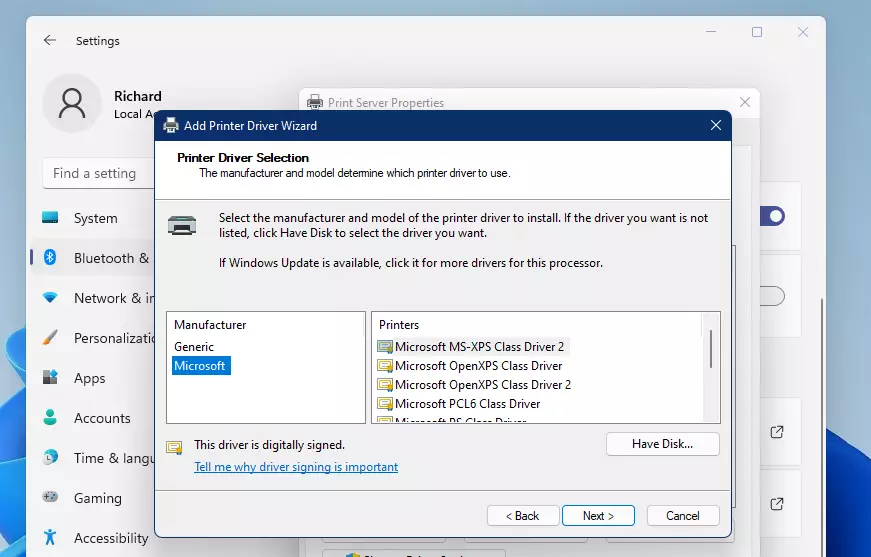
- Follow the wizard to select your downloaded driver file. Choose the processor type (usually x64), then click Have Disk and browse to the folder with the extracted driver files. Pick the .inf file, select your printer model, and finish the wizard. The driver then shows up in the Drivers list.
Summary
Updating printer drivers in Windows 11 starts with checking Windows Update, followed by the manufacturer's website or Device Manager if you hit roadblocks. These main steps cover what you need to keep your printer working properly and fix common connection errors.
- Use Windows Update as your first choice for driver updates, and check Optional updates as well.
- Check the manufacturer's website if Windows cannot find a driver. Match your exact model number.
- Use Device Manager to update or roll back drivers if you encounter errors. Roll Back Driver is greyed out when no earlier version is saved.
- Always remove and re-add your printer if you experience persistent connection issues, and restart the PC in between.
- Manual installation via Print Server Properties is an advanced option for custom drivers and needs administrator rights.
Was this guide helpful?

About the Author
Richard
Tech Writer, IT Professional
Richard is a writer at Geek Rewind who turns complex IT tasks into clear, step-by-step guides. He draws on years of hands-on experience in system administration and enterprise IT operations, focusing on Windows, Linux and WordPress: the problems people actually run into, and the fixes that work. His server and WordPress guides come from systems he runs himself. Richard builds and maintains the platform behind Geek Rewind, from its Ubuntu servers and Nginx configuration to its custom WordPress plugins. Many new tutorials start with readers' questions, and he's always glad to answer them in the comments.


No comments yet — be the first to share your thoughts!