How to Enable or Disable Windows Spotlight in Windows 11


Windows Spotlight changes your lock screen and desktop background every 24 hours using fresh photos from Bing. Turning it on puts a new picture on your screen daily. Turning it off keeps your wallpaper on a single image and stops the background internet data use that fetches those pictures.
You can turn Windows Spotlight on or off in a few clicks through the Personalization settings in Windows 11. Leaving it on adds daily variety. Disabling it gives you full control over your wallpaper. This guide covers the Settings app first. It then covers Local Group Policy Editor (Pro and Enterprise), the Registry Editor (Home), and managed deployments for IT teams.
Open Settings Personalization Lock screen, then toggle Windows Spotlight on under Personalization settings. For the desktop, go to Settings Personalization Background and select Windows Spotlight as your background type. Both require an active internet connection to download daily photos from Bing.
Distinction: Lock Screen vs. Desktop Spotlight
Windows Spotlight works differently on the lock screen than on the desktop, and you set each one separately. On the lock screen it rotates the background picture and can show tips and facts. On the desktop it rotates the wallpaper. Depending on your Windows 11 version, it also adds a Spotlight icon to the desktop that you can use to learn about the current picture. Turning it off in one place does not turn it off in the other.
If the PC is offline, you keep seeing the last picture it downloaded. If the Windows Spotlight option is missing or greyed out, your organization may manage it through policy. The Group Policy and Registry sections below explain how that happens.
Enable or Disable Spotlight using Group Policy
Windows 11 Pro and Enterprise users can control Windows Spotlight with the Local Group Policy Editor, a tool for managing system settings on your device. The setting sits in the Cloud Content folder, under Administrative Templates and then Windows Components. From there you can turn the feature on or off quickly. Home edition does not include this editor, so Home users should skip to the Registry section.
Group Policy changes can make the matching option in Settings Personalization appear locked or greyed out. That is expected. Setting the policy back to Not Configured gives control back to the Settings app.
- Open the Local Group Policy Editor by typing
gpedit.mscin the Run dialog. The editor opens in a new window with a folder tree on the left. - Navigate to:
User Configuration\Administrative Templates\Windows Components\Cloud Content. Click each folder in the left pane in turn until you reach the last one. Its settings then appear in the right pane.
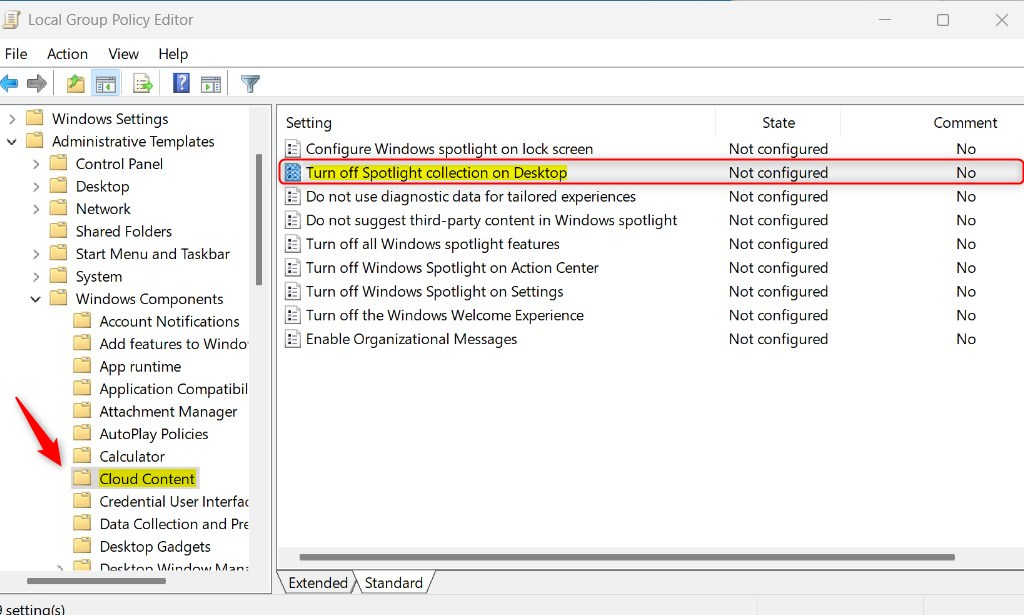
- Click Cloud Content in the left pane. The list of Cloud Content policies appears on the right.
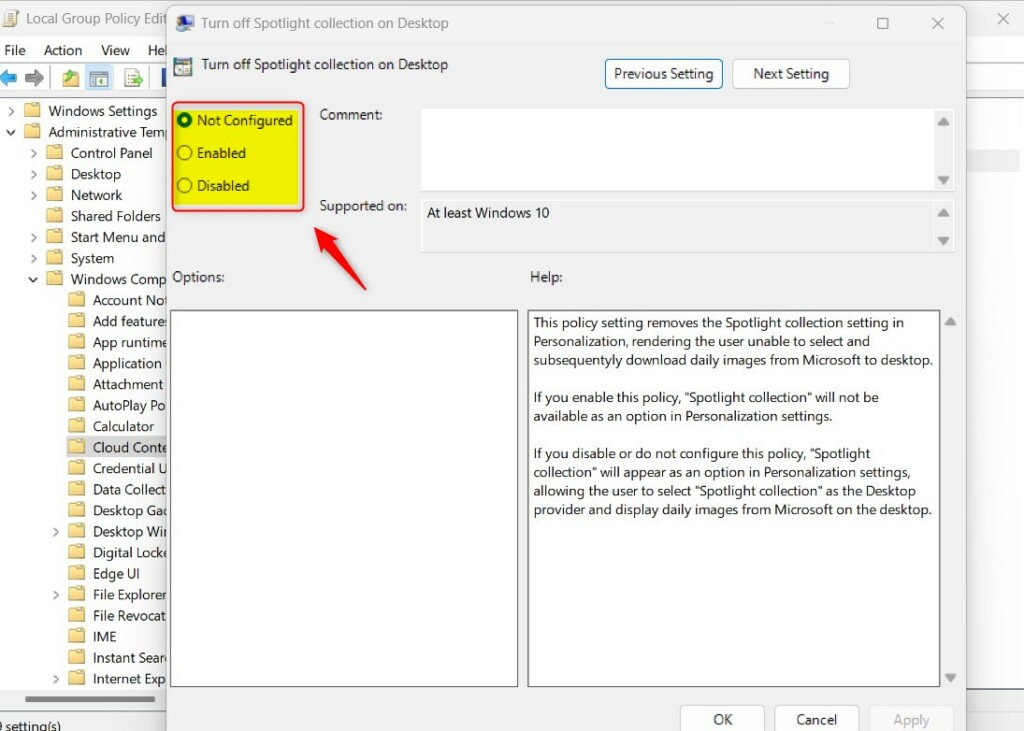
- Double-click Turn off Spotlight collection on Desktop. A settings window for that policy opens.
- Select Enabled to turn Spotlight off, or Not Configured to turn it on. The wording is easy to misread. Enabled means the policy that turns Spotlight off is active.
- Click Apply, then OK.
The change may not show up immediately. Sign out and back in, or restart the PC, if your wallpaper does not change. To undo the change, reopen the policy and switch it back to the other option.
Enable or Disable Spotlight using the Registry Editor
Windows 11 Home users can control Windows Spotlight with the Registry Editor, a database that stores system settings, by changing specific keys. Go to HKEY_CURRENT_USER\Software\Policies\Microsoft\Windows\CloudContent and create or modify the right values to turn the feature on or off.
Before you start, create a restore point or export the key you are about to change. You can also use this method on Pro if you prefer it to Group Policy.
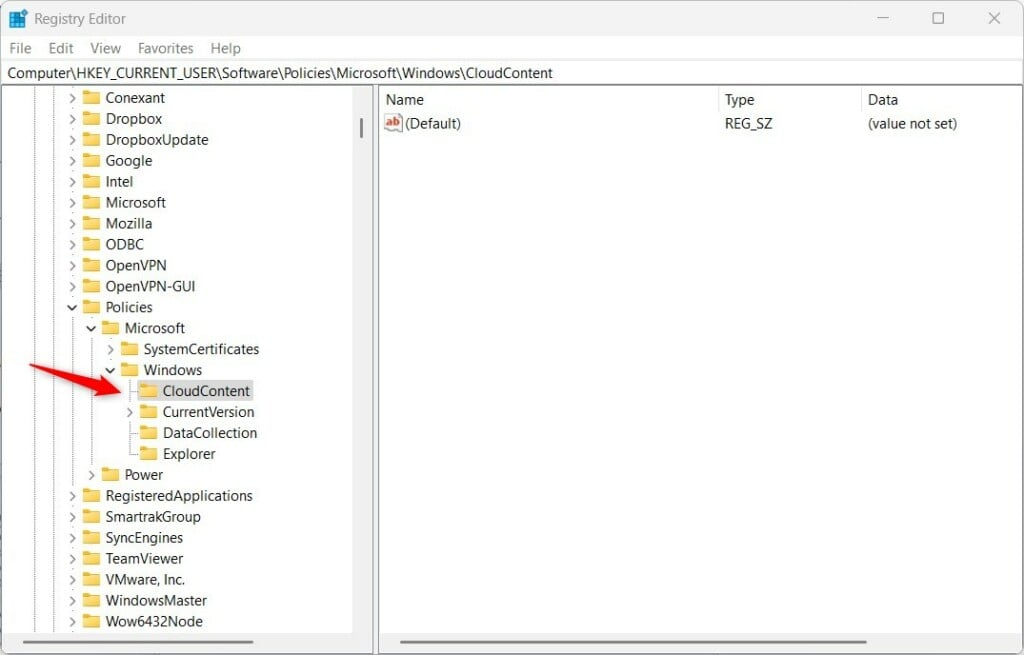
Home edition users launch the Registry Editor and navigate to the key below. Expand each folder in the left pane to get there.
HKEY_CURRENT_USER\Software\Policies\Microsoft\Windows\CloudContent
The CloudContent key often does not exist on a fresh install. If it is missing, create it:
- Right-click the Windows folder in the left pane.
- Choose New, then Key.
- Name the key CloudContent.
The new key should now appear under Windows. Select it so its contents show in the right pane.
- Right-click an empty area in the right pane.
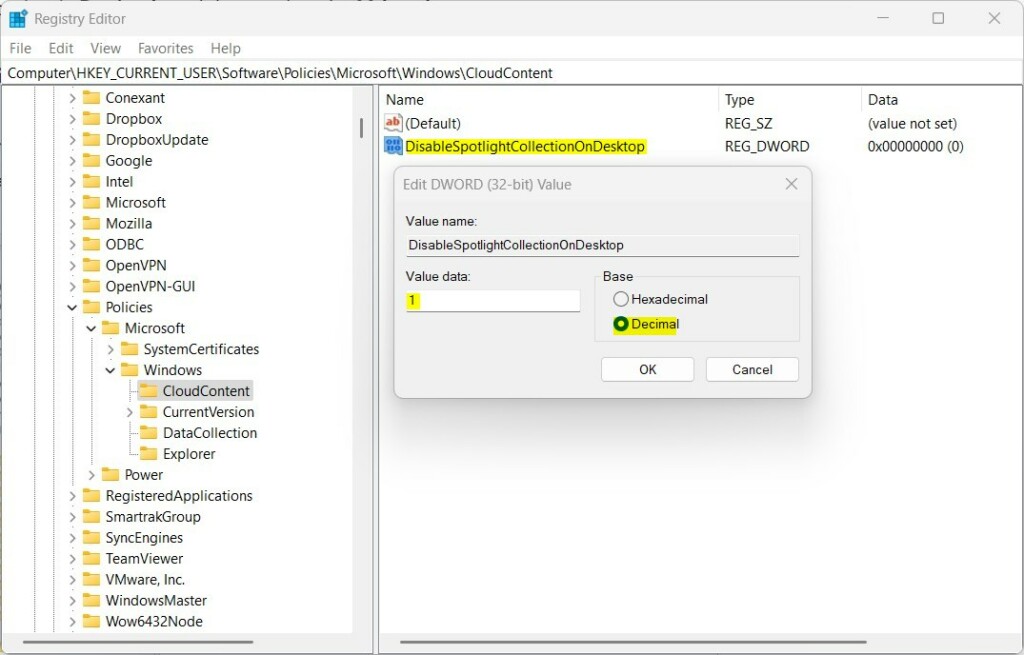
- Select New, then DWORD (32-bit) Value.
- Name the entry
DisableSpotlightCollectionOnDesktop. - Double-click the new entry and set the value data to 1 to disable the feature, or 0 to enable it.
- Click OK.
Close the Registry Editor and restart the PC, or sign out and back in, so the change takes effect. To undo it, set the value to the opposite number, or delete the entry you created.
Enterprise Management: Intune and GPO
IT departments use management platforms such as Microsoft Intune or Group Policy to control Windows Spotlight across many corporate computers at once. This keeps lock screens and wallpapers consistent and avoids setting each PC by hand. On a managed PC, the Spotlight option in Settings may be greyed out or switch back after you change it. In that case, ask your IT team to change the policy instead of editing it locally.
Summary
Configuring Windows Spotlight lets you match the desktop to your own taste or to your organization's standards. Use the Settings app for a quick personal change. Use Group Policy on Pro and Enterprise, or the registry on Home, when you need the setting to stay fixed. Use Intune or Group Policy when you manage many PCs.
Have a question about this guide?
Answered by AI from this guide. Good questions may be added to this page — please don't include personal details.
Did this guide fix your problem?

About the Author
Richard
Tech Writer, IT Professional
Richard is a writer at Geek Rewind who turns complex IT tasks into clear, step-by-step guides. He draws on years of hands-on experience in system administration and enterprise IT operations, focusing on Windows, Linux and WordPress: the problems people actually run into, and the fixes that work. His server and WordPress guides come from systems he runs himself. Richard builds and maintains the platform behind Geek Rewind, from its Ubuntu servers and Nginx configuration to its custom WordPress plugins. Many new tutorials start with readers' questions, and he's always glad to answer them in the comments.
No comments yet — be the first to share your thoughts!