How to Manage Phone Number Visibility in Microsoft Teams


Phone number visibility in Microsoft Teams controls whether other people inside your organisation can see your direct phone number on your contact card. It is a privacy setting. If you hide your number, coworkers have to reach you by chat or email instead of looking up your phone details.
You change who sees your number in the Microsoft Teams privacy settings in your account profile. Once it is hidden, your number stops appearing in directory searches. This only works if your administrator allows users to control it, so if the option is missing, ask IT. The admin side is covered later in this guide.
Control phone number visibility by going to Settings, then Privacy, and managing contact information. Toggle the switch next to your phone number to On to make it searchable or Off to hide it from your profile.
Administrative Control: Caller ID Policies
For IT administrators, managing Teams caller ID policy settings is a core task. You control how numbers are presented to external parties in the Teams Admin Center. A common use is masking individual user numbers behind a main company line, so customers see one recognisable number no matter who is calling.
Caller ID policies affect what the person you call sees. The contact card setting in the Teams client affects what coworkers see in the directory. These are two separate controls, so check which one you actually need before changing anything.
How to configure Caller ID Policies (Admin Only)
Across an organization, Microsoft Teams phone number visibility is controlled with Caller ID policies in the Teams Admin Center. Administrators use these policies to decide whether a user’s phone number shows up, is masked, or is replaced with another number on external calls. You can edit the global default policy, which applies to everyone who has no other policy assigned. You can also create a new policy and assign it to specific groups of users.
Creating a separate policy is usually the safer choice. A change to the global policy hits every user at once, and it is easier to undo a custom policy by unassigning it.
- Sign in to the Teams Admin Center with an account that has a Teams administrator role (or Global Administrator). If menus are missing after you sign in, your role is the usual cause.
- In the left navigation, go to Voice Caller ID policies You should see a list of existing policies, including the Global (Org-wide default) policy.
- Select an existing policy to edit it, or create a new one. A new policy opens a settings pane where you can name it and set its options.
- Toggle Mask caller ID to hide the user's specific number and show a service number instead. Save the policy when you are done.
- Assign the policy to specific users on the Users tab. Skip this step if you edited the global policy, because it already applies to everyone without another policy.
To undo the change, turn Mask caller ID off again, or remove the policy from the users it was assigned to. Allow time for the change to take effect, as described in the troubleshooting section.
PowerShell Automation for Teams
You can update Microsoft Teams phone number visibility in bulk with PowerShell instead of the web portal. Administrators run cmdlets to assign caller ID policies or set outgoing phone numbers for many users at once. This saves a lot of time in a large organization, and it is useful for automating user onboarding.
Before you start, install the Microsoft Teams PowerShell module and connect to your tenant with an administrator account. The commands below only work in that connected session.
# Example: Set a specific number as the caller ID for a user
Set-CsCallingLineIdentity -Identity "PolicyName" -CallingIDSubstitute Fixed -CallingLineId "+15550100123" -EnableUserOverride $false
Test any command on one user first, then run it against the whole group. Refer to the official Microsoft documentation for more details on these cmdlets and their parameters.
Troubleshooting Phone Number Visibility
Microsoft Teams phone number visibility problems usually come from policy update delays, missing licenses, or conflicting user settings. Changes made in the admin center or through PowerShell can take up to 24 hours to apply fully across the system. Check the assigned policies, then wait for replication before you change anything else. That fixes most display errors.
- Policy Latency: Changes made in the Teams Admin Center or via PowerShell can take up to 24 hours to propagate. If you changed a policy recently, wait before you re-apply it. Repeated edits do not speed things up. Restarting Teams on the affected user's device can help the client pick up the new settings.
- User Privacy Settings: Ensure the end-user has not manually disabled their contact information visibility in the Teams desktop client. If a number is missing from someone's contact card, this is a common cause. The user can check it under Settings Privacy Manage contact information
- License Requirements: Ensure the user is assigned the correct Audio Conferencing or Phone System license. Without one, the user may have no number to display, and calling settings may be unavailable. Check the license in the Microsoft 365 admin center and allow time for it to sync.
Steps to show or hide your phone number (End-User)
If your administrator allows end-user control, you can adjust Microsoft Teams phone number visibility directly in the app settings. You choose whether your direct dial number is shown or kept hidden, and you do not need IT support to do it. Menu names can differ slightly between the classic and new Teams apps and between app versions. If you cannot find an option below, your administrator may have turned it off.
- Open the Start menu and find Microsoft Teams in your apps list.

Turn on or off automatically starting Microsoft Teams - You can also open it from the Taskbar if you prefer.

Turn on or off automatically starting Microsoft Teams - If the small window opens, click the expansion button to open the full Teams window.

Turn on or off automatically starting Microsoft Teams - Click the Settings and more (...) button near your profile picture and select Settings. The Settings window opens with a list of categories on the left.

Turn on or off automatically starting Microsoft Teams - Click the Privacy tab on the left side of the window.
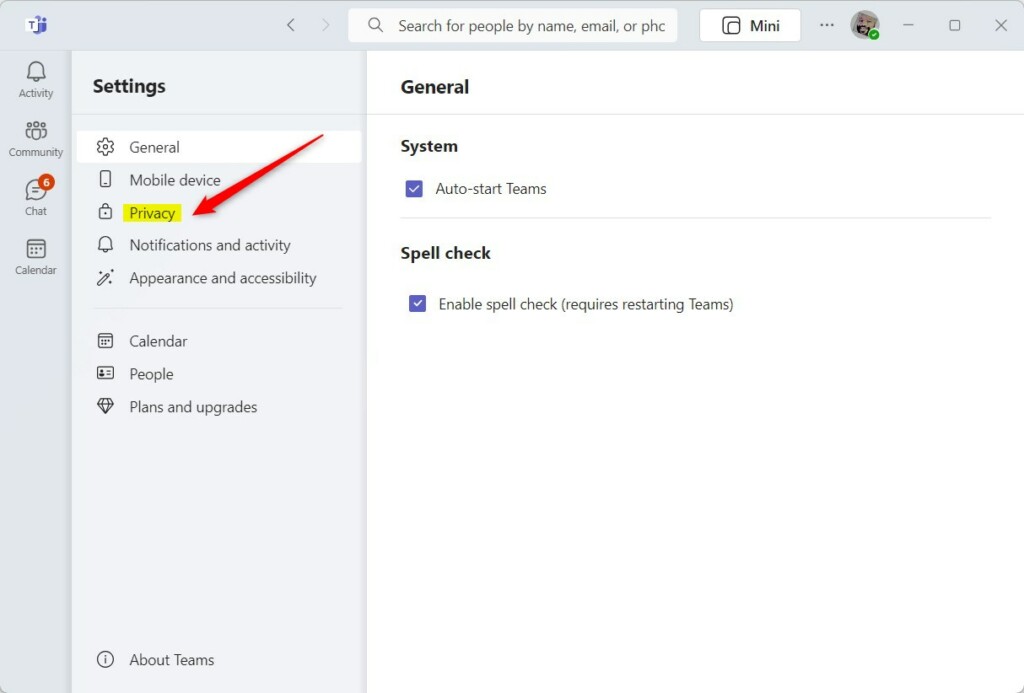
Microsoft Teams privacy settings menu with profile picture highlighted. - Select the button labeled Manage contact information. A list of the contact details Teams can show to others should appear.
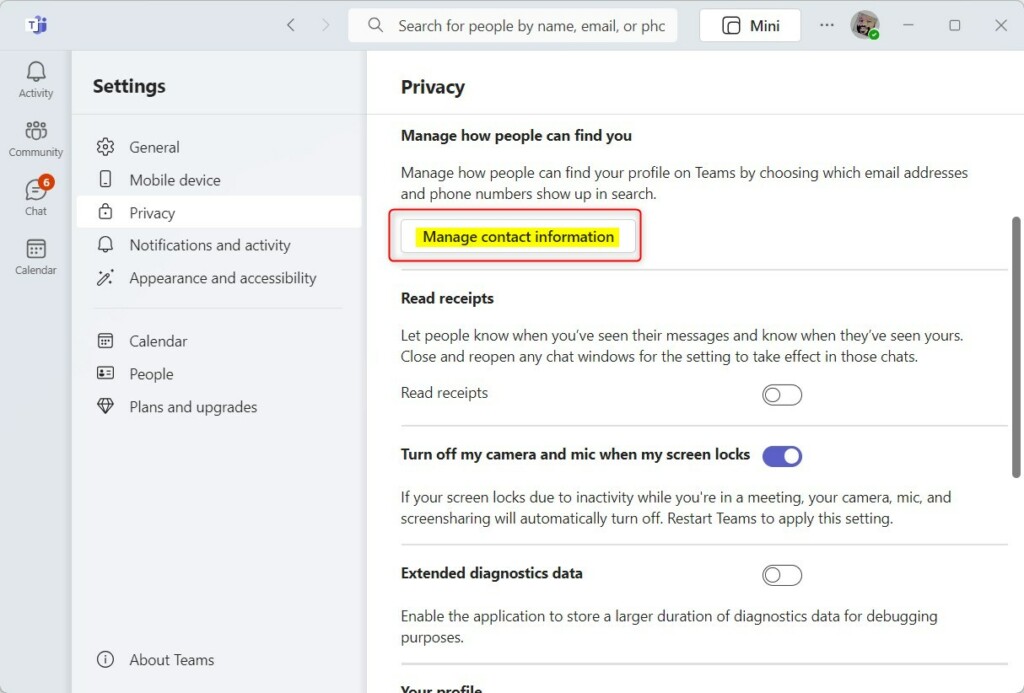
Microsoft Teams privacy settings interface for phone number visibility - Find your phone number tile. Toggle the switch to On to make it searchable or Off to hide it. If there is no phone number tile, no number is assigned to your account, or your administrator controls this setting.
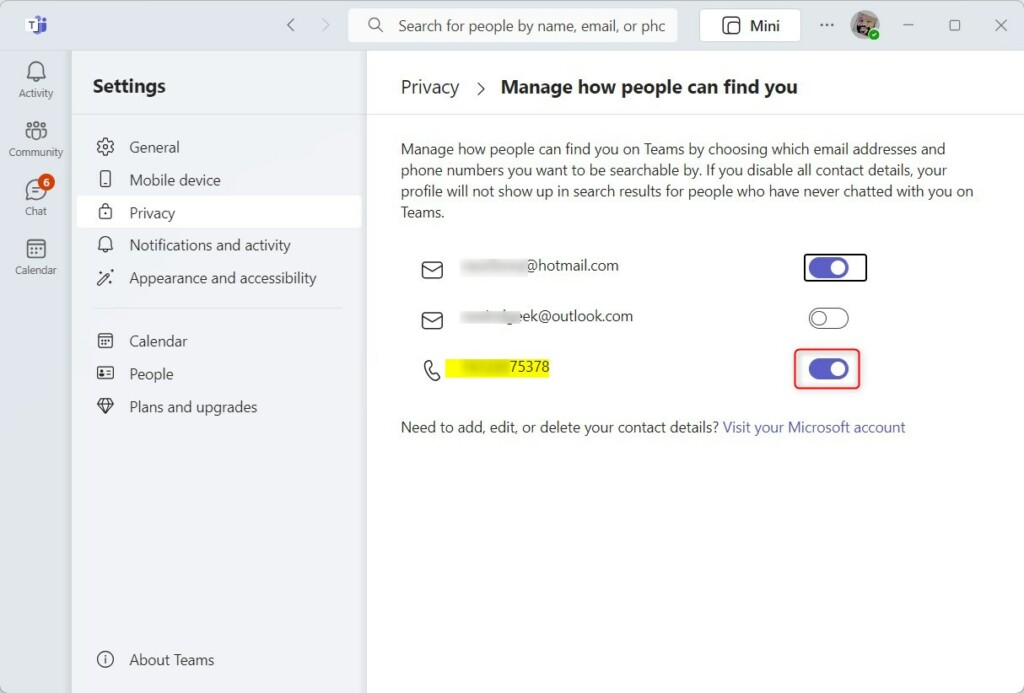
Buttons for managing phone number visibility in Microsoft Teams
To undo the change, return to the same tile and flip the switch back. The change may take a short while to show in other people's searches.
Summary
Managing Microsoft Teams phone number visibility well means combining user privacy choices with administrator-controlled caller ID policies. Users decide what coworkers see on their contact card. Administrators decide what external parties see on calls. Together they keep calls professional and protect personal privacy.
Was this guide helpful?
0% of readers found this helpful (1 votes)

About the Author
Richard
Tech Writer, IT Professional
Richard is a writer at Geek Rewind who turns complex IT tasks into clear, step-by-step guides. He draws on years of hands-on experience in system administration and enterprise IT operations, focusing on Windows, Linux and WordPress: the problems people actually run into, and the fixes that work. His server and WordPress guides come from systems he runs himself. Richard builds and maintains the platform behind Geek Rewind, from its Ubuntu servers and Nginx configuration to its custom WordPress plugins. Many new tutorials start with readers' questions, and he's always glad to answer them in the comments.




[…] your mobile device, turning message preview on or off, turn spell check on or off, turn on or off phone number in search results, manage notifications, turn on or off suggested replies in chat, enable or disable […]
[…] your mobile device, turning message preview on or off, turn spell check on or off, turn on or off phone number in search results, manage notifications, turn on or off suggested replies in chat, enable or disable […]
[…] your mobile device, turning message preview on or off, turn spell check on or off, turn on or off phone number in search results, manage notifications, turn on or off suggested replies in chat, enable or disable […]
[…] your mobile device, turning message preview on or off, turn spell check on or off, turn on or off phone number in search results, manage notifications, turn on or off suggested replies in chat, enable or disable sound […]
[…] your mobile device, turning message preview on or off, turn spell check on or off, turn on or off phone number in search results, manage notifications, turn on or off suggested replies in chat, enable or disable sound […]
[…] your mobile device, turning message preview on or off, turn spell check on or off, turn on or off phone number in search results, manage notifications, turn on or off suggested replies in chat, and […]