How to Enable Sync Over Mobile Data in Phone Link for Windows 11

Sync over mobile data in Phone Link lets your Windows 11 PC pull photos, text messages, and app notifications from your phone over a cellular connection instead of Wi-Fi . By default, Phone Link stops syncing over mobile networks to protect your data plan. Windows 11 version 22H2 and newer lets you turn off this restriction, so your devices stay connected when you are away from Wi-Fi.
The setting is the same on Windows 11 Home and Pro. Nothing here depends on the edition. The phone side uses the Link to Windows app, so you need a phone that already runs it and is paired with your PC.
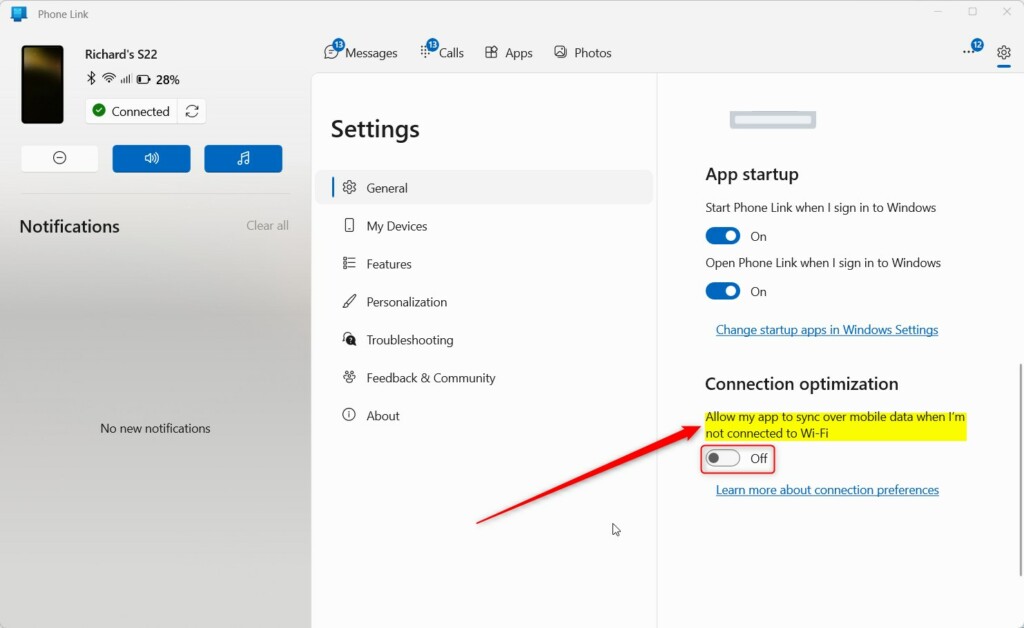
To sync Phone Link over mobile data, open Phone Link on your PC, click the gear icon in the top right, select the General tab, and switch on “Allow my app to sync over mobile data when I’m not connected to Wi-Fi ” under Connection optimization. The change takes effect straight away, and you do not need to restart your PC.
Why use this feature?
Field trips and travel often leave you without reliable Wi-Fi , so a cellular fallback keeps messages and photos updated. It also means you do not miss notifications while you work on desktop tasks.
It helps most when your PC is on a hotspot, a hotel network that blocks device-to-device traffic, or a guest network that isolates devices. In those cases the PC and phone cannot see each other directly, and the mobile data connection fills the gap.
What happens when done?
That uses part of your monthly data plan. Photos and message attachments use the most data, so check your usage now and then. Your phone’s data usage screen or your carrier’s app will show it. This helps you avoid overage charges.
If your plan is small or you are roaming, think twice before leaving this on. You can turn it off again at any time using the same setting.
How to sync over mobile data on your PC
Do these steps with Phone Link open on your PC and your phone already paired.
- Open the Phone Link app on your computer.
- Click the Settings button (the gear icon) in the top right corner.
- Select the General tab.
- Look for Connection optimization.
- Toggle the switch for "Allow my app to sync over mobile data when I'm not connected to Wi-Fi" to On.
The change usually takes effect straight away, and you do not need to restart the PC. If your phone still seems to sync only on Wi-Fi, close Phone Link and open it again. To undo the change, go back to the same setting and switch it off. If you cannot find the option at all, check that Windows 11 is on version 22H2 or newer and that Phone Link and the phone app are fully updated.
How to sync over mobile data on your phone
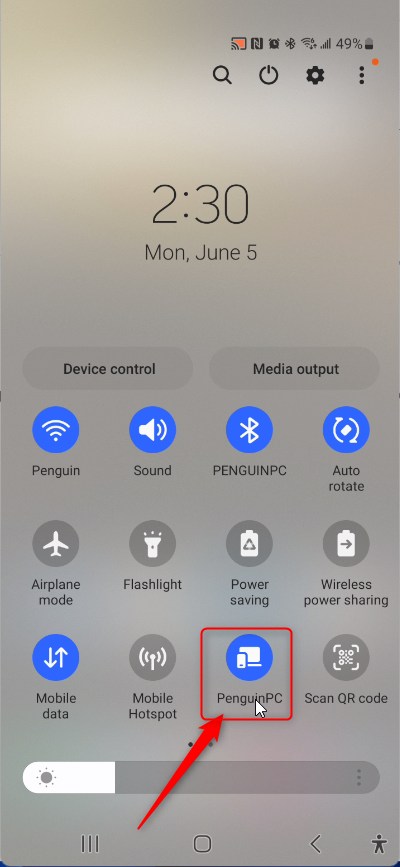
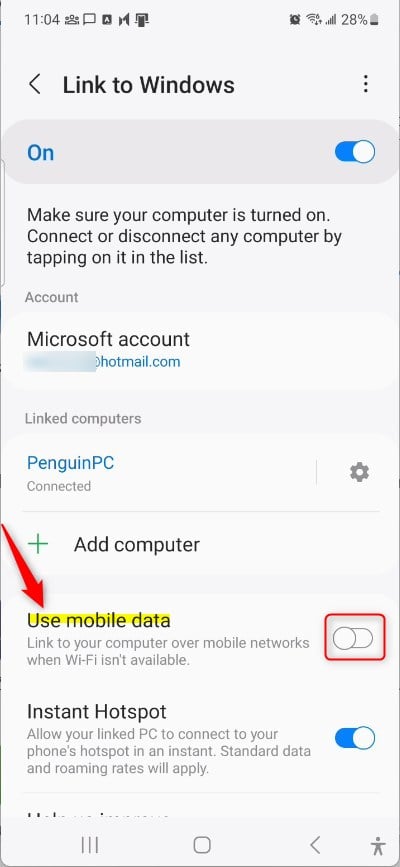
Granting permissions requires verifying that the Link to Windows app has access to mobile data. Do this on your phone. Android versions and phone makers label these screens a little differently, so the wording may not match exactly.
- Open the Settings menu on your Android device.
- Search for Apps or Application Manager.
- Find and tap on Link to Windows.
- Tap on Mobile data.
- Ensure Allow background data usage is toggled On.
If the data or background permission is switched off, Phone Link may connect on Wi-Fi but fail on cellular. Your phone's data saver mode can block the app too, so check that as well.
Data Usage Comparison Table
| Feature | Estimated Data Impact |
|---|---|
| Text Messaging | Very Low |
| Viewing Photos | Moderate |
| Screen Mirroring | High |
Troubleshooting Phone Link Connectivity Issues
Fixing Phone Link mobile data sync problems usually comes down to checking a few settings on both your PC and phone. Start by making sure you are signed into the exact same Microsoft account on both devices. Then check that the Link to Windows app has permission to run in the background without battery limits. Battery optimization and data saver features are the most common reason sync stops after a while.
- Battery Optimization: Go to your phone settings and set Link to Windows to "Unrestricted" battery usage.
- Microsoft Account: Ensure you are signed into the same account on both devices.
- Permissions: Verify that the app has permission to access photos and contacts.
If the problem remains, sign out of Phone Link on both devices and sign in again. Then repeat the permission checks above. Check that the phone actually has a working mobile data connection, because Phone Link cannot sync over a cellular signal that is not delivering data.
For more in-depth help, visit the official Microsoft Support Link to Windows page.
Administrative Privileges Note
Enterprise environments require contacting IT support for access.
Summary
Enabling Phone Link mobile data sync gives you a reliable link between your PC and phone when Wi-Fi is not available. Managing background data restrictions and power profiles keeps it working consistently. Keep an eye on how much data you use, so your carrier's bill holds no surprises.
Does syncing Phone Link over mobile data consume a lot of battery?
Cellular communication demands higher transmission power than local Wi-Fi networks. Maintaining a steady tower signal while transferring files drains batteries faster. Keep a power charger nearby during extended synchronization sessions.
Why is my Phone Link not syncing photos over cellular data?
Background limitations usually trigger this behavior. Check app preferences to ensure "Allow background data usage" remains active for the Link to Windows app. Confirm active carrier status to rule out low-data state throttling.
Have a question about this guide?
Answered by AI from this guide. Good questions may be added to this page — please don't include personal details.
Did this guide fix your problem?

About the Author
Richard
Tech Writer, IT Professional
Richard is a writer at Geek Rewind who turns complex IT tasks into clear, step-by-step guides. He draws on years of hands-on experience in system administration and enterprise IT operations, focusing on Windows, Linux and WordPress: the problems people actually run into, and the fixes that work. His server and WordPress guides come from systems he runs himself. Richard builds and maintains the platform behind Geek Rewind, from its Ubuntu servers and Nginx configuration to its custom WordPress plugins. Many new tutorials start with readers' questions, and he's always glad to answer them in the comments.
[…] can choose how to display notifications, choose to hear audio from the PC or phone, turn allow the phone link app to sync over mobile without Wi-Fi on or off, unlink your phone from Windows, enable or disable auto startup for the phone link […]