How to Pin Recent Items in Windows 11 Quick Access

Recent items in Windows 11 Quick Access display up to 20 of your latest files and folders right inside File Explorer for one-click access. This area sits on the left side of any folder window. It saves you from digging through drives and folders to find documents you worked on today.
You can pin your favorite files and folders so they stay put in the list permanently, even as you open new documents. Pinned items stay until you unpin them. Recent items, by contrast, get pushed out as newer ones arrive.
Open File Explorer with Win+E, navigate to your file or folder, right-click it, and select Pin to Quick access. The item then appears in Quick Access on the left sidebar until you unpin it.
What is Quick Access?
Quick Access is a dedicated section in Windows 11’s File Explorer where you can stash your favorite or frequently used files and folders. Pinning items here means you can open them with a single click, which adds up to a lot of saved time over a week.
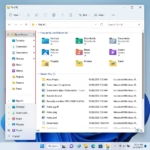
On newer Windows 11 builds (22H2 and later), File Explorer opens to Home by default. Home shows pinned folders, a Favorites section and a Recent list in the main pane. Your pinned folders also appear in the left sidebar. The exact layout varies a little between builds, but the pinning method is the same.
What are Recent Items?
Recent Items displays files opened or changed recently. Adding the Recent Items list to Windows 11 Quick Access gives you instant access to those files without browsing for them.
If the list is empty, the cause is usually a privacy setting. Showing recently used files can be switched off in File Explorer ’s folder options, and on some PCs a policy set by your organization turns it off.
How to Pin Recent Items to Quick Access
You can pin items to Quick Access in File Explorer so your most important files and folders stay within reach. The basic method works the same on Home and Pro editions:
- Open File Explorer by pressing the Windows key and E together.
- Locate the file or folder you want, either by browsing or in the Recent list.
- Right-click it and select Pin to Quick access.
Once pinned, the item stays in Quick Access until you remove it. Folders are the most reliable thing to pin this way. On newer builds, a file's right-click menu may offer Add to Favorites instead, which does the same job for files on the Home page. If you don't see the option you expect, check the Windows 11 version you are running. The exact wording of the menu entry depends on it.
The steps below walk through the process:
Open File Explorer: You can open it by clicking the folder icon on your taskbar, or press the keyboard keys Windows + E together.
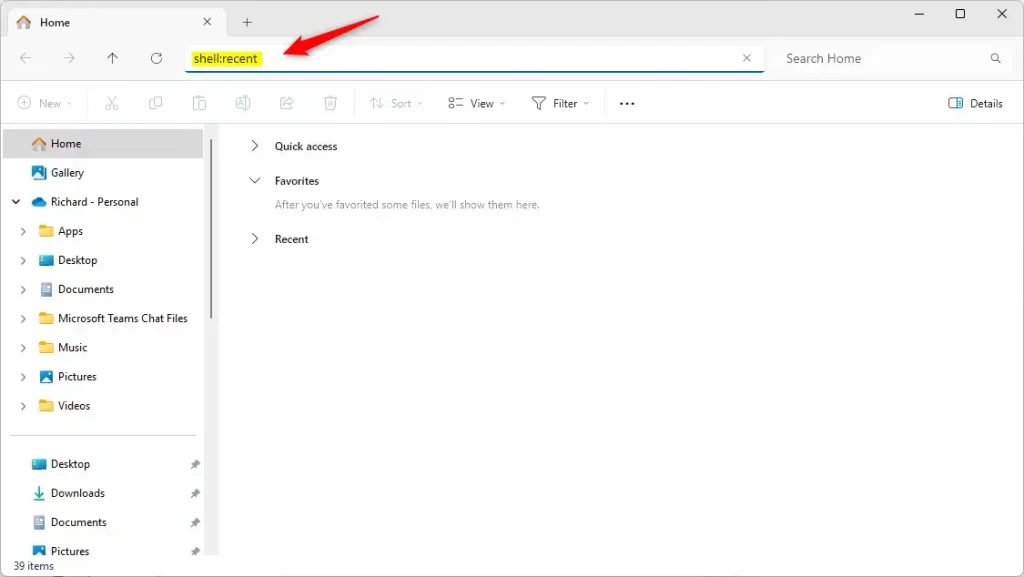
Go to Recent Items: Click on the address bar at the top of File Explorer, delete what's there, then type this exactly and press Enter:
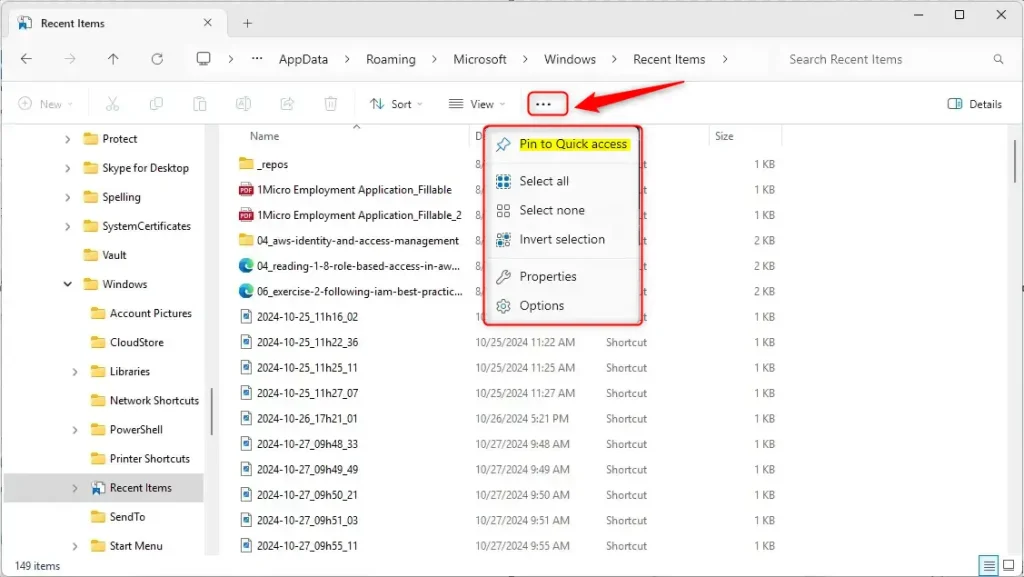
shell:recentYou will see your Recent Items folder open. Now, click the 3 dots (See more) button near the top right of the window.
From the menu, click Pin to Quick access.
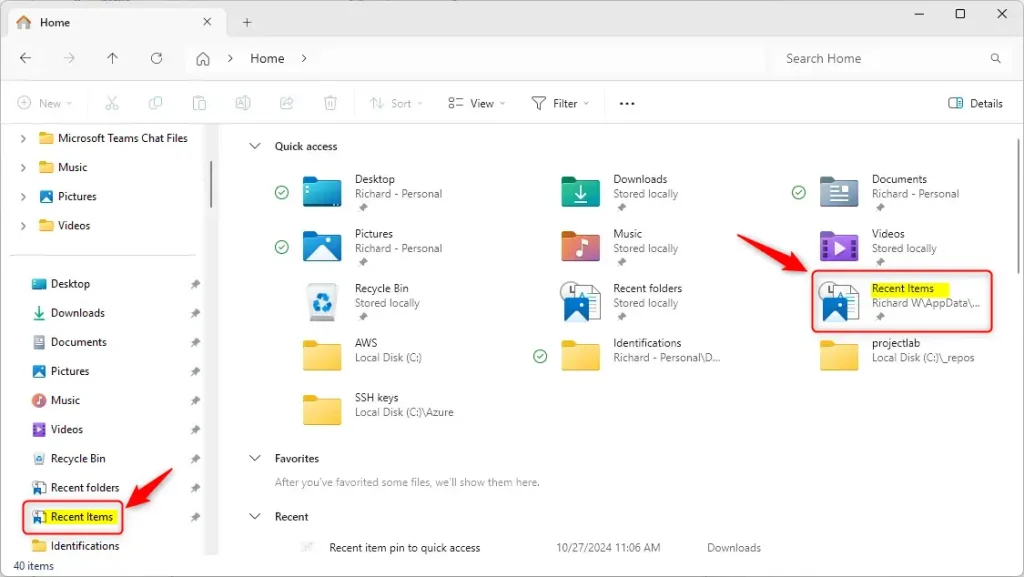
After the last step, the item should show up in Quick Access. If it doesn't appear straight away, close the File Explorer window and open it again. No restart of Windows is needed.
Windows 11's Quick Access shows a list of Recent Items on the left side of File Explorer after a specific action. This helps you locate recently opened files quickly. The list updates as you work, so the newest file sits at the top.
Keep in mind that a recent item is not the same as a pinned one. Recent items drop off as you open newer files. Pin anything you want to keep.
How to Remove Recent Items from Quick Access
They only take the entries off the list. Your actual files and folders are not deleted or moved.
- Right-click on Recent Items in the Quick Access list.
- Select Unpin from Quick access.
To undo the change, repeat the same steps and turn the setting back on. For a single pinned item, right-click it in Quick Access and choose Unpin from Quick access. Neither action needs a restart.
Summary
Pinning recent items in Windows 11 to Quick Access saves you time by letting you open active project files with a single click from the sidebar. You no longer have to dig through deep folder paths every time you need a document. Customizing this list takes only a few seconds and helps keep your workspace organized.
- Save Time: Open your recent files with one click.
- Easy to Do: Just a few simple steps to pin or unpin.
- Visual Help: The images above guide you through the process.
- Control: You can remove Recent Items anytime if you want.
Windows 11 Quick Access uses a pinning feature to help locate documents faster. Pinning selects frequently used files and keeps those files visible in the Quick Access area. Documents remain visible, speeding up daily tasks. For example, pinning a monthly budget report ensures the file remains accessible without navigating multiple folders.
A good habit is to review your pinned items every few weeks. Unpin finished projects and pin the ones you are working on now. That keeps the list short enough to be useful.
Was this guide helpful?

About the Author
Richard
Tech Writer, IT Professional
Richard is a writer at Geek Rewind who turns complex IT tasks into clear, step-by-step guides. He draws on years of hands-on experience in system administration and enterprise IT operations, focusing on Windows, Linux and WordPress: the problems people actually run into, and the fixes that work. His server and WordPress guides come from systems he runs himself. Richard builds and maintains the platform behind Geek Rewind, from its Ubuntu servers and Nginx configuration to its custom WordPress plugins. Many new tutorials start with readers' questions, and he's always glad to answer them in the comments.

No comments yet — be the first to share your thoughts!